background image

iv

Important Safety Instructions
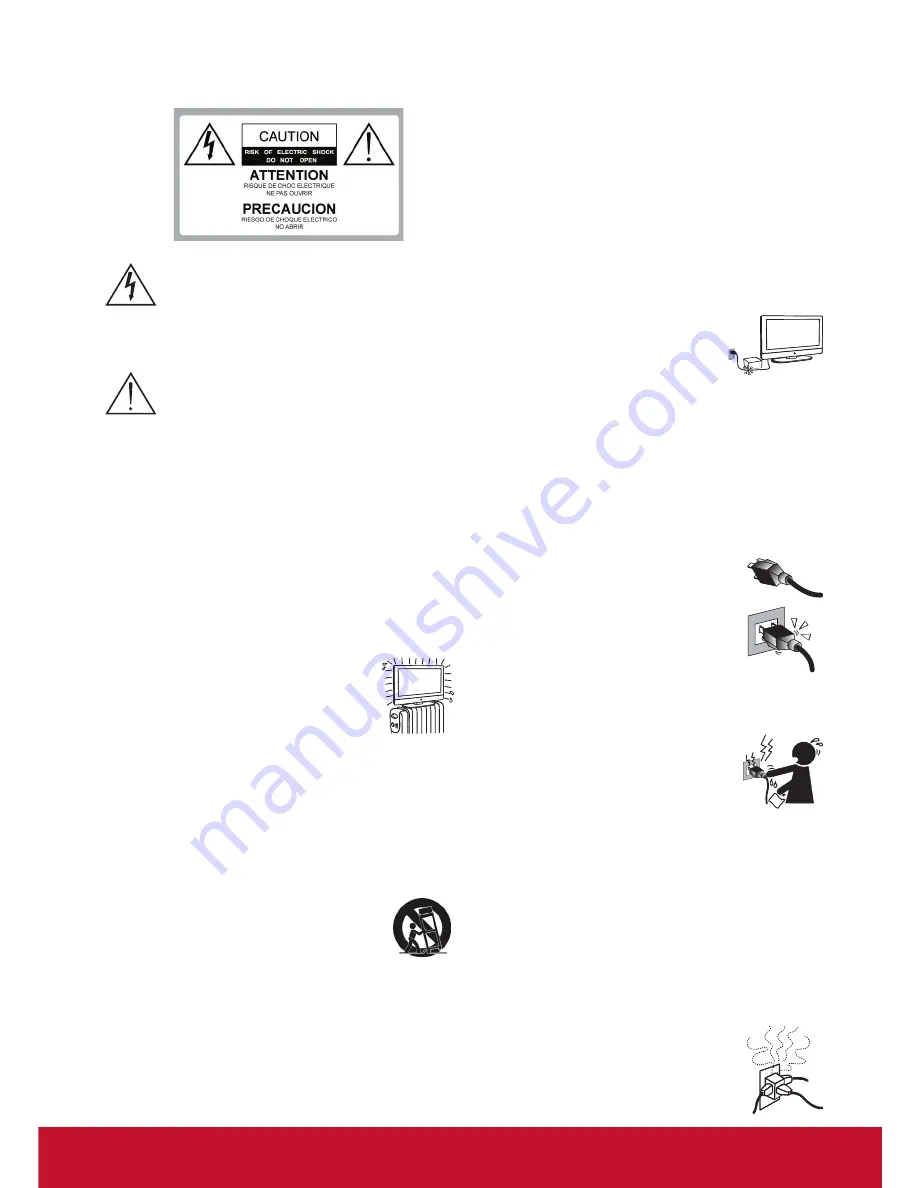
Dangerous Voltage:


The lightning flash with 

arrowhead symbol, within an equilateral 

triangle, is intended to alert the user to the 

presence of dangerous voltage within the 

inside of the product that may be sufficient 

level to constitute a risk of electric shock to 

persons.

Instruction:


The exclamation point within 

an equilateral triangle is intended to alert the 

user to the presence of important operating 

and servicing instructions in the literature 

accompanying the appliance.

1. Read these instructions completely before using the equipment.
2. Keep these instructions in a safe place.
3. Heed all warnings.
4. Follow all instructions.
5. Do not use this apparatus near water.
6. Clean with a soft, dry cloth.
7. Do not block any ventilation openings. Install the equipment in 

accordance with the manufacturer

s instructions.

8. Do not install near any heat sources such as 

radiators, heat registers, stoves, or other devices 

(including amplifiers) that produce heat.

9. Do not attempt to circumvent the safety 

provisions of the polarized or grounding-type 

    plug.

 A

 polarized plug has two blades with one wider than 

the other.

 A

 grounding type plug has two blades and a third 

grounding prong.


The wide blade and the third prong are 

provided for your safety. If the provided plug does not fit into 

your outlet, consult an electrician for replacement of the outlet.

10. Prevent the power cord from being tread upon or pinched, 

particularly at the plug, convenience receptacles, and the point 

where they

 exit 

from

 the 

device.

 Be 

sure that


the power outlet


is 

located near the equipment so that it is easily accessible.

1

1. Only use attachments/ accessories specified by the 

manufacturer.

12. Use only with the cart, stand, tripod, bracket, or 

table specified by the manufacturer, or sold with 

the apparatus.


When a cart is used, use caution 

when moving the cart/ apparatus combination to 

avoid injury from tip-over.

13. Unplug this apparatus when it will be unused for a long period 

of time.

14. Refer all servicing to qualified service personnel. Servicing 

is required when the apparatus has been damaged in any way, 

such as power-supply cord or plug is damaged, liquid has been 

spilled or objects have fallen into the apparatus, the apparatus 

has been exposed to rain or moisture, or the unit does not 

operate normally, or has been dropped.

USE

AC power Cord

Keep the following guidelines to protect the


AC power cord from 

being damaged. If the


AC power cord is damaged, it may result 

in a fire or an electric shock. Stop using it and ask your dealer or 

V

iewSonic service center to exchange it.

Do not place the display where the power cord is subject to 


wear or abuse.
Do not pinch, bend, or twist the cord excessively.


The core lines may be bared and cut, causing a short-circuit, and 


resulting in a fire or an electric shock.
Do not convert or damage the power cord.


A

void power cord being rolled over or rested upon. 


When the power cord is plugged in, do not 


move the display.
Keep the power cord away from heat sources.


When you disconnect the


AC power cord, disconnect it from the 


wall outlet first.

When disconnecting the power cord, grasp the plug instead of 


pulling the power cord.
Use only an original

 V

iewSonic


AC power cord, not other brands. 


Do not use the supplied


AC power cord on any other equipment.

The plug of power cord is intended to serve as disconnection device 

And the socket-outlet shall be installed close to the shredder for easy

Access.


Wall outlet

Insert the plug fully into the outlet. If it is loose, do 

not use it. Doing so may cause arcing and result in a 

fire. Contact your electrician to change the outlet.

Wiring

For your safety, be sure to unplug the


AC power 

cord when connecting cables.

T

ake care not to trip on the cables. It may cause damage to the 

display set.

Electric shock

Do not touch the


AC power cord or the  

display with a wet hand. If you plug/unplug the 

AC power cord from the display with a wet 

hand, it may cause electric shock.

Lightning storms

During a lightning storm, unplug the display from the wall 

outlet and disconnect the antenna to prevent damage to the  

display.

When not in use

If you will not be using the display set for long periods of 

time, the display set should be disconnected from the


AC 

power outlet to prevent power line surges.


The display set is 

not disconnected from the


AC power source when the display 

set is switched off.

T

o disconnect the display set completely, unplug from the


AC 

power outlet.

Overloading

This display set is designed to operate on a 

120V 

AC supply only. 


If there are too many appliances connected to the 

same


AC power outlet, it could result in a fire or 

an electric shock.

Summary of Contents for CDE4200-L

Page 1: ...registering your product for future service Warranty information contained in this User Guide will describe your limited coverage from ViewSonic Corporation which is also found on our web site at http...

Page 2: ...lay to the wall 3 Wall Mount Kit Speci cations VESA 4 Front View of the Product 5 Rear View of the Product 6 Connecting the display 7 HD Cable Box HD Satellite Box 7 Personal Computer 9 Using the disp...

Page 3: ...Increase the separation between the equipment and receiver Connect the equipment into an outlet on a circuit different from that to which the receiver is connected Consult the dealer or an experience...

Page 4: ...the Annex III of the RoHS2 Directives as noted below Examples of exempted components are 1 Mercury in cold cathode fluorescent lamps and external electrode fluorescent lamps CCFL and EEFL for special...

Page 5: ...any means for any purpose without prior written permission from ViewSonic Corporation Product Registration To meet your future needs and to receive any additional product information as it becomes ava...

Page 6: ...atus the apparatus has been exposed to rain or moisture or the unit does not operate normally or has been dropped USE AC power Cord Keep the following guidelines to protect the AC power cord from bein...

Page 7: ...MOST INVARIABLY FATAL Be sure the antenna system is grounded so that it can provide some protection against voltage surges and built up static charges Section 810 of the National Electrical Code NEC i...

Page 8: ...hock Do not place any objects on the display MOISTURE Moisture and ammable objects Keep the product away from moisture Do not expose this appliance to rain or moisture Do not place objects lled with l...

Page 9: ...the screen surface to direct sunlight It is likely to damage the panel Do not push or scratch the screen or place objects on top of the display The image may be uneven or the panel may be damaged If t...

Page 10: ...5pcs Screw type2 x 5pcs Bottom stand Stand neck Screw driver x 1piece Getting Started Power Cord Only for US model Power Cord Only for EU UK model The photos of the accessories are for reference only...

Page 11: ...the neck piece onto the display and screw in the 5 screws to secure the neck then insert the neck onto the bottom stand and secure the parts by inserting the screws and tightening them with the screw...

Page 12: ...ect the power and any other cables that might hinder moving the display Set the display on a table or work surface placing the screen face down on a towel or woolen blanket to protect the screen surfa...

Page 13: ...des the standard dimensions for wall mount kits as shown in the table above To nd the perfect mount please browse www viewsonic com or call our service team United States 1 800 688 6688 Canada 1 866 4...

Page 14: ...me Move to the right or adjust the setting on the OSD menu 2 Move downward to scroll through menu options Move upward to scroll through menu options 4 Input INPUT Select the input source Enter the sub...

Page 15: ...SPDIF Optical output Connect to the SPDIF input of A V device 4 USB Connect to USB devices such as USB ash drive 1 HDMI input Connect to the HDMI output of A V devices 6 Remote Control Out Connect to...

Page 16: ...ble box HD satellite box CATV Satellite antenna cable Rear side of the display DVI Connection For DVI connection connect the HDMI jack with DVI to HDMI cable or DVI to HDMI adapter and connect the aud...

Page 17: ...P50 V V 14 720P50 V V 15 720P60 V V 16 1080I50 V NA 17 1080I60 V NA 18 1080P50 V NA 19 1080P60 V NA 20 1080P24 V NA COMPONENT VIDEO OUT Pr Y VIDEO DVI HDTV OUT HDMI OUT OUT IN AUDIO L R Pb LINE OUT Au...

Page 18: ...lly works with DIRECTV Personal Computer Use the display as the monitor of your computer Connect the PC IN jack to the PC using a 15 pin cable and audio cable COMPONENT VIDEO OUT Pr Y VIDEO DVI HDTV O...

Page 19: ...V 3 VESA DMT 800 x 600 37 88 60 32 40 P P V 4 VESA DMT 1024 x 768 48 36 60 65 N N V 5 VESA DMT 1280 x 768 47 77 59 8 79 5 N P V 6 VESA DMT 1280 x 800 49 7 59 81 83 5 N P V 7 VESA DMT 1280 x 1024 63 9...

Page 20: ...ispose of the battery in accordance with local laws and regulations Keep the batteries away from children or pets When the remote control will not to be used for an extended period remove the batterie...

Page 21: ...creen 7 8 ENTER buttons Press these buttons to navigate the OSD menus move upward downward to select menu options move to the right left to select the main menu or adjust the settings You can also use...

Page 22: ...Press VOL to adjust volume To turn off the volume press MUTE To restore volume press MUTE again or press VOL directly Viewing the Displayed Information To display the current information of the displa...

Page 23: ...V CHIP then press to enter V CHIP submenu 5 Press or to select US V Chip then press to enter the US rating system submenu Movie Rating 1 Press or to select Movie Rating then press to enter its submen...

Page 24: ...V ratings level TV ratings content TV Y all children TV Y7 older children TV G general audience TV PG guidance suggested TV 14 strongly cautioned TV MA mature audience D suggestive dialog L adult lang...

Page 25: ...English rating levels are de ned as following C children C8 children eight years and older G general programming suitable for all audiences PG parental guidance 14 viewers and older 18 adult programm...

Page 26: ...grams To block the unrated movies programs 1 Press MENU to display the OSD main menu 2 Press or to select PARENTAL menu then press ENTER to enter the menu 3 Enter the password 4 Press or to select V C...

Page 27: ...PARENTAL menu then press ENTER to enter the menu 3 Enter the password 4 Press or to select Source Lock then press ENTER to enter its submenu 5 Press or to select the input source that you want to bloc...

Page 28: ...en press ENTER to con rm the setting 3 Press MENU to display the OSD main menu 4 Press or to select PICTURE menu then press ENTER to enter the menu 5 Press or to select PC Settings then press ENTER to...

Page 29: ...nnector on the rear side of the display 2 Press SOURCE to display the Source Select menu 3 Press or to select USB then press ENTER to con rm the setting The USB menu appears on the screen 4 Press or t...

Page 30: ...iption Slideshow Interval Set the interval time between each slide displays 3 S 5 S 10 S 30 S 1 Min 30 Min Slideshow Effect Select the transition effect between each slide displays Random Off Wipe Rig...

Page 31: ...ss to Execute MENU MENU ENTER ENTER Menu item Description Picture Settings Apply a preset picture mode optimized for different viewing conditions Standard Movie User Power Saving Dynamic If Picture Se...

Page 32: ...ETTINGS SRS SETTINGS TruSurround HD Dialog Clarity Low TruBass Medium Definition Low Return Move MENU MENU Change Setting Sound Menu Menu item Description Sound Settings Apply a preset audio option op...

Page 33: ...Setup Menu Menu item Description Closed Caption Set Closed Caption CC settings Caption Display Enable Disable the caption display Analog Caption Type Set the analog CC display type Menu Language Selec...

Page 34: ...f Display ID 1 All Reset Hospitality Menu 1 Press MENU and 9 9 3 button on the remote controller to display the Hospitality menu 2 Press or to select the menu item then press or to adjust or select th...

Page 35: ...he proper voltage No picture Make sure that the cable connection to other components are properly installed Make sure that setup has been done correctly after connections Make sure the correct input i...

Page 36: ...a time and it is the correct one for the operation you want to perform Unit cannot be operated External in uences such as lightning or static electricity may cause improper operation In this case oper...

Page 37: ...tion Remote Control Out Remote control out NEC 38KHz RC5 38KHz Power Voltage AC 100 240V 50 60Hz Operating conditions Temperature 0 C to 40 C Humidity 20 to 90 no condensation Storage condition Temper...

Page 38: ...ort in the rear side 1 Connector type DSUB 9 Pin Male 2 Pin Assignment 2 2 Communication Setting Baud Rate Select 9600bps xed Data bits 8bits xed Parity None xed Stop Bits 1 xed 2 3 Command Message Re...

Page 39: ...and Reply 0x2Dh Invalid command Reply Command Function command code One byte ASCII code Value 1 3 Three bytes ASCII that de nes the value CR 0x0D Set Function format Send Command Type s Name Length ID...

Page 40: ...TV 001 AV 002 S Video 003 YPbPr 004 HDMI 014 HDMI2 024 HDMI3 005 DVI 006 PC VGA 1 No need for USB 2 For the case of two more same sources the 2nd digital is used to indicate the extension Contrast 8 s...

Page 41: ...U has no effect on HDTV and all RCU command codes are transmitted to FC via the RS232 port Restore default 8 s 7E 000 Resets HDTV to factory setting NOTE 1 Behavior at lock modes Lock Mode Behavior Bu...

Page 42: ...which is similar to the Set Function packet structure Note that the Value byte is always 00 Get Function description Length Total Byte of Message excluding CR ID Identi cation for each of display Comm...

Page 43: ...8 0x30 0x35 0x72 0x62 0x30 0x36 0x37 0x0D Example2 Get Brightness from TV 05 but the Brightness command ID is error and it is NOT in the command table Send Hex Format Name Length ID Command Type Comma...

Page 44: ...C sets the display to Remote Control Pass through mode the display shall send a 7 bytes packet followed by CR in response to RCU button activation Note that in this mode the RCU shall have no effect o...

Page 45: ...E 2F NOTE 1 This IR pass through code is different with RCU key code 2 Special control sequence for POWER key under IR pass through mode 2 1 When display is OFF and receives the POWER code The display...

Page 46: ...m Canada www viewsonic com T Toll Free 1 866 463 4775 T Toll 1 424 233 2533 F 1 909 468 3757 service ca viewsonic com Latin America Argentina www viewsonic com la T 0800 4441185 soporte viewsonic com...

Page 47: ...t receiving service under warranty contact ViewSonic Customer Support please refer to Customer Support page You will need to provide your product s serial number 2 To obtain warranted service you will...

Page 48: ...in the space provided below on your purchase for your future use Please retain your receipt of proof of purchase to support your warranty claim For Your Records Product Name __________________________...

Page 49: ...777 3124014 E Mail aquevedo compusupportcva com Distrito Federal QPLUS S A de C V Av Coyoac n 931 Col Del Valle 03100 M xico D F Tel 01 52 55 50 00 27 35 E Mail gacosta qplus com mx Guadalajara Jal SE...

Page 50: ......

Reviews: