background image

15

all flashing digit, press BAND button to play the track 
of the selected serial number.
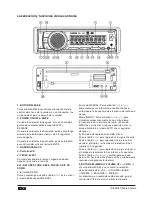
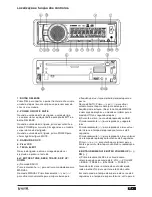
19. APS BUTTON
Press this button briefly then the LCD will display the 
preset stations for 5 seconds.
Press and hold this button then the radio searches 
fromthe current frequency and checks the signal 
strength level until 6 stations are found.
And then the 6 stations frequency are preset to the 
corresponding preset memory numbered bank. The 
auto-storage operation is implemented in the each 
selected band. When the auto-storage operation is 
finished, the radio execute the Preset Scan.
20. MMC/SD CARD SLOT
When you need to play the file in the MMC/SD card, 
insert the MMC/SD card into the MMC/SD card slot. 
The systemwill change into the MMC/SD mode 
automatically, and then play the first file in the MMC/
SD.
Note:
When MMC/SD card and USB stick are both inserted 
into their slot or socket, the systemwill change into 
the playback mode of the latter one.
21. RESET BUTTON
Before operating the unit for the first time, or 
after replacing the car battery or changing the 
connections. You must reset the unit.
Press this button with a cuspidal object. This 
operation will erase the clock setting and some 
stored contents.
22. FLASHING LED
When the front control panel is removed this indicator 
flashes.

Blue Tooth Handfree System

1. Pairing
Turn on the Bluetooth mode of the mobile phone, 
then select the item of Finding the Bluetooth Device 
and enter it. After finishing the finding, it will show the 
name of the Bluetooth Device if finding a Bluetooth 
Device. Select it and enter it, then it will show a 
interface that ask you to input a password. Input the 
password 0000 and enter it.
Then it will tell you that pair OK and then connection 
OK, and the LCD of the car audio system will show 
BT READY and then show the name of the Bluetooth 
Device of the mobile phone.
2. Connection or disconnection
A) Use the mobile phone to do connection or 
disconnection
1) In the connection status, find the paired and 

connected Bluetooth Device, then press the 
disconnection button to do disconnection.
2) In the disconnection status, find the paired and 
disconnected Bluetooth Device, then press the 
connection button to do connection.
B) When turn on the power again(after Acc off ), 
the front panel can search the phone have pair 
automatically and be connection. And it will take you 
about 20 seconds.
Note:
1) The Bluetooth LED indicator on the front panel 
indicates the three connection status:
-LED Turn off: No connection at all
-LED Blinking: Connection status
-LED Turn on: Talking status
2) Bluetooth icon appears on LCD only when in 
connection status.
3) In the connection status: Mobile phone transfers to 
the car audio whenever a dialling takes place; Mobile 
phone transfers to the car audio whenever receiving 
a call. 
3. Dialling when in connection status
A) Dial with the mobile phone directly.
B) Redial
1) Press TEL button twice, it will show the last dialled 
phone number on LCD.
Press TEL button once again, it will dial the number 
directly.
Note: the phone number are numbers you have 
dialed and the call you have received.
4. Accept/ Reject/ Hold/ End Call
A) During ringing, press TEL button to accept the 
call.
B) During ringing, press HANG UP button to reject 
the call.
C) During talking, short press HANGUP button to end 
the call.
D) During talking, press and hold the TEL button 
about 3-4 seconds it can do mobile phone transfers 
to the car audio or the car audio transfers to mobile 
phone.
Note: During ringing, CALL OUT appears and then 
the phone number.
During talking, talking time appears.
5. Talking volume level setting
At talking status, use the VOL knob to adjust the 
sound output, but this volume level can be reserved.
Note: the default volume level is 25.

Summary of Contents for VC-HA4000BT

Page 1: ...ead the user manual first before using the product keep well for future referring Por favor leia o manual de utilizador antes de utilizar o produto e mantenha o para futura referência VC HA4000BT Manual de usuario CD USB SD Radio Android User Manual CD USB SD Android Radio Manual de utilizador CD USB SD Rádio Android ...

Page 2: ...empo de vida depende de la frecuencia de uso 11 Fallos menores o variaciones en la calidad del producto que no afecten a su valor o el propósito para el cual fue creado 12 Negligencia 13 Accesorios Estuches y piezas de los enchufes Cables de conexión Diademas Kits de los extremos de los auriculares almohadillas para las orejas Acabados decorativos 14 Cualquier incidencia detectada al recibir la me...

Page 3: ...Indice Localización y funciones de los controles 4 Sistema de manos libres Bluetooth 7 Instalación 8 Cuidado y uso de CDs 9 Conexión de los cables 10 Especificaciones 10 ...

Page 4: ...AL Pulse el botón o brevemente para sintonizar manualmente hacia arriba abajo la frecuencia de la emisora de radio que desee Modo INAUTO Pulse el botón o para sintonizar automáticamente hacia arriba abajo la frecuencia de la emisora de radio En modo MANUAL y sin realizar ninguna operación más la unidad cambiará al modo AUTO unos segundos después b En modo de reproducción USB disco Pulse el botón p...

Page 5: ...o Segmento encendido Modo de cambio AF activado información RDS incluida Segmento parpadeante Modo de cambio AF encendido pero la información RDS no se recibe aún Cuando se seleccione el modo de cambio AF la radio comprobará la intensidad de señal de AF todo el tiempo El intervalo de comprobación de cada una de las AF dependerá de la intensidad de la señal de la emisora actual desde unos pocos min...

Page 6: ...lla LCD Durante el modo MP3 WMAdisc MMC SD o USB pulse y mantenga pulsado el botón RPT para reproducir la carpeta actual repetidamente y D RPT aparecerá en la pantalla LCD En el proceso de RPT pulse el botón RPT de nuevo para detener el modo de reproducción repetido y en la pantalla LCD aparecerá RPT OFF 4 Pulse el botón RDM para reproducir todas las pistas del disco en orden aleatorio y el LCD mo...

Page 7: ...para Búsqueda de Dispositivos Bluetooth y entre Una vez finalizada la búsqueda mostrará el nombre del dispositivo Bluetooth encontrado en caso de que los haya Selecciónelo y entre después mostrará una interfaz que le pedirá que introduzca una contraseña Introduzca la contraseña 0000 y entre A continuación aparecerá sincronizar OK y conexión OK y la pantalla LCD del sistema de audio para el coche m...

Page 8: ...vance rápido retroceso para los botones El resto de botones disponible en el modo disco no están disponibles En modo A2DP si el dispositivo Bluetooth del teléfono móvil soporta AVRCP al pulsar el botón MODE se puede cambiar entre la radio disco USB TARJETA y A2DP Pero después de entrar en el modo A2DP de nuevo para reanudar la reproducción y transferir al reproductor de audio del coche por el telé...

Page 9: ...ro 2 Cuando hay un disco insertado Insertar otro al mismo tiempo puede dañar la unidad No pegue etiquetas o cinta adhesiva en el disco Sujete el disco por los bordes para mantenerlo limpio y no toque la superficie Si introduce un disco con la etiqueta hacia abajo puede dañar la unidad 3 No exponga el disco a la luz solar directa ni lo coloque cerca de fuentes de calor como conductos de calor calef...

Page 10: ...onsumo Máx 10A Potencia de salida 4 x 25 W Número de canales 2 canales ESTÉREO Dimensiones 178 W X 165 D X 50 H mm SECCIÓN FM Banda de frecuencias 87 5MHz 108MHz Sensibilidad efectiva 3uV Frecuencia I F 10 7MHz SECCIÓN AM Banda de frecuencias 522KHz 1620KHz Sensibilidad efectiva 40dB Frecuencia I F 450KHz SALIDA RCA Salida 1000mV CD MAX REPRODUCTOR DE CD Sistema Sistema de audio MP3 Compatible CDs...

Page 11: ...Contents Locationand function of controls 12 Blue Tooth Handfree System 15 Installation 16 Care for using CD S 17 Wires connection 18 Specification 18 ...

Page 12: ...Press and hold the button to activate MANUAL searching mode IN MANUAL mode Press the or button briefly to manual tune up down for the desired radio station frequency step by step INAUTO mode Press the or button to automatically tune up down for the radio station frequency If in MANUAL mode and without further operation the unit will change to AUTO mode a few seconds later b During disc USB playbac...

Page 13: ...s not received yet When AF switching mode is selected the radio checks the signal strength of AF all the time The interval of checking time of each AFs depends on the signal strength of current station from a few minute for strong station to a few seconds for weak station Every time that new AF is stronger than current station it switches over to that frequency for very short time and NEWFREQUENCY...

Page 14: ...rrent folder repeatedly and the D RPT will be visible on the LCD display In the process of RPT press RPT button again to stop playing repeatedly mode and the LCD will display RPT OFF 4 Press the RDMbutton to play all tracks on disc in randomorder and the RANDOMwill be visible on the LCD display In the process of RDM press RDM button again to stop playing in random order and the LCD will display RD...

Page 15: ...stem will show BT READY and then show the name of the Bluetooth Device of the mobile phone 2 Connection or disconnection A Use the mobile phone to do connection or disconnection 1 In the connection status find the paired and connected Bluetooth Device then press the disconnection button to do disconnection 2 In the disconnection status find the paired and disconnected Bluetooth Device then press t...

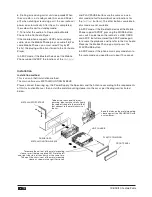
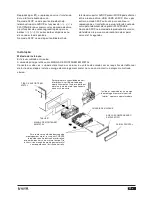
Page 16: ...d A2DP But after entered the A2DP mode again to resume the playback and transfer to the Car Audio Player by the Mobile Phone you must press the PLAY PAUSE button In A2DP mode if the phone music play mode turn to the radio mode you need to wait about 10 seconds Installation Installation method This is an anti theft installation method The main unit wears a METAL MOUNTING SLEEVE Please connect the w...

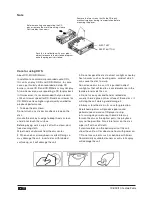
Page 17: ...Before playing a disc wipe it off with a clean dust free cleaning cloth Wipe the disc outwards fromthe disc center 2 When one has already been inserted Doing so may damage the unit Insert a disc with labeled surface up or it will damage the unit 3 Do not expose the disc to direct sunlight or nearby heat sources such as heating vents caliduct which can cause the disc to warp Do not leave disc in a ...

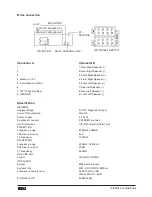
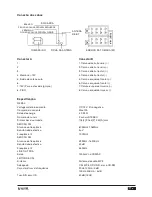
Page 18: ...ly Voltage DC 12V Negative Ground Current Consumption Max 10A Power Output 4 x 25 W Number of channels 2 STEREO channels Unit Dimensions 178 W X 165 D X 50 H mm FM SECTION Frequency range 87 5MHz 108MHz Effective sensitivity 3uV I F Frequency 10 7MHz AM SECTION Frequency range 522KHz 1620KHz Effective sensitivity 40dB I F Frequency 450KHz RCA LINE OUT Output 1000mV CD MAX CD PLAYER System MP3 Audi...

Page 19: ...ltantes de uso e desgaste 10 Baterias recarregáveis e ou descartáveis o tempo de vida depende da frequência de uso 11 Falhas menores ou diferenças na qualidade do produto que não afetem o seu valor ou o propósito da sua utilização 12 Negligencia 13 Acessórios Kits e peças das tomadas Cabos de ligação Auscultadores Kits dos extremos dos auscultadores e almofadas de auscultadores Acabamentos decorat...

Page 20: ...Índice Localização e função dos controlos 21 Sistema mãos livres Bluetooth 24 Instalação 25 Cuidado na utilização de CDs 26 Conexão dos cabos 27 Especificação 27 ...

Page 21: ...ra baixo para a frequência da estação de rádio desejada passo a passo No modo AUTO Prima ou para afinar automaticamente para cima para baixo para a frequência da estação Se está no modo MANUAL e sem mais operações a unidade vai alterar para o modo AUTO uns segundos depois b Durante o disco no modo de reprodução USB Prima brevemente para reproduzir a seguinte faixa Prima brevemente para reproduzir ...

Page 22: ...informação RDS ainda não foi recebida Quando o modo AF está seleccionado o rádio verifica sempre a força do sinal de AF O intervalo do tempo de verificação de cada AF depende da força do sinal de cada estação de alguns minutos para uma estação forte para alguns segundos para uma estação fraca Sempre que uma nova AF é mais forte do que a estação actual ela altera para aquela frequência por um peque...

Page 23: ...petidamente a faixa actual e RPT ONE vai estar visível no visor LCD Durante o modo disco MP3 WMA MMC SD ou USB prima e mantenha RPT para reproduzir a pasta actual repetidamente e D RPT vai estar visível no visor LCD No processo de RPT prima RPT outra vez para parar a reprodução do modo repetidamente e o LCD vai exibir RPT OFF 4 Prima RDM para reproduzir todas as faixas no disco aleatoriamente e RA...

Page 24: ...desconectado encontre o Dispositivo Bluetooth emparelhado e desconectado depois prima o botão de conexão para conectar B Quando ligar outra vez após Acc estar desligado o painel frontal pode pesquisar se o telefone está automaticamente emparelhado e conectado Vai demorar cerca de 20 segundos Nota 1 O indicador Bluetooth LED do painel frontal indica três estados de conexão LED desligado Sem conexão...

Page 25: ...montagem em metal contra o tablier com uma aparafusadora Para melhorar a capacidade de anti interferência certifique se de que aperta fixamente a tira de suporte em metal na junta de metal que conecta ao chassis do carro TIRA DE SUPORTE EM METAL TABLIER MANGA DE MONTAGEM EM METAL Para remover a unidade da manga de montagem em metal insira duas CHAVES fornecidas dentro das ranhuras direita e esquer...

Page 26: ... sujidades Limpe o disco para fora do centro do disco 2 Quando um já tenha sido inserido Fazê lo pode danificar a unidade Não cole nenhum autocolante ou fita cola no disco Pegue no disco pela borda para manter o disco limpo e não toque a superfície Insira o disco com a superfície etiquetada para cima ou vai danificar a unidade 3 Não exponha o disco à luz directa do sol ou perto de fontes de calor ...

Page 27: ...rgia 4 X 25 W Número de canais 2 canais STEREO Dimensões da unidade 178 L X 165 P X 50 A mm SECÇÃO FM Alcance da frequência 87 5MHz 108MHz Sensibilidade efectiva 3uV Frequência I F 10 7MHz SECÇÃO AM Alcance da frequência 522KHz 1620KHz Sensibilidade efectiva 40dB Frequência I F 450KHz LINE OUT RCA Saída 1000mV no CD MÁX LEITOR DE CDs Sistema Sistema de áudio MP3 Adequado CDs MP3 CD CD R disco CD R...

Page 28: ...www vieta es ...

Reviews: