3.0
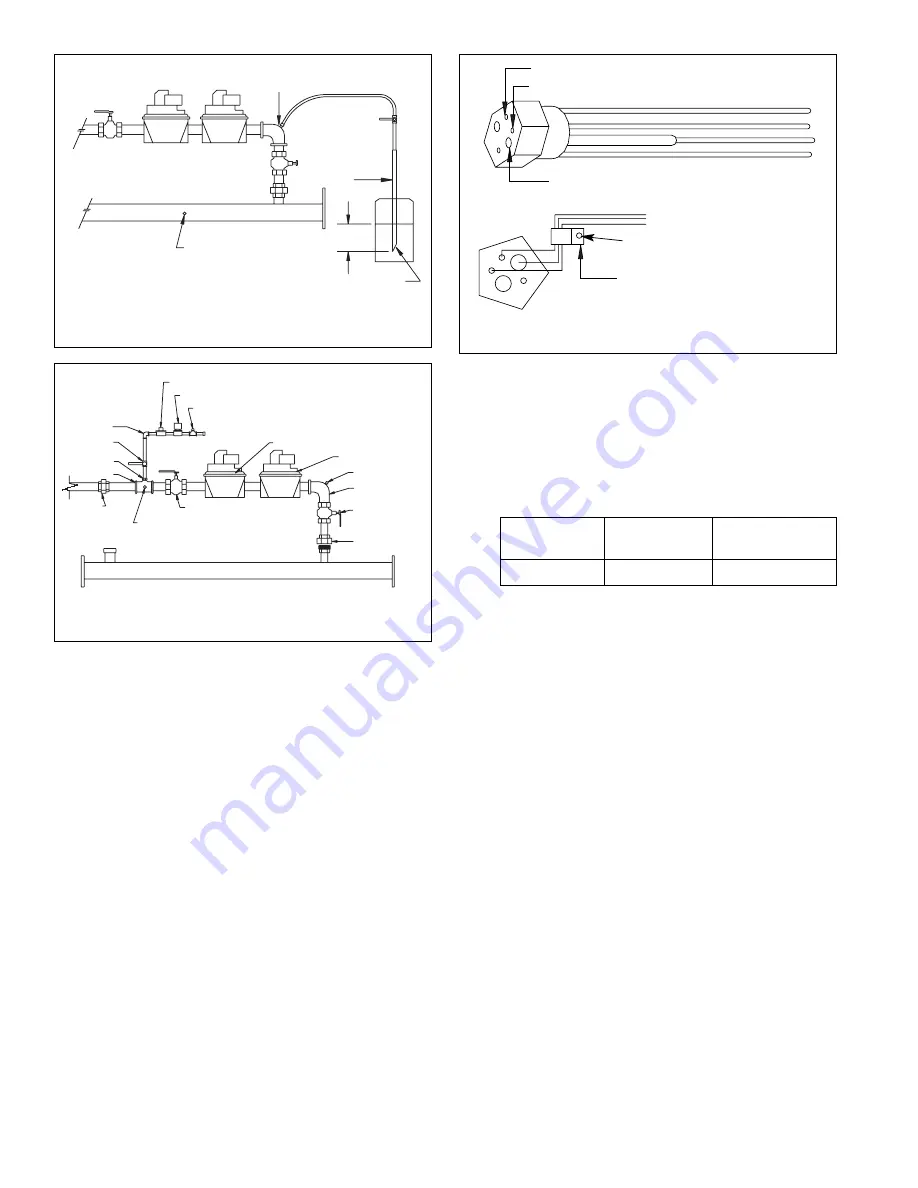
Gas valve leakage test
Maximum inlet pressure for all gases 14˝ w.c.
This is a test for checking the tightness of closure of the
gas safety shut-off valves. It should be performed by
qualified personnel during the initial start-up of a burner
system, or whenever the valve is replaced. It is
recommended that this test also be included in
scheduled inspection and maintenance procedures. For
a periodic inspection test, follow steps 1, 3, 4, 5, 8, 9,
10, 12, 13, 16 and 17.
1. De-energize the control system to ensure that there
is no power to the safety shut-off valves (B) and
(C), shown in Fig. 8.
2. Close the upstream manual gas valve (A).
3. Make sure the manual test valve (F) is closed in the
leak test tap assembly (D).
4. Remove the leak test tap plug and connect the test
apparatus to the leak tap (D).
5. Close the downstream manual gas valve (E).
6. Open the upstream manual gas valve (A).
7. Run the safety shut-off valves (B) and (C) to their
fully open positions (through the safety system);
then immediately de-energize the system to close
the valves.
8. Immerse a
1
⁄
4
˝ tube vertically
1
⁄
2
˝ (12.7mm) into a jar
of water.
9. Slowly open the test valve (F).
10. When the rate of bubbles coming through the water
stabilizes, count the number of bubbles appearing
during a 10 second period. Each bubble appearing
during a 10 second period represents a flow rate of
approximately 0.001 ft
3
/h (27 cm
3
/h).
To meet all U.S. requirements, leakage must not
exceed the values given below.
Following the test:
11. Close the upstream manual gas valve (A).
12. Close the test valve (F), remove the test apparatus,
and replace the leak test tap plug (D).
13. Open the upstream manual gas valve (A) and
energize the safety shut-off valves (B) and (C).
14. Test with soap bubbles to ensure that there is no
leak at the test tap (D).
15. De-energize the safety shut-off valves (B) and (C).
16. Open the downstream manual gas valve (E).
17. Restore the system to normal operation.
4.0
Water connections (see Figs. 11, 15, 23, 24, 25)
The 2˝ NPT supply and return water connections must
be on the same side of the boiler (right side is
standard). Use isolation valves for service purposes.
The length of 2˝ pipe should be limited to the distance
from the boiler to the main headers which will usually be
larger than 2˝ diameter pipe. This distance should be
kept as short as possible. Larger diameter pipe can be
used to connect the boiler to the main supply and return
headers. Use standard friction loss methods for
calculating pipe sizes.
4.1
Low water cut-off
An approved low water cut-off device must be supplied
and installed by the mechanical contractor (see Fig. 11).
Do not install shut-off valve between low water cut-off
and boiler.
8
Fig. 9
Gas control assembly
Pilot gas pressure (5˝) regulator RV-10
Pilot gas valve ITT
Pilot gas pressure test port
1
⁄
8
˝ NPT
Manual gas
shut-off valve
Inlet
pressure
test port
1
⁄
8
˝ NPT
Pilot manual
shut-off valve
Reducing
bushing
Reducing
elbow
Tee
Union
Gas burner manifold
Main gas valve
and regulator
Automatic gas
valve
Pressure test port
1
⁄
8
˝ NPT
90° street elbow
Manual test
firing valve
Union
Fig. 10
5-point boiler well
Adjustable high limit sensor bulb
Manual reset high limit sensor bulb
Thermometer
Install cable clamp to secure high
limit capillaries in well
Attach to mid panel with sheet
metal screw
Gas valve
Allowable
No. of bubbles
size (in.)
leakage
per 10 sec.
1, 1
1
⁄
4
353 cm
3
/h
13
Fig. 8
Gas valve leak test
Gas
supply
Manual
gas shut-
off valve
Cut at 45°
angle
Jar or glass
with water
1
⁄
2
˝
Test
valve
Leak test
tap
1
⁄
4
˝ flexible
tubing
1
⁄
4
˝ aluminum
or copper
tubing
Redundant
automatic
gas valve
Combination
regulator and
automatic gas
valve
A
B
C
E
F
D
Manifold pressure
test port


