background image

26

0005

0006

0010

0008

0004

0003

0002

0003

0006

0003

0001

0004

0007

0008

0002

0011

0009

0010

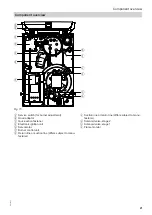
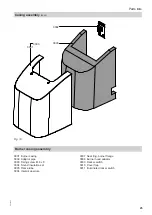
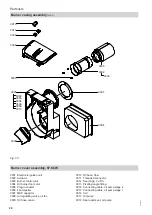
Fig. 20

Burner cover assembly, 67.6 kW

0001 Electronic ignition unit
0002 Actuator
0003 Burner control unit
0004 Oil burner fan motor
0005 Plug-in coupler
0006 Fan impeller
0007 MKP capacitor
0008 Air regulating valve, oil fan
0009 Oil hose, return

0010 Oil hose, flow
0011 Threaded connector
0012 Seal rings, Cu R 

¼

0013 Pivoting angle fitting
0014 Connecting cable, oil pump stage 2
0015 Connecting cable, oil pump stage 1
0016 Coil
0017 Oil pump
0018 Spare parts set, oil pump

Parts lists

Burner casing assembly

 (cont.)

5831447

Summary of Contents for Vitoflame 300 VHG III

Page 1: ...tructions for contractors VIESMANN Vitoflame 300 Type VHG III Pressure jet oil burner for the Vitorondens 200 T 67 6 to 107 3 kW For applicability see the last page VITOFLAME 300 5831447 GB 6 2016 Please keep safe ...

Page 2: ...tem Working on the system Isolate the system from the power supply e g by removing the separate fuse or by means of a mains isolator and check that it is no longer live Safeguard the system against reconnection Danger Hot surfaces can cause burns Before maintenance and service work switch OFF the appliance and let it cool down Never touch hot surfaces on the boiler burner flue system or pipework P...

Page 3: ...ons to the building characteristics are not permissible e g cable pipework routing cladding or partitions Danger Leaking or blocked flue systems or an inade quate supply of combustion air can cause life threatening poisoning from carbon monoxide in the flue gas Ensure the flue system is in good working order Vents for supplying combustion air must be non closable Extractors Operating appliances th...

Page 4: ...view 21 5 Connection and wiring dia gram 23 6 Parts lists Parts lists 24 Ordering parts 24 Overview of assemblies 24 Casing assembly 24 Burner casing assembly 25 Burner cover assembly 67 6 kW 26 Burner cover assembly 85 8 and 107 3 kW 27 Blast tube connection assembly 28 Miscellaneous 30 7 Report 31 8 Specification 32 9 Standard values for burner adjustment 33 10 Appendix Information on fuel oil 3...

Page 5: ...ections 9 Cleaning the burner 10 10 Checking the impeller fixings 11 Checking the flame tube fixings 12 Replacing the nozzle 11 13 Checking and adjusting the ignition electrodes 12 14 Fitting the burner cover on the burner casing 15 Cleaning the oil pump filter and replacing it if required 13 16 Replacing the pre filter element 17 Commissioning the system 18 Checking the oil lines and connections ...

Page 6: ... the filter with fuel oil using a manual oil suction pump before switching the burner on 4 Switch ON the mains isolator outside the installa tion room 5 Switch ON system ON OFF switch B at the con trol unit If fault indicator A on the control unit illuminates press reset button C on the burner Checking the burner Checking the oil pressure and vacuum adjusting the CO2 value The oil pressure is fact...

Page 7: ...etween the oil pump and the bottom of the tank Note If the vacuum pressure is higher than 0 35 bar check the filter for contamination and check the pipe run E Fig 4 07 Should the CO2 value fall outside the range of 13 to 14 by vol adjust the CO2 value by regulating the oil pressure Note Subject to pump type the pressure adjusting screws may be located at the front or on the side of the oil pump Fo...

Page 8: ...oid valve control During a controlled shutdown the burner air damper moves into the closed position This reduces the cool down losses The switching cams are located under the cover of the air damper servomotor A scale ring is located adjacent to each switching cam where the selected angle of the air damper can be checked The switching cams have the following function Z Air damper closed 0 Never al...

Page 9: ...er the flame monitor during operation and leave in this condition Restart followed by a fault shutdown at the end of the safety time Red flashing code flashes 2x Installing and adjusting the flame monitor if available Before fitting check whether slider sleeve B is pushed as far forward as it will go x max Push on restrictor A must sit on flame monitor C x Fig 7 Shutting down the system Checking t...

Page 10: ...urner casing with the blast tube connection pointing upwards or to the side 2 Clean flame tube sensor plate A ignition electro des B and flame monitor C 3 In the case of severely deviating burner pressure Remove burner cover E and clean casing with impeller for this first remove hood adaptor F Checking the impeller fixings Checking the flame tube fixings Commissioning inspection maintenance Cleani...

Page 11: ... to prevent the blast tube connection from turning during this step prevent air bubbles from forming in the blast tube connection Note For the make and type of nozzle see standard val ues for burner settings on page 4 Mount mixing facility A Position the nozzle in the centre of the sensor plate and note the distance between the sensor plate and the nozzle see page Accurately position the ignition ...

Page 12: ...ce between mixing system and nozzle Check either dimension a or dimension b and adjust if required Rated heating out put Dim a Dim b 63 67 6 kW 9 4 mm 80 85 8 kW 5 mm 10 0 mm 100 107 3 kW 12 0 mm Fitting the burner cover on the burner casing Commissioning inspection maintenance Checking and adjusting the ignition electrodes 5831447 ...

Page 13: ...r replace Fig 12 Oil pump make Suntec A Filter clean or replace B Flat gasket replace C O rings replace D Cover Replacing the pre filter element Commissioning the system Commissioning inspection maintenance Cleaning the oil pump filter and replacing it if required 5831447 ...

Page 14: ... for safekeeping Retain the heating contractor s section 2 File all parts lists operating and service instruc tions in the folder and hand this over to the system user The installation instructions are no longer required after the installation is complete and therefore do not need to be retained Commissioning inspection maintenance Checking the oil lines and connections for leaks 5831447 ...

Page 15: ...me monitor R Output controller t1 Pre purge time min 20 s t40 Delay time between enabling solenoid valve stage 1 and enabling controller input approx 11 s t3 Pre ignition time approx 20 s t3n Post ignition time begins with flame max until end of TSA max 5 s TSA Start up safety time max 5 s Function and fault indications of the signal indicator LED During standard operation the operating conditions...

Page 16: ...y Undervoltage 195 V Red continuous Fault burner locked out Red flashing Fault code indication for an explanation see chapter Faults with flash code indication Green red alternately External light before burner start Red flickering Interface diagnosis was activated accidentally Pressing the reset but ton once approx 3 s starts the burner in standard mode Burner fault flowchart System cold LED on b...

Page 17: ...17 Reset burner control unit Press reset button for approx 1 s 3 s Burner start Burner control unit Burner control unit cont 5831447 ...

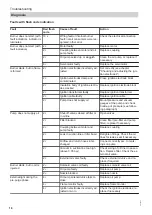
Page 18: ... Mount pressure and vacuum gauges at the pump and check build up of pressure see follow ing paragraph Pump does not supply oil 2 Shut off valves closed at filter or in oil line Open valves 2 Filter blocked Clean filter pre filter and pump filter replace if necessary 2 Coupling between motor and pump faulty Replace coupling 2 Leak in suction line or filter bowl Retighten fittings Check the oil line...

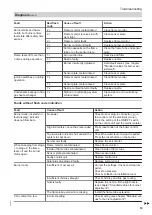
Page 19: ...t display indicator does not illuminate No power Check fuse or plug in connector aBÖ in the control unit the electrical connec tions the setting of the ON OFF switch on the control unit and the mains isolator High limit safety cut out has responded Press reset button at the boiler control unit The low water indicator has caused the system to shut down Check the water level top up if required Press...

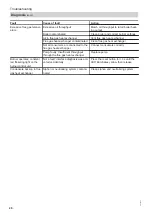
Page 20: ...nsumers are connected to the flue gas heat exchanger Connect consumers correctly Pump faulty Insufficient throughput through the flue gas heat exchanger Replace pump Burner operates constant red flickering light on the burner control unit Not a fault interface diagnosis was acti vated accidentally Press the reset button for 3 s until the LED illuminates yellow then release Condensate backup in flu...

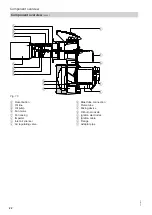
Page 21: ...astener D Electronic ignition unit E Servomotor F Burner control unit G Return line or suction line differs subject to manu facturer H Suction line or return line differs subject to manu facturer K Solenoid valve stage 2 L Solenoid valve stage 1 N Flame monitor Component overview Component overview 5831447 ...

Page 22: ...l pump S Fan motor T Fan casing U Impeller V Inlet air silencer W Air regulating valve X Blast tube connection Y Flame tube a Mixing device b Oil burner nozzle c Ignition electrodes d Ignition cable e Flange f Adaptor pipe Component overview Component overview cont 5831447 ...

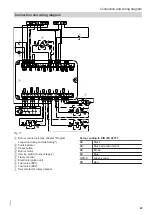
Page 23: ...n E Burner motor F Service switch burner stage 2 G Flame monitor H Electronic ignition unit K Fuel valve BV1 L Fuel valve BV2 M Servomotor for rotary damper Colour coding to DIN IEC 60757 BK Black BK Black wire with imprint BN Brown BU Blue GN YE Green yellow RD Red Connection and wiring diagram Connection and wiring diagram 5831447 ...

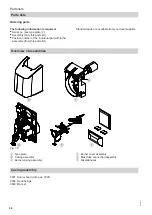
Page 24: ...assembly from this parts list Standard parts are available from your local supplier Overview of assemblies B C A D E F Fig 18 A Type plate B Casing assembly C Burner casing assembly D Burner cover assembly E Blast tube connection assembly F Miscellaneous Casing assembly 0001 Burner hood with pos 0003 0002 Hood fixings 0003 Mat set Parts lists Parts lists 5831447 ...

Page 25: ...g 0002 Adaptor pipe 0003 Fixing screw M 8 x 8 0004 Sound insulation set 0005 Flame tube 0006 Inlet air aperture 0007 Seal ring burner flange 0008 Burner hood adaptor 0009 Rocker switch 0010 Cover flap 0011 Illuminated rocker switch Parts lists Casing assembly cont 5831447 ...

Page 26: ...Oil burner fan motor 0005 Plug in coupler 0006 Fan impeller 0007 MKP capacitor 0008 Air regulating valve oil fan 0009 Oil hose return 0010 Oil hose flow 0011 Threaded connector 0012 Seal rings Cu R 0013 Pivoting angle fitting 0014 Connecting cable oil pump stage 2 0015 Connecting cable oil pump stage 1 0016 Coil 0017 Oil pump 0018 Spare parts set oil pump Parts lists Burner casing assembly cont 58...

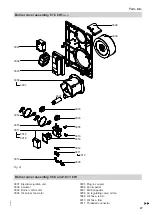
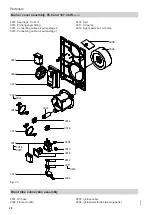
Page 27: ...ver assembly 85 8 and 107 3 kW 0001 Electronic ignition unit 0002 Actuator 0003 Burner control unit 0004 Oil burner fan motor 0005 Plug in coupler 0006 Fan impeller 0007 MKP capacitor 0008 Air regulating valve oil fan 0009 Oil hose return 0010 Oil hose flow 0011 Threaded connector Parts lists Burner cover assembly 67 6 kW cont 5831447 ...

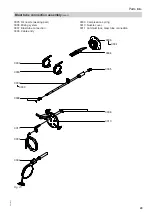
Page 28: ...il pump 0018 Spare parts set oil pump 0018 0007 0016 0011 0012 0007 0014 0016 0015 0012 0009 0010 0018 0017 0013 0005 0016 0001 0002 0003 0004 0006 0008 Fig 22 Blast tube connection assembly 0001 Oil hose 0002 Flame monitor 0003 Ignition cable 0004 Ignition electrodes wearing parts Parts lists Burner cover assembly 85 8 and 107 3 kW cont 5831447 ...

Page 29: ... Blast tube connection 0008 Cable entry 0009 Compression spring 0010 Nozzle cover 0011 Anti twist lock blast tube connection 0009 0004 0002 0001 0011 0010 0003 0003 0008 0007 0009 0005 0004 0006 Fig 23 Parts lists Blast tube connection assembly cont 5831447 ...

Page 30: ...30 0001 Burner installation instructions 0002 Installation instructions 0003 Service instructions 0004 Small parts 0004 0003 0002 0001 Fig 24 Parts lists Miscellaneous 5831447 ...

Page 31: ...enance Stage 2 actual after maintenance Carbon dioxide content CO2 Stage 1 actual by vol set by vol Stage 2 actual by vol set by vol Oxygen content O2 Stage 1 actual by vol set by vol Stage 2 actual by vol set by vol Flue gas temperature gross Stage 1 actual C set C Stage 2 actual C set C Flue gas loss Stage 1 actual set Stage 2 actual set Draught at the back of the boiler actual hPa set hPa Hours...

Page 32: ... registration no Applied for Voltage V 230 Frequency Hz 50 Power consumption W Stage 1 585 Stage 2 616 Motor speed rpm 2800 Version Two stage Oil pump rate l h 70 Connections Suction and return line on the sup plied oil hoses R female thread Max permissible pre charge pres sure in the supply lines with ring pipelines 2 1 Corresponds to the rated heat input of the boiler Specification Specification...

Page 33: ... 30 Inlet air aperture setting 5 5 5 Static burner pressure 4 Stage 1 mbar 12 0 15 5 15 5 Stage 2 mbar 22 5 25 5 22 5 2 Due to nozzle tolerances and varying oil characteristics the oil pressure may vary from the specified values 3 The air damper servomotor is factory set and must only be adjusted in exceptional cases Exceptions are the replacement of the air damper servomotor soot build up and the...

Page 34: ...ction of odour development during filling Please note Fuel oil additives can create residues and impair the safe operation of your heating system The use of fuel oil additives that leave residues is not permissible Combustion improvers Combustion improvers are additives for optimising fuel oil combustion Viessmann oil burners do not require combustion improvers as these burners operate with clean ...

Page 35: ...n and wiring diagram 23 D Diagnosis Faults with flash code indication 18 Faults without flash code indication 19 F Flame monitor Installation and adjustment 9 Flame monitor cleaning and testing 9 Flame monitor safety check 9 Flash code 18 Flowchart burner faults 16 Fuel oil Additives 34 Quality 34 I Ignition air setting 8 Ignition electrodes checking and adjusting 12 N Nozzle replacement 11 O Oil ...

Page 36: ...ed Hortonwood 30 Telford Shropshire TF1 7YP GB Telephone 44 1952 675000 Fax 44 1952 675040 E mail info uk viessmann com Viessmann Werke GmbH Co KG D 35107 Allendorf Telephone 49 6452 70 0 Fax 49 6452 70 2780 www viessmann com 5831447 Subject to technical modifications ...

Reviews: