background image

23

Selected gas type

Gas

type

Date

CO

2

 content in

%

O

2

 content in % CO content in

ppm

Delivered condition

G 20


7.5 - 10.5

  < 1000

Changed to 


  < 1000

Changed to 


  < 1000

Checking the static pressure and supply pressure

Danger

CO formation as a result of incorrect burner
adjustment can have serious health implications.
Check the CO content before and after carrying
out work on gas appliances.

Operation with LPG

Purge the LPG tank twice on commissioning or
replacement. Vent the tank and gas connection line
thoroughly after purging. 

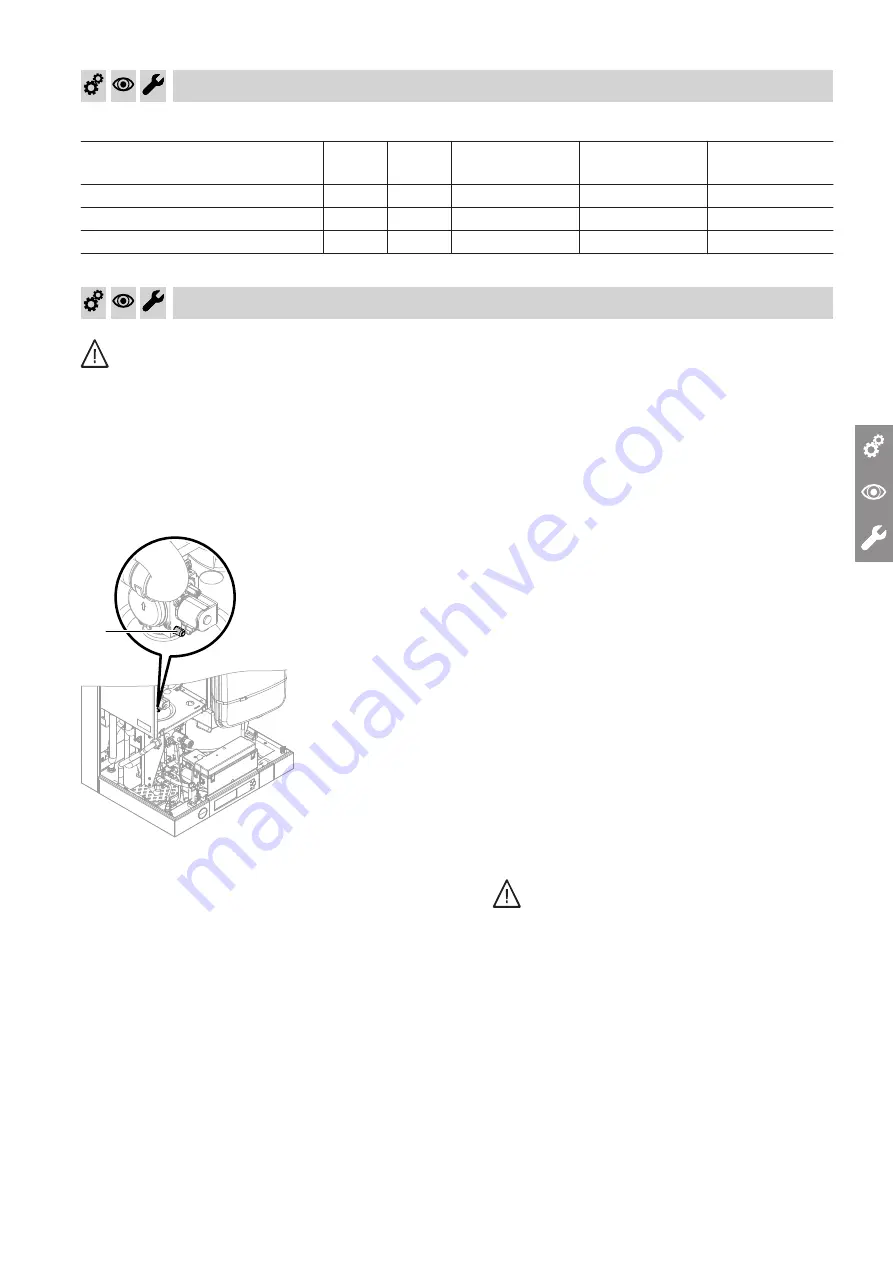
A

Fig. 18

1. 

Close the gas shut-off valve.

2. 

Undo screw 

A

 inside test connector "IN" on the

gas train, but do not remove it. Connect the pres-
sure gauge.

3. 

Open the gas shut-off valve.

4. 

Check the static pressure.
Set value: max. 57.5 mbar (5.75 kPa)

5. 

Start the boiler.

Note

During commissioning, the appliance can enter a
fault state because of airlocks in the gas line. After
approx. 5 s, tap and hold 

"R"

 for approx. 2 s to

reset the burner.
Ensure that enough heat is being drawn during the
testing and setting processes.

6. 

Check the supply (flow) pressure.

Set value:

Natural gas: 20 mbar (2.0 kPa)

LPG: 50 mbar (5.0 kPa)

Note

Use a suitable tester with a resolution of at least
0.1 mbar (10 Pa) to check the supply pressure.

7. 

Implement measures as indicated in the table
below.

8. 

Shut down the boiler and close the gas shut-off
valve. Remove the pressure gauge and seal test
connector 

A

 with screw.

9. 

Open the gas shut-off valve and start the appli-
ance.

Danger

Gas escaping from the test connector leads
to a risk of explosion.
Check gas tightness at test connector 

A

.

Note

The maximum pressure drop between the gas shut-off
valve and test connector 

A

 at the gas train is

0.5 mbar (50 Pa).

Commissioning, inspection, maintenance

Changing the gas type 

 (cont.)

5697789


Summary of Contents for Vitodens 111-W

Page 1: ...tructions for contractors VIESMANN Vitodens 111 W Type B1LD 4 7 to 35 0 kW Gas condensing storage combi boiler Natural gas and LPG version Gas Council Number 47 819 43 47 819 44 VITODENS 111 W 5697789...

Page 2: ...st unintentional reopening Isolate the system from the power supply e g by removing the separate fuse or by means of a mains isolator and check that it is no longer live Safeguard the system against r...

Page 3: ...an be harmful to health Never let condensate touch your skin or eyes and do not swallow it Flue systems and combustion air Ensure that flue systems are clear and cannot be sealed for instance due to a...

Page 4: ...cables leads and closing the control unit enclosure 17 4 Commissioning inspec tion maintenance Steps commissioning inspection and maintenance 18 5 Changing the gas type Changing from operation with LP...

Page 5: ...5 13 Keyword index 58 Index Index cont 5697789...

Page 6: ...on and identified as follows Symbol Meaning Steps required during commissioning Not required during commissioning Steps required during inspection Not required during inspection Steps required during...

Page 7: ...system for DHW heating For the connection of heating circuits and the DHW line see page 11 onwards In the delivered condition the Vitodens 111 W is set up for operation with a constant boiler water t...

Page 8: ...for installation in wet rooms inside safety zone 1 in accordance with IEEE Wiring Regulations providing the occurrence of hosed water can be ruled out Observe the IEEE Wiring Regulations 1 Prepare the...

Page 9: ...accesso ries Combination inlet group Combines elements A M and N Pressure reducing valve This must be installed near the cylinder The cold water supply to any mixer taps showers must be taken from th...

Page 10: ...ollow ing materials Concrete Vertically perforated bricks Hollow concrete breeze blocks Hollow brick and concrete ceilings Perforated sand lime bricks Solid sand lime bricks Natural stone with dense s...

Page 11: ...te from the documenta tion supplied with the boiler In consultation with the system user attach the additional type plate to the outside of the appliance in a position visible to the flue gas inspecto...

Page 12: ...Connection on the DHW side Permiss operating pressure cylinder 10 bar Install supplied safety assembly F in the cold water connection No flow limiter is fitted in the cold water supply Mounting the co...

Page 13: ...ate hose sup plied meets the temperature requirements that are part of the CE certification We recommend connecting the condensate pipe internally to the domestic waste water system either directly or...

Page 14: ...s sory must be installed on every boiler Do not carry out commissioning until the following conditions are met Free passage through the flue gas pipes Flue system with positive pressure is gas tight I...

Page 15: ...on instructions provided with them X7 X20 A B 4 3 2 1 OT C X21 L N 1 L N F E D X1 96 Fig 12 A Only for weather compensated mode Outside temperature sensor accessories B OpenTherm device Remove jumper...

Page 16: ...gulations IEC 60364 4 41 IEEE Wiring Regulations Connection requirements specified by your local power supply utility Route extra low voltage ELV leads 42 V and 42 V 230 V cables separately Strip as l...

Page 17: ...Connecting cables leads will be damaged if they touch hot components When routing and securing cables leads on site ensure that the maximum permissible tempera ture for these is not exceeded 1 2 Fig...

Page 18: ...ng the burner gasket and burner gauze assembly 33 14 Checking and adjusting the electrode 33 15 Cleaning the heat exchanger 34 16 Checking the condensate drain and cleaning the trap 35 17 Installing t...

Page 19: ...pump is briefly switched off During the test also switch off all external circula tion pumps in the system If the flue gas temperature sensor is positioned incorrectly commissioning is cancelled and f...

Page 20: ...system pressure bar Response pressure safety valve bar 6 8 10 Pre charge pressure of DHW side diaphragm expansion vessel bar 2 5 2 3 2 3 3 0 2 8 2 8 3 5 3 3 Specification for DHW side diaphragm expans...

Page 21: ...int 3 Once air stops coming out of the DHW draw off point the loading cylinder is completely filled Venting the boiler by flushing Note Inadequate venting can result in damage due to steam blasts in t...

Page 22: ...inimum system pressure 0 8 bar 80 kPa Open the shut off valves on the heating water side 7 Remove the drain hose again from top valve B and retain outside the boiler Changing the gas type In the deliv...

Page 23: ...Note During commissioning the appliance can enter a fault state because of airlocks in the gas line After approx 5 s tap and hold R for approx 2 s to reset the burner Ensure that enough heat is being...

Page 24: ...flashes 04 Use to select 12 05 OK to confirm 1 flashes in the l h display area 06 Use to select 2 07 OK to confirm The value of the selected maximum heating out put in of the upper heating output flas...

Page 25: ...temperature in C Speed circulation pump in 0 5 10 15 20 5 10 15 20 100 90 80 25 70 60 50 25 B C A Fig 19 A Max speed 26 kW B Max speed 35 kW C Min speed Changing the maximum speed Only when operating...

Page 26: ...axial 26 5 20 25 35 5 13 22 25 Burner adjustment when connecting multiple flues to a shared flue system When connecting several Vitodens 111 W to a shared flue system Adjust the burner settings of eac...

Page 27: ...tion with natural gas Number of boilers 2 3 4 5 6 Correction factor adjustable value Flue length a m 0 1 18 9 2 18 25 9 21 13 12 3 21 25 13 23 12 18 16 4 23 25 18 25 16 21 5 21 25 6 Commissioning insp...

Page 28: ...r adjustable value Flue length a m 0 1 19 9 2 19 25 9 21 13 12 3 21 25 13 18 12 15 14 4 18 25 15 18 14 16 5 18 24 16 20 6 24 25 20 23 Rated heating output 35 kW operation with LPG Number of boilers 2...

Page 29: ...t 26 kW operation with natural gas Number of boilers 2 4 6 Correction factor adjustable value Flue length a m 0 1 16 4 2 16 25 4 10 7 3 10 20 7 11 4 20 25 11 15 5 15 20 6 20 24 Commissioning inspectio...

Page 30: ...stion quality The Vitodens 111 W is factory set for natural gas Dur ing commissioning or maintenance the CO2 and CO have to be measured at the boiler flue adaptor test port to check the flue integrity...

Page 31: ...ut 100 For CO2 content limits see page 23 5 Check the CO2 content for the lower heating output 20 The CO2 content must be between 0 5 and 0 9 below the value of the upper heating output 6 If the CO2 c...

Page 32: ...e cables from fan motor A gas train B and electrodes C 4 Push grommet D down 5 Undo gas supply pipe fitting E 6 Undo 4 screws F and remove the burner Please note To prevent damage never rest the burne...

Page 33: ...ents do not suffer damage and will function correctly 5 Mount thermal insulation ring C Please note Tighten screws enough to ensure the components do not suffer damage and will function correctly 6 Fi...

Page 34: ...tween the coils Never use brushes to clean the heating sur faces Please note Prevent damage due to cleaning water Cover electronic components with suitable watertight material Note Discolouration on t...

Page 35: ...ion 5 Refit supply hose C 6 Fill trap A with water For this pour approx 0 3 l of water into the combustion chamber 7 Check that condensate can drain freely and that the connections are tight Installin...

Page 36: ...he diaphragm expansion vessel can lose some charge pressure over time When the boiler heats up the pressure gauge will indicate a higher pressure of 2 or 3 bar The safety valve may also respond and di...

Page 37: ...on spray can result in faulty operation Leak detection spray must not come into contact with electrical contacts or block the diaphragm opening on the gas valve Fitting the front panel 2x 1 2 Fig 30 1...

Page 38: ...3 flashes in the r h display area 09 Use to adjust the display contrast Adjustable from 0 to 6 The higher the value the greater the contrast 10 OK to confirm Setting the signal tone for display operat...

Page 39: ...ll gas equipment for tightness Please note The use of leak detection spray can result in faulty operation Leak detection spray must not come into contact with electrical contacts or block the diaphrag...

Page 40: ...es Ionisation current builds above 2 A Symbol A No Fault F4 Check electrode adjust ment and gas line for air locks Yes Burner in operation No Shuts down below the set boiler water temperature and rest...

Page 41: ...ature sensor Check the sensor see page 46 59 No DHW heating Lead break outlet temper ature sensor Check the sensor see page 46 A3 Burner blocked Flue gas temperature sen sor incorrectly positioned No...

Page 42: ...trol Press Reset see page 42 FA Burner in a fault state Fan idle state not reached Check the fan fan connecting ca bles and fan control Press Reset see page 42 FC Burner blocked Electrical fan control...

Page 43: ...r DHW circuit Water ingress can result in damage to other components Protect the following components against ingress of water Control unit components especially in the service position Electrical com...

Page 44: ...onnect leads from outside temperature sensor 100 10 20 10 0 10 20 30 Temperature in C 6 8 20 40 60 80 200 Resistance in k Fig 35 Sensor type NTC 10 k 3 Check the sensor resistance and compare it to th...

Page 45: ...6 8 20 Resistance in k Fig 37 2 Check the sensor resistance and compare it to the curve 3 In the case of severe deviation drain the boiler on the heating water side and replace the sensor Danger The...

Page 46: ...le harness 10 1 10 30 50 70 90 110 Temperature in C 0 4 0 6 0 8 2 4 6 8 20 Resistance in k Fig 39 2 Check the sensor resistance and compare it to the curve 3 In the event of severe deviation replace t...

Page 47: ...g Drain the boiler on the DHW side before replacing the sensor Checking the temperature limiter If the burner control unit cannot be reset after a fault shutdown although the boiler water temperature...

Page 48: ...sensor is correctly positioned If the flue gas temperature sensor is incorrectly posi tioned commissioning is aborted and fault message A3 is shown 1 Check whether the flue gas temperature sensor is c...

Page 49: ...and remove towards the front 2 Check the connections on the heating water and DHW sides for contamination and scaling replace the plate heat exchanger if necessary 3 Install in reverse order using new...

Page 50: ...rly fitted fuses can lead to an increased risk of fire Insert fuses without using any force Posi tion fuses correctly Only use structurally identical types with the specified response characteristics...

Page 51: ...ing circuit pump is switched ON and the 3 way diverter valve will be changed over if the cylinder temperature sensor captures a temperature lower than the defaulted set value The cylinder loading pump...

Page 52: ...inder loading pump is switched ON when the required boiler water temperature is reached DHW is regulated to the set temperature via the outlet temperature sensor After the draw off process has ended t...

Page 53: ...accessories G Time switch accessories or Vitotrol 100 type UTDB RF2 H Gas pressure switch accessories X Electrical interface Boiler water temperature sensor Outlet temperature sensor Cylinder tempera...

Page 54: ...serv ice Date Signature Gas type G Static pressure mbar kPa Supply pressure flow pres sure mbar kPa Carbon dioxide content CO2 Upper heating output by vol Lower heating output by vol Oxygen content O...

Page 55: ...50 Rated current A 2 0 Backup fuse max A 16 Power consumption max W 152 151 Weight kg 62 64 Permissible ambient temperature during operation C 0 to 40 during storage and transport C 20 to 65 IP rating...

Page 56: ...tem are not part of ordi nary household waste For decommissioning the system isolate the system from the power supply and allow components to cool down where appropriate All components must be dispose...

Page 57: ...es with the European directives and supplementary national requirements in terms of its design and operational characteristics Using the serial number the full Declaration of Con formity can be found...

Page 58: ...Gas train 23 Gas type changing At the control unit 39 LPG 22 39 Gas type selected 23 H Heat exchanger cleaning 34 Heating curve 51 Heating flow 8 Heating return 8 I Ignition 33 Ignition electrode 33 I...

Page 59: ...59 5697789...

Page 60: ...Shropshire TF1 7YP GB Telephone 44 1952 675000 Fax 44 1952 675040 E mail info uk viessmann com Viessmann Werke GmbH Co KG D 35107 Allendorf Telephone 49 6452 70 0 Fax 49 6452 70 2780 www viessmann com...

Reviews: