


-11-
Setting Nameplate Illumination Mode
Setting Unlock Time
There are 3 illumination modes for nameplate indicator, Normally on ,Normally off and Auto .
Normally on is default, to change the setting, please follow the steps:
By default, the unlock time is 1s, but it can be changed,the setting range is 1s~99s.
Follow the steps:
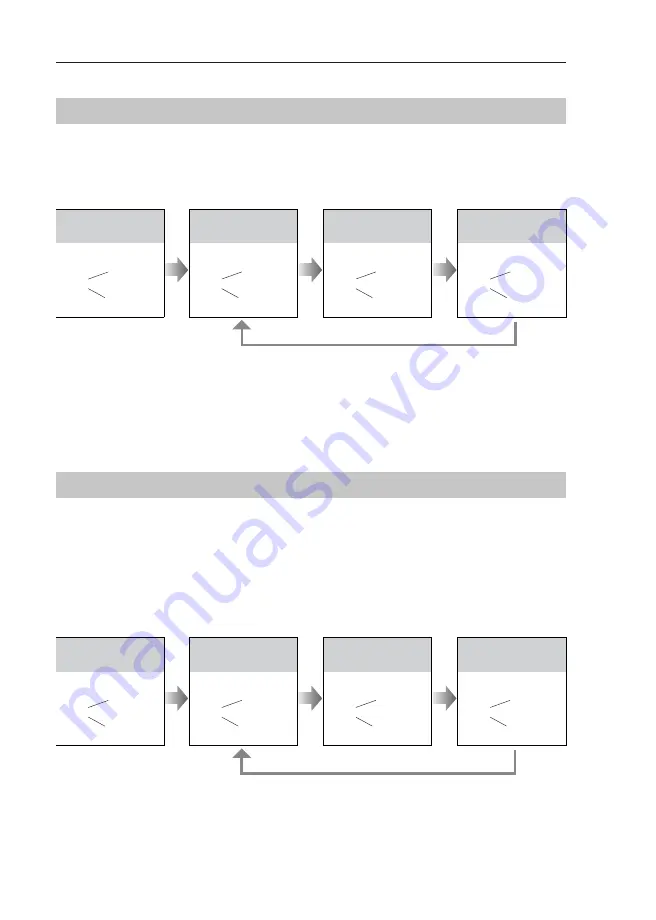
SETUP INSTRUCTIONS
UNLOCK Indicator:ON
TALK Indicator:OFF
Buzzer
Beep+, Beep
In standby mode, press
KEY_SET button three
times .
UNLOCK Indicator:ON
TALK Indicator:OFF
Buzzer
Beep,Beep......
Press and hold on KEY_2
button. The time you holding
on is the new unlock time.
UNLOCK Indicator:ON
TALK Indicator:OFF
Buzzer
Beep+, Beep
In standby mode, press
KEY_SET button three
times .
UNLOCK Indicator:ON
TALK Indicator:OFF
Buzzer
Beep+
Press KEY_3 button to set
the nameplate illumination
mode to Normally on .
UNLOCK Indicator:ON
TALK Indicator:OFF
Buzzer
Beep, Beep
Press KEY_3 button again
to set the nameplate illumina-
tion mode to Normally off .
UNLOCK Indicator:ON
TALK Indicator:OFF
Buzzer
Beep, Beep,Beep
Press KEY_3 button again
and again to set the nameplate
illumination mode to Auto .
Press KEY_3
• When entering time delayed setting, the buzzer sound one time every second.
• The LED_NAME indicator will blink all the time until exit out the setting mode.
• If without any operation in 10 seconds, it will exit out setting mode automatically.
• In this step,press KEY_SET button twice to exit out the setting mode manually.
• If setting mode has not been exited, you can change the nameplate illumination mode by pressing KEY3
circularly.
• The LED_NAME indicator will blink all the time until exit out the setting mode.
• If without any operation in 10 seconds, it will exit out setting mode automatically.
• In this step,press KEY_SET button twice to exit out the setting mode manually.
-12-
Setting Ring-back Tone
If allow ring-back tone, press the call button to call monitor, a ring-back call tone can be heard
from door station.
There are 3 ring-back call tones, Ringing one time ,Ringing continuously and No ring-back
tone .
Ringing one time is default, to change the setting, please follow the steps:
Setting Night View LED Illumination Mode
There are 3 working modes for night view LED indicator, Normally on ,Normally off and Auto .
Auto is default, to change the setting, please follow the steps:
SETUP INSTRUCTIONS
UNLOCK Indicator:ON
TALK Indicator:OFF
Buzzer
Beep+, Beep
In standby mode, press
KEY_SET button three
times .
UNLOCK Indicator:ON
TALK Indicator:OFF
Buzzer
Beep+
Press KEY_4 button to set
the night view LED mode
to Normally on .
UNLOCK Indicator:ON
TALK Indicator:OFF
Buzzer
Beep, Beep
Press KEY_4 button again
to set the night view LED
mode to Normally off .
UNLOCK Indicator:ON
TALK Indicator:OFF
Buzzer
Beep, Beep,Beep
Press KEY_4 button again
and again to set the night
view LED mode to Auto .
Press KEY_4
UNLOCK Indicator:ON
TALK Indicator:ON
Buzzer
Beep+, Beep
In standby mode, press
KEY_SET button four
times .
UNLOCK Indicator:ON
TALK Indicator:ON
Buzzer
Beep+
Press KEY_1 button to set
the ring-back call tone ringing
one time.
UNLOCK Indicator:ON
TALK Indicator:ON
Buzzer
Beep, Beep
Press KEY_1 button again
to set the ring-back call tone
ringing continuously.
UNLOCK Indicator:ON
TALK Indicator:ON
Buzzer
Beep, Beep,Beep
Press KEY_1 button again
and again to close ring-back
call tone.
Press KEY_1
• If setting mode has not been exited, you can change the night view LED illumination mode by pressing
KEY4 circularly.
• The LED_NAME indicator will blink all the time until exit out the setting mode.
• If without any operation in 10 seconds, it will exit out setting mode automatically.
• In this step,press KEY_SET button twice to exit out the setting mode manually.
• If setting mode has not been exited, you can change the ring-back tone by pressing KEY1 circularly.
• The LED_NAME indicator will blink all the time until exit out the setting mode.
• If without any operation in 10 seconds, it will exit out setting mode automatically.
• In this step,press KEY_SET button once to exit out the setting mode manually.


