Videotree Videospa VSPA19LCD-AE1B Instruction Manual Download Page 13

AUTO TUNING (Analogue and Digital TV) 

1. Press LCD MENU button. 

2. Scroll left or right until reach 
CHANNEL menu. 

3. Scroll down with the arrow keys 
and select Auto Tuning with the 
OK button. 

4. Select the country with the left 
and right arrow keys and press 
the OK button twice . 
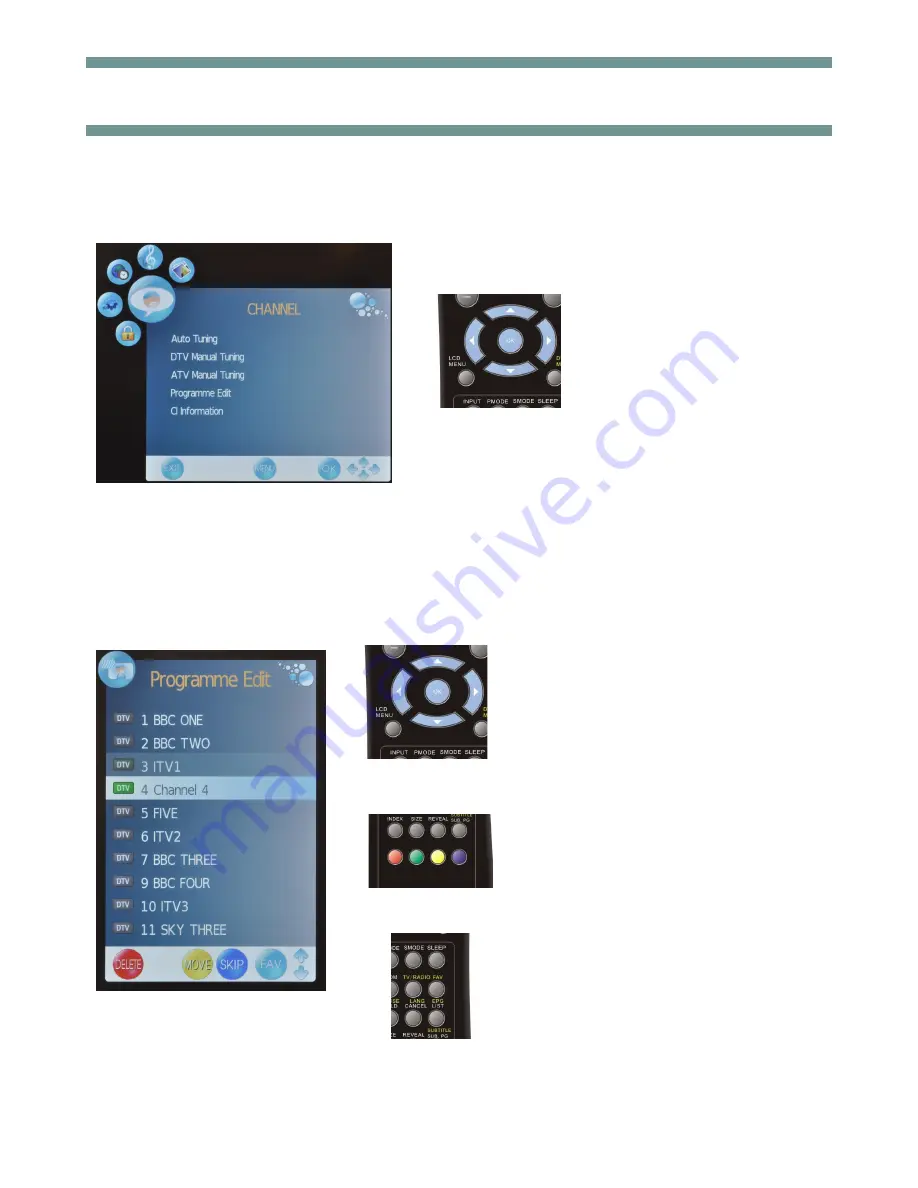
PROGRAMME EDIT 

1. Press LCD MENU button. 

2. Scroll down with the arrow keys and 
select Programme Edit with the OK button. 

3. To Delete a channel, select the channel 
scrolling up or down with the arrow keys. 
Press the Red button twice.  

4. To Move a channel, select the channel 
scrolling up or down with de arrow keys. 
Press the Yellow button to select the chan-
nel and with arrow keys move it and place 
it with the LCD MENU button. 

5. To Skip a channel from the programme, 
scroll with arrow keys and press the Blue 
button. The channel will still appear in the  
programme list and the channel list. 

6. To select a Favourite channel, scroll the 
channels and press the FAV button. These 
channels will appear when the FAV button 
is pressed. 

13 

TV OPERATION 

Summary of Contents for Videospa VSPA19LCD-AE1B

Page 1: ...Widescreen Water Resistant Television Model No VSPA19LCD AE1B VSPA19LCD AE1M VSPA19LCD AE1W IMPORTANT Please read these instructions before installing and operating the unit Retain them for future ref...

Page 2: ...The Box Installation Procedure Control Remotes Basic Connections Extended Connections Touch Control Settings TV Operation Technical Specifications Troubleshooting Appendix A RS232 Commands 2 CONTENTS...

Page 3: ...age to the LCD Do not expose rear of the TV to water or moisture The TV is IP65 rated against water from the front only after it has been correctly installed See installation instructions for more inf...

Page 4: ...aster Remote 1 x Wall Frame with Magnets 1 x Videospa TV 1 x Videospa Waterproof Remote 2 x AAA Batteries Master Remote Installation Backbox Battery inside the remote 1 x CR2332 Remove the safety tab...

Page 5: ...Out L x 525mm D x 75mm H x 330mm INSTALLATION PROCEDURE Backbox Optional Cut Out L x 530mm D x 80mm H x 335mm Without Backbox With Backbox 5 The Backbox is essential for environments where the TV will...

Page 6: ...ccount the cables that are connected to the TV Give some space to let the cables run properly without any damage Make sure that the cables power aerial HDMI are passed through the holes before the box...

Page 7: ...available The frame must be fitted with at least one fixing hole in each corner Take care not to over tighten bend the frame Clean off the excess silicone sealant Leave to set before continuing instal...

Page 8: ...LED Indicator Zoom N A 7 Red Green Yellow Blue Buttons Selection navigation and operation of various services Factory Reset Touch Beep POWER LED s Flashing control buttons the TV must be off STBY to c...

Page 9: ...ERIAL SPEAKERS POWER R L HDMI SCART Aerial Input Output 9 BASIC CONNECTIONS CONNECTIONS RS232 POWER IN HDMI PC VGA SCART S VIDEO YPbPr COMPONENT AV AUDIO IN CI SLOT PC AUDIO HEADPHONE OUT AERIAL IN AV...

Page 10: ...3 Rx 5 Ground RS232 Protocol Baud Rate 9600 bps Bits 8 Parity None Stop Bit 1 COMMAND SEQUENCE A0 F0 55 FF Code Check Sum Code Check Sum 100 Hex e g Turn On Code Checksum Complete Sequence E1 1F A0 F0...

Page 11: ...All the LED s go off and after 2 seconds the standby LED s go on all red 1 2 3 4 5 6 7 Level 1 Touch control is disabled The touch will not respond to anything Level 2 Touch control is at its least s...

Page 12: ...in standby Press the BLUE button on the MASTER remote 2 Scroll up or down with the arrow keys and save the changes with the OK button 3 All the LED s go off and after 2 seconds the standby LED s go o...

Page 13: ...a channel select the channel scrolling up or down with the arrow keys Press the Red button twice 4 To Move a channel select the channel scrolling up or down with de arrow keys Press the Yellow button...

Page 14: ...ll left or right until reaching the SOUND menu 3 Scroll with the arrow keys and save the changes with the OK button Some modes are predefined and cannot be modified 14 PICTURE SETTINGS TV OPERATION TI...

Page 15: ...to be changed 15 TV OPERATION LOCK SETTINGS 1 Press LCD MENU button 2 Scroll left or right until reaching the LOCK menu 3 Scroll with the arrow keys and save the changes with the OK button 4 This menu...

Page 16: ...Scroll with the arrow keys the move be tween channels and programmes 3 To retrieve information of a programme press the INFO button 4 To Schedule a programme scroll over the guide and press the Blue b...

Page 17: ...RCA Yellow colour 1 PC RGB Format Up to 1360 768 60Hz 1920 1080 60Hz Colour 16bit 24bit 32bit Terminal Video VGA Sound PC Earphone input 1 HDMI Resolution 480i 480p 576i 576p 720p 1080i 1080p 1 SCART...

Page 18: ...on Press the Mute button Volume is set too low Press the VOL button No Speaker is connected Check connection between TV and speaker No sound for PC input The audio cable is not connected correctly Ch...

Page 19: ...2 EE 6 06 FA TTX 44 BC 7 07 F9 GUIDE 1C E4 8 08 F8 SUBTITLES 19 E7 9 09 F7 RED 16 EA 0 00 FF GREEN 17 E9 CH 1F E1 YELLOW 18 E8 CH 1E E2 BLUE 19 E7 VOL 58 A8 DISCREET ON E0 20 VOL 4B B5 DISCREET OFF E1...

Page 20: ...856 382 Fax 44 0 1932 856 649 E mail sales videotree com ESC House South Road Weybridge Surrey KT13 9DZ Sales and Support Information com Please make a note of the model and serial numbers Model Numbe...

Reviews: