19616-001 Rev. D
DiagnosticPRO
Edge
Film Digitizer Installation Guide
9
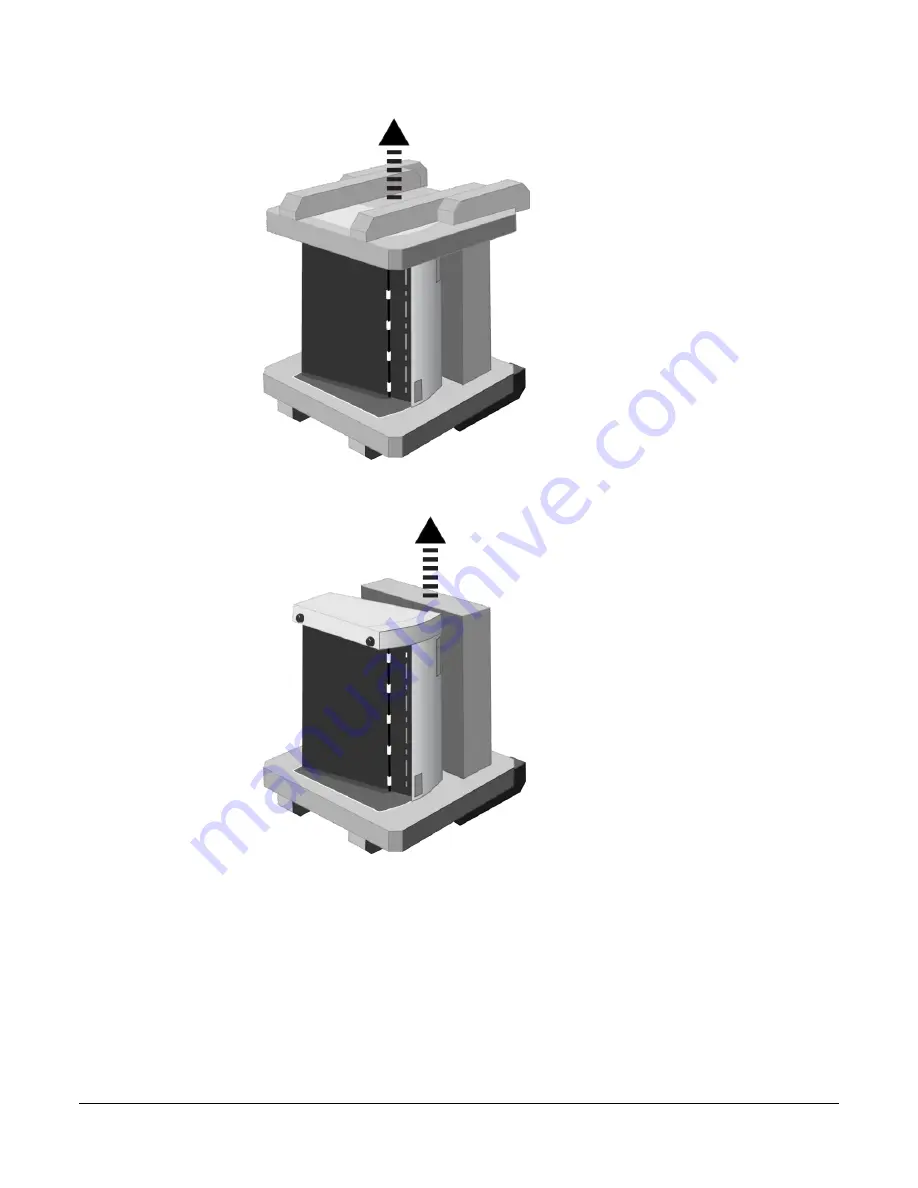
c. Place the group on one foam end cap. Lift off the upper foam end cap.
d. Remove the feeder box from the lower end cap.
Page 1: ...Installation guide for DiagnosticPRO Edge Multi film feeder Serial numbers 380 000 to 389 999...
Page 2: ...re approved separately from a regulatory perspective The digitizers are marketed as a component to application software development companies who will incorporate the digitizer into their respective P...
Page 3: ...equipment generates uses and can radiate radio frequency energy and if not installed and used in accordance with the instruction manual may cause harmful interference to radio communications Operatio...
Page 4: ...electrical shock WARNING To avoid the risk of electric shock this equipment must only be connected to a supply mains with protective earth Grounding reliability can only be achieved when the equipmen...
Page 5: ...d activate your product warranty 14 Assemble the digitizer 15 Place the digitizer on a table 18 Final assembly 19 Connect the USB cable and power supply 19 Install the exit tray 20 Install Device Driv...
Page 6: ...e images for consultation review and final interpretation The devices are indicated for the digitization of mammography images for review and analysis but not as the sole basis for screening or diagno...
Page 7: ...r s parts Identify the digitizer s parts 1 Look for damage Before unpacking the DiagnosticPRO Edge film digitizer examine the shipping carton for damage If the carton is damaged Notify the shipper imm...
Page 8: ...ter you should repack the digitizer in the original materials by reversing the procedure described here Failure to properly pack or failure to use VIDAR authorized shipping materials will void the pro...
Page 9: ...19616 001 Rev D DiagnosticPRO Edge Film Digitizer Installation Guide 9 c Place the group on one foam end cap Lift off the upper foam end cap d Remove the feeder box from the lower end cap...
Page 10: ...ANT Save all packing materials If you need to ship the digitizer later you should repack the digitizer in the original materials by reversing the procedure described here Failure to properly pack or f...
Page 11: ...ntify the parts Check carefully to ensure you received the items listed below Standard items Description Note items are not shown to same scale DiagnosticPRO Edge film digitizer Multi film feed tray F...
Page 12: ...Power Cord P N 4635 Multi film feed tray cable VIDAR part number 4200 001 if unit has multi film feed tray Quick start guide card VIDAR DiagnosticPRO Edge Installation CD USB Cable VIDAR part number...
Page 13: ...e digitizer To turn digitizer ON Press and release power switch To turn digitizer OFF Press and hold for two seconds CAUTION The digitizer power switch is used to disconnect the 24 volts from the exte...
Page 14: ...mation section record this information Product you are registering DiagnosticPRO Edge Digitizer serial number d Complete the form e Mail or fax the form to VIDAR Systems Corp If your digitizer needs s...
Page 15: ...base on a table Orient the digitizer base with the back toward you Notice the two slots on top of the digitizer base Slots 2 Orient the film feeder with the back toward you multi film feeder is shown...
Page 16: ...19616 001 Rev D DiagnosticPRO Edge Film Digitizer Installation Guide 16 3 Insert the tabs on the bottom of the feeder into the slots on the digitizer base...
Page 17: ...uide 17 4 Tighten the thumbscrew to secure the feeder to the base 5 Connect the multi film feeder cable between the feeder and digitizer base as shown below 6 Go to Placing the digitizer on a table th...
Page 18: ...esk or countertop not more than 36 91cm high and with no more than a 5 tilt The digitizer must not be placed on the floor VIDAR Systems Corp is not liable for any damages or injuries to persons or pro...
Page 19: ...rovider or Vidar Systems Corp 1 Connect the USB cable to the USB port on the back of the digitizer Do not connect the USB cable to the PC until instructed later 2 Connect the power adapter s cable to...
Page 20: ...the digitizer keeping it high then drop it down and slide it back toward you so the notches fit over the internal pins Notch Internal pin 2 When properly positioned the exit tray will protrude a smal...
Page 21: ...itizer The on off switch is located on the front of the digitizer To turn digitizer ON Press and release power switch To turn digitizer OFF Press and hold for two seconds Note The digitizer power swit...
Page 22: ...or 64 bit Note These instructions have been successfully tested on a wide range of Windows 7 systems In rare instances you may have difficulty installing the VIDAR driver If that happens try again af...
Page 23: ...6 001 Rev D DiagnosticPRO Edge Film Digitizer Installation Guide 23 d In the first screen click Next e In the License Agreement screen activate I accept the terms of the license agreement then click N...
Page 24: ...616 001 Rev D DiagnosticPRO Edge Film Digitizer Installation Guide 24 f In the Ready to Install the Program screen click Install g The Setup Status screen will appear Wait while the files are installe...
Page 25: ...y window will appear Click Install this driver software anyway each time it appears i On a 64 bit system only When prompted Would you like to install this device software click Install j InstallShield...
Page 26: ...ter Note Wait 30 seconds after you connect the digitizer before you launch the Demoscan program This ensures the computer has recognized the new hardware and has installed the driver properly l On a 6...
Page 27: ...Not Ready appears the digitizer is normalizing Note that The digitizer will report as VXR 12 for backward compatibility You may not see the same firmware and hardware version as shown in the window a...
Page 28: ...Digitizer Installation Guide 28 64 bit system only In the Windows 7 Computer Management window the digitizer is listed under Jungo 32 bit system only In the Windows 7 Computer Management window the di...
Page 29: ...igitizer The on off switch is located behind the upper right corner To turn digitizer ON Press and release power switch To turn digitizer OFF Press and hold for two seconds Note The digitizer power sw...
Page 30: ...s have been successfully tested on a wide range of Windows XP systems In rare instances you may have difficulty installing the VIDAR driver If that happens try again after logging on as Administrator...
Page 31: ...6 001 Rev D DiagnosticPRO Edge Film Digitizer Installation Guide 31 d In the first screen click Next e In the License Agreement screen activate I accept the terms of the license agreement then click N...
Page 32: ...616 001 Rev D DiagnosticPRO Edge Film Digitizer Installation Guide 32 f In the Ready to Install the Program screen click Install g The Setup Status screen will appear Wait while the files are installe...
Page 33: ...er Install window previews the next steps Click Next i The Digital Signature Not Found window will may appear Each time it appears click Yes Note the screen may look a bit different in Windows VISTA j...
Page 34: ...ever the driver installation is not complete l Earlier you connected a USB cable to the digitizer Now attach the connector on the other end of that cable to a USB 2 0 port on the computer m The Found...
Page 35: ...001 Rev D DiagnosticPRO Edge Film Digitizer Installation Guide 35 o On the next screen click Install the software automatically Recommended then click Next p Wait while the wizard searches for the dr...
Page 36: ...ppear click Yes each time it appears r After the driver has been installed click Finish s Verify that the digitizer drivers are fully installed by checking the device properties at Start Control Panel...
Page 37: ...appears the digitizer is normalizing Note that The digitizer will report as VXR 12 for backward compatibility You may not see the same firmware and hardware version as shown in the window above The se...
Page 38: ...ics Caution In a domestic environment this product may cause radio interference in which case the user may be required to take adequate measures Guidance and manufacturer s declaration electromagnetic...
Page 39: ...Surge IEC 61000 4 5 1 kV differential mode 2 kV common mode 1 kV differential mode 2 kV common mode Mains power quality should be that of a typical commercial or hospital environment Voltage dips sho...
Page 40: ...s m Field strengths from fixed RF transmitters as determined by an electromagnetic site survey a should be less than the compliance level in each frequency range b Interference may occur in the vicini...
Page 41: ...communications equipment Rated maximum output power of transmitter W Separation distance according to frequency of transmitter m 150 kHz to 80 MHz 80 MHz to 800 MHz 800 MHz to 2 5 GHz 0 01 0 12 0 12...
Page 42: ...19616 001 Rev D DiagnosticPRO Edge Film Digitizer Installation Guide 42 Appendix Patient Vicinity Note Dimensions shown are not prescriptive...
Page 43: ...tructions for use Underwriters Laboratories classification symbol Authorized Representative in the European Community Compliance to EU Directives Indicates the Medical Device Manufacturer This symbol...
Page 44: ...erndon Parkway Herndon VA 20170 USA Phone 1 703 471 7070 Main fax 1 703 471 1165 Web www filmdigitizer com Technical Support Phone 1 703 471 7070 1 800 471 7226 Fax 1 703 471 7665 E mail medtech VIDAR...