background image

- 14 -

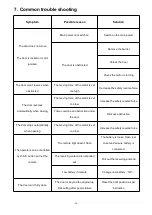
7. Common trouble shooting

Symptom

Possible reason

Solution

The door does not move

The door is locked or motor

jammed

Main power not switch on

Switch on the main power

The door is obstructed

Remove the barrier

Unlock the door

Check the motor is turning

The door won’t reverse when

obstructed

The moving force of the motor is set

too high

Decrease the safety reverse force

The door reverses

automatically when closing

The moving force of the motor is set

too low

Increase the safety reverse force

There could be an obstruction under

the door

Remove obstruction

The door stops automatically

when opening

The moving force of the motor is set

too low

Increase the safety reverse force

The operator can be controlled

by O/S/C button but not the

remote

The remote light doesn’t flash

The battery is loose. Open rear

cover and ensure battery is

connected.

The receiving antenna is not pulled

out

Pull out the receiving antenna

Low battery in remote

Change new battery

12V

The door can’t fully close

The door is beyond the original up

limit setting after power failure

Reset the limit position as per

instruction

Summary of Contents for VR1000E

Page 1: ...www vicway com au Instruction Manual Rolling Garage Door Opener VR900E VR1000E INSTALLATION INSTRUCTIONS OWNERS COPY...

Page 2: ......

Page 3: ...persons to follow all instructions Failure to comply with the installation instructions and the safety warnings may result in serious personal injury and or property and opener damage Please save the...

Page 4: ...2 2 Product features 3 3 Installation instructions 4 6 4 Setting and operating 7 12 5 Packing list 12 6 Technical data 13 7 Common trouble shooting 14 15 8 Warranty 16 17 9 Final note 18 10 Important...

Page 5: ...ugh and make sure children can t reach them The door opener is not intended for use by young children or infirm persons without adequate supervision Children should be supervised to ensure that they d...

Page 6: ...garage door opener to sense an object obstructing under the door way some force must be exerted on the object As a result the object door and or person may suffer damage or injury If the circuit is da...

Page 7: ...ers can be stored in the opener s memory 6 Energy efficient LED light The light will automatically on when operating and automatically off 3 minutes later after finish operating 7 Back up battery term...

Page 8: ...DOOR ARE FOR RIGHT HAND INSTALLATIONS ONLY IMPORTANT SAFETY INSTRUCTIONS FOR INSTALLATION Warning Incorrect installation can lead to severe injury Follow this installation instruction SIDE ROOM REQUI...

Page 9: ...Remove the drive assembly from the packaging Try to rotate the drive gear by pushing on the fork Fig 6 If the gear does not rotate the manual mode has to be selected To select pull downward the manual...

Page 10: ...6 2 O S C button 4 Manual release lever 6 Programming panel 1 PB GND PE 24V terminal 3 Battery backup terminal 5 K button the same function as O S C button...

Page 11: ...stallation or 0 right installation Press SET button to confirm the setting The default setting is right hand installation 0 means right installation Press UP button Press SET button Display from 1 to...

Page 12: ...button Fine tune using up or down button to determine the final up limit position then press SET button to confirm The display will now show a 2 automatically Adjust the down limit by pressing down b...

Page 13: ...er remote learning mode Press any one button two times on the remote the coding light will extinguish The remote has been coded successfully Use the same method to code multiple remotes Up to 20 can b...

Page 14: ...le as a special order Press SET button Display from 1 to 3 Press UP or DOWN button to adjust the force The force from 1 to 9 Min force is 1 max force is 9 Press DOWN button Display 11 Press UP button...

Page 15: ...Press UP button and hold on until the LED displays Press up button once the auto close time will increase by 1 minute the maximum time is 9 minutes Press down button the auto close time decrease by 1...

Page 16: ...to the battery female plug at the back of the motor Fig 11 Please see fig 13 and fig 14 for the wires connection of the battery male plug and insert direction 5 Packing list Item Quantity Roller door...

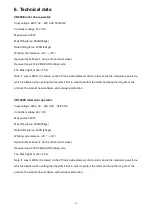
Page 17: ...to protect the motor and keep the long life of the product the product have software and hardware protection VR1000E roller door operator Input voltage 220 V AC 240 V AC 50 60 HZ Controller voltage 2...

Page 18: ...set too low Increase the safety reverse force There could be an obstruction under the door Remove obstruction The door stops automatically when opening The moving force of the motor is set too low Inc...

Page 19: ...ection according to left right installation setting in the instruction manual 2 short beeps from buzzer means 24V DC Motor out of work The connector of motor break away the control board Please make s...

Page 20: ...fee is payable by the owner Repairs and replacement parts provided under this Vicway Australia Pty Ltd Warranty are provided free of charge and warranted for the remaining balance of the original warr...

Page 21: ...are of a kind ordinarily acquired for personal domestic or household use or consumption Liability for breach of those Implied Terms cannot be excluded or limited and the limitations and exclusions ab...

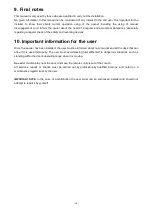
Page 22: ...0 Important information for the user Once the opener has been installed the user must be informed about how it works and all the risks that can arise if it is used improperly The user must avoid placi...

Page 23: ......

Page 24: ......

Reviews: