9
9. FAILURE REPORT INDICATIONS
If the charger does not function (anymore), it can be restarted by pulling the mains plug
from the wall socket and putting it back in again. First of all you should however follow the
indications in the next paragraphs based on the failure report indications.
9.1 Not a single LED is lighting
There is no mains voltage.
First check whether the plug has been fitted in the wall socket. If this has been fitted in a
wall socket it should be checked whether there is any voltage on the wall socket. If there is
no mains voltage then you should check the safety fuses in the distribution cabinet or call a
technician.
9.2 Both LED’s light
If no battery is connected, this is a stand-by condition and no failure condition.
If a battery is connected however, one of the following failure conditions may
have occurred: There is no battery voltage present.
Check whether the battery has correctly been connected to the charger.
If it is not connected then the connection must be restored and the charging
process should be restarted.
The polarity of the battery connected to the charger is not correct.
Check whether the polarity of the charger corresponds with the polarity of
the battery. If it is connected correctly then you should consult your
supplier/dealer.
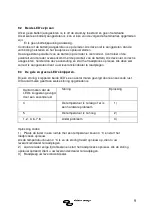
9.3 The yellow and green LED’s are blinking.
In case of a failure, both LED’s blink a number of times followed by one second rest.
This number indicates which failure has occurred.
Number of times the
LED’s blink followed
by a short rest
Failure description
Remedy
4
Temperature too low or hardware problem
1)
5
Temperature too high
2)
1, 2, 3, 6, 7, 8
Other problem
3)
Remedy codes:
1. Move charger to a room with temperature above 0 °C and restart the charging process. If
temperature is above 0 °C and the failure report repeats
itself, then you should consult your supplier/dealer.
2. Allow the charger to cool down for some time and then the charging process should be


