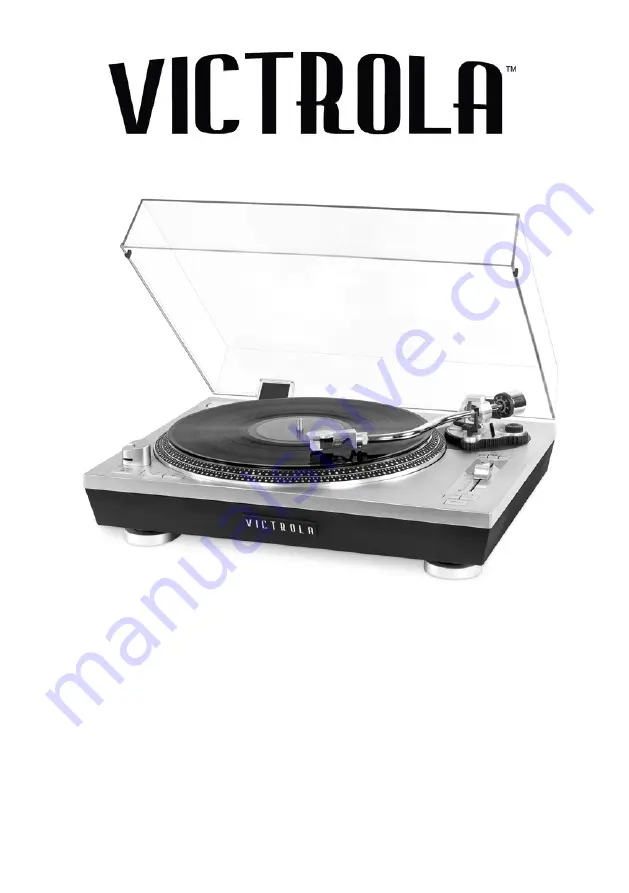
MODEL: VPRO-2000
PROFESSIONAL TURNTABLE
Instruction Manual
PLEASE READ THIS INSTRUCTION MANUAL CAREFULLY
BEFORE USE AND KEEP IT FOR FUTURE REFERENCE.
Page 1: ...MODEL VPRO 2000 PROFESSIONAL TURNTABLE Instruction Manual PLEASE READ THIS INSTRUCTION MANUAL CAREFULLY BEFORE USE AND KEEP IT FOR FUTURE REFERENCE...
Page 2: ...STENING TO A VINYL RECORD 8 LISTENING TO MUSIC VIA RCA LINE OUT 10 LISTENING TO MUSIC VIA BLUETOOTH OUT 10 USING THE ANTI SKATE PITCH CONTROL STROBOSCOPE 11 USB RECORDING OPERATION 12 SPECIFICATIONS 1...
Page 3: ...y ventilation openings Install in accordance with the manufacturer s instructions 8 Do not install near any heat sources such as radiations heat registers stoves or other apparatus including amplifier...
Page 4: ...in such a way that it does not require a safety connection to electrical earth 17 The mains plug is used as disconnect device the disconnect device shall remain readily operable 18 WARNING To reduce...
Page 5: ...peed indicator will light up 5 STROBE DOTS On Turntable Edge Operate in conjunction with stroboscopic light located under the ON OFF to provide visual indication of accurate turntable speeds 6 TURNTAB...
Page 6: ...OR 19 CARTRIDGE COVER 20 PITCH LED INDICATORS 21 PITCH SPEED RANGE Select 10 or 20 speed range 22 QUARTZ LOCK BUTTON Press to turn the pitch control on and off Rear View 23 OUTPUT JACKS Used for conne...
Page 7: ...stretch the belt to the small access hole as shown in the illustration below 3 Carefully turn the platter over while continuing to hold the belt through the access hole While keeping the belt on the...
Page 8: ...With your hand lift the tone arm up and move the tone arm away from the tone arm rest but not over the black record platter see photo A Be careful that the needle does not hit anything Rotate the silv...
Page 9: ...e record or the starting point of a track Then press the START STOP button to start playing 6 At the end of the record the turntable will not stop rotating unless you press the START STOP button again...
Page 10: ...following a sudden temperature change there is the danger that water vapor in the air may condense on the unit preventing proper operation In such cases leave the unit for 1 2 hours after plugging it...
Page 11: ...tional speed by as much as 20 and the QUARTZ indicator will light up red 3 Use the Pitch Adjustment Slide to find the desired pitch control 4 When the Quartz is in the center position the speed rate i...
Page 12: ...t please go to http audacityteam org SPECIFICATIONS GENERAL Power Requirements AC 120 V 60 Hz Power Consumption 6 W Dimensions W x H x D 17 7in x 5 9in x 14 7in approx 450mm x 150mm x 375mm approx Wei...
Page 13: ...devices then re plug in the unit after one minute The sound is noisy when playing the record The stylus is not weighted properly Rebalance the stylus using the counter weight RECORD PLAYER The sound...
Page 14: ...dential installation This equipment generates uses and can radiate radio frequency energy and if not installed and used in accordance with the instructions may cause harmful interference to radio comm...
Page 15: ...or replacement Returns without an RMA number on the package will be refused and returned to sender Upon receipt of the returning item and our full inspection IT may issue a replacement to customer fo...
Page 16: ...NTABILITY OR FITNESS FOR A PARTICULAR PURPOSE ON THIS PRODUCT IS LIMITED IN DURATION TO THE DURATION OF THIS WARRANTY Some states do not allow the exclusion or limitation of incidental or consequentia...