ESS7/EST4/ESL4/ELC4
- 28 -
SECTION 3
CAUSES
POSSIBLE CORRECTIVE ACTIONS
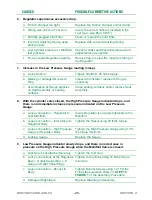
6. Regulator experiences excessive drop.
a. Friction Damper too tight.
Replace the Friction Damper and/or Gland.
b. Wrong size orifice in Test Gun.
Insure the correct orifice is installed in the
Test Gun - size #52 (.0635”).
c. Partially plugged Inlet Filter.
Clean or replace the Inlet Filter.
d. Incorrect Adjusting Spring used
during repair.
Replace with correct Adjusting Spring.
e. Low Cylinder pressure or Manifold
test pressure.
Check Cylinder and Manifold pressure and
adjust/replace as needed.
f. Flow exceeds Regulator capacity.
Reduce flow to below the maximum rating of
the Regulator.
7. Increase in the Low Pressure Gauge reading (creep).
a. Loose Nozzle.
Tighten Nozzle to 20 ft-lbs torque.
b. Missing or damaged Nozzle O-
Ring.
Inspect and install or replace O-Ring as
necessary.
c. Accumulation of foreign particles
on Seat Assembly or seating
surfaces.
Clean seating surfaces and/or replace Seat
Assembly.
8. With the cylinder valve closed, the High Pressure Gauge indicator drops, and
there is no immediate increase in pressure indicated on the Low Pressure
Gauge.
a. Loose connection – Regulator to
Test Manifold.
Insure Regulator is securely tightened to the
Manifold.
b. Loose connection – Inlet Swivel to
Regulator Body.
Tighten the Swivel using 20 ft-lbs torque.
c. Loose connection – High Pressure
Gauge to Regulator Body.
Tighten the High Pressure Gauge using 10 ft-
lbs torque minimum.
d. Leaking Gauge.
Replace the Gauge.
9. Low Pressure Gauge indicator slowly drops, and there is no decrease in
pressure on the High Pressure Gauge when the Manifold Valve is closed.
a. Test Gun is not attached securely.
Tighten the Test Gun.
b. Loose connections at the Regulator
Body – Outlet Connection, L.P.
Gauge or Relief Valve/Plugs
Tighten connections using 15 ft-lbs torque
minimum.
c. Loose connection – Bonnet to
Body.
Tighten Bonnet Screws using 12-15 ft-lbs.
Follow the sequence shown in
STEP 19
FIGURE 1
of the Assembly Procedure.
d. Damaged Diaphragm.
Replace Diaphragm Assembly.

