Vicon V9360W Installation Manual Download Page 14


V9360W Hemispheric Camera with Advanced WDR 

Hardware User’s Manual 


3. Accessing Camera 

If you have DHCP server/router in your network: 

Many network server/routers are able to automatically provide IP addresses through DHCP. If 

you have DHCP on the network, just plug in your computer and IP Hemispheric Camera into 

the network and your IP device will acquire a network address by itself. Find and access the 

device with the IP Utility program.   


If you do


NOT  have DHCP server/router in your 

network: 

1.  Configure your PC to use the same subnet by changing your PC’s IP address to the 

subnet with prefix 192.168.0.XXX. The last number should be anything from 1 to 254 

except 100 or other used IP addresses. Subnet mask should be 255.555.255.0. 

2.  The default IP used by this device is 192.168.0.100. Make sure your PC is 

NOT

 using 

this address and that no two devices use the same IP address in the network. 

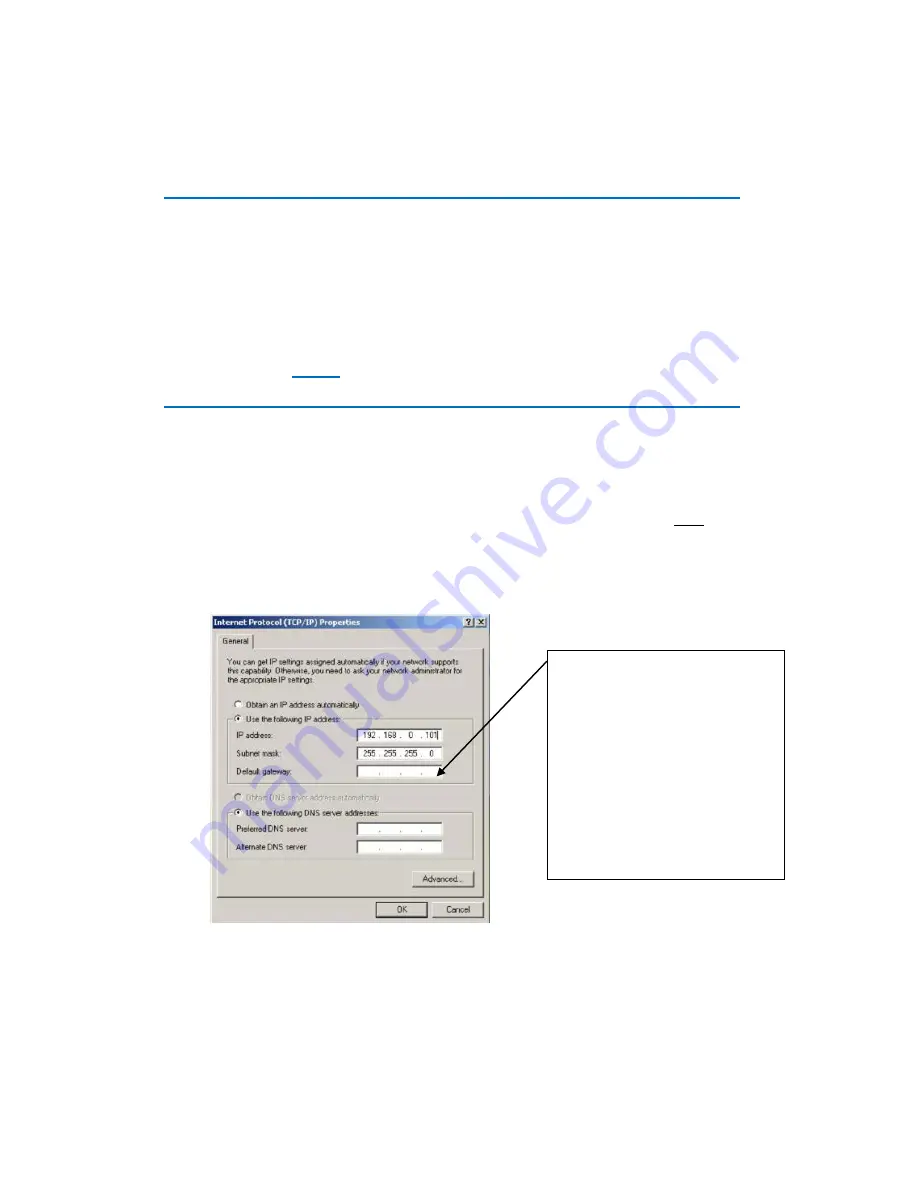
3.  Change your IP address by going to Control Panel ->Manage Network Connections ->. 

Right click on the connection to change -> Option -> TCP/IP IPv4 Properties.   


4.  Open Internet Explorer (Version 8.0 or above) , and type in the Default IP: 

192.168.0.100 


Enter the settings as below. 


IP address: 192.168. 0.xxx   


Subnet mask: 255.255.255.0   

NOTE

: xxx should be a number 

from 1 to 254 except 100, which is 

used by the IP device. Make sure 

that no two devices use the same 

IP address in the same network. 


14 

Summary of Contents for V9360W

Page 1: ...mentation This system has not been designed to be used in life critical situations and must not be used for this purpose Vicon Industries Inc 89 Arkay Drive Hauppauge New York 11788 Tel 631 952 2288 F...

Page 2: ...fety Instructions Error Bookmark not defined Physical description 7 2 Installation Procedure 10 Connecting the IP Hemispheric Camera 10 1 Remove the cover 10 2 Insert the cable 10 3 Connect cables to...

Page 3: ...ring the writing of this manual Inform your local office if you find any inaccuracies or omissions We cannot be held responsible for any typographical or technical errors and reserve the right to make...

Page 4: ...ly before cleaning Attachments Do not use attachments not recommended by the video product manufacturer as they may cause hazards Water and Moisture Do not use this video product near water for exampl...

Page 5: ...en directly exposed to rain or water 4 If the video product does not operate normally by following the operating Instructions in this manual Adjust only those controls that are covered by the instruct...

Page 6: ...Camera with Advanced WDR Hardware User s Manual 1 Introduction Package Contents H 264 4 Megapixel IP D N Outdoor Hemispheric Camera with Advanced WDR QIG Terminal Blocks for Power DI O Audio Accessori...

Page 7: ...Output Ethernet Port Digital Input Output Reset Button Micro SDHC Card Slot Power Button 1 12 VDC Power Input Connect DC power source to the terminal block The wire with white dashed lines is the live...

Page 8: ...s from power up this length of time fluctuates slightly with the environment You may then release the Reset Button The Power LED light will come back on and stay on after a few more seconds The unit w...

Page 9: ...for protection against transient voltages Max load 100 mA Max voltage 24 VDC to the transistor Pin 5 GND Ground Connect with Pin 7 for DI control loop Pin 6 12 V Provides power to external devices wit...

Page 10: ...ccessory kit 2 Insert the cable There are two conduit holes on the hemispheric camera one on the bottom and the other on the side Remove the plug if the cable will be routed through the hole on the bo...

Page 11: ...included in the package Insert the Ethernet cable through the flex conduit together with RJ 45 connector As an alternative connect the RJ 45 connector by crimping after pushing the cable through the c...

Page 12: ...nduit gland from the inside of the camera Connect the Ethernet cable to the camera s network port If you are not using PoE pull the DC power cable through the flex conduit as well and connect to the c...

Page 13: ...ropriate for the mounting surface 1 A mounting template is provided with the wall mount Mark the mounting holes on the surface and drill mounting holes Mount the flat side of the V9360 WM to the wall...

Page 14: ...ith prefix 192 168 0 XXX The last number should be anything from 1 to 254 except 100 or other used IP addresses Subnet mask should be 255 555 255 0 2 The default IP used by this device is 192 168 0 10...

Page 15: ...ve View will display To go to the main menu click the Setup button on the top left If there is only a single camera the procedure is complete to access the device If there are multiple devices in the...

Page 16: ...his is not the first device you add to the network please also avoid other devices IPs 10 Click Apply 11 Go to System Save Reboot and click Apply Internet Explorer will close after a few seconds This...

Page 17: ...K Ltd Brunel Way Fareham PO15 5TX United Kingdom Phone 44 0 1489 566300 Fax 44 0 1489 566322 2 Attach a sheet of paper to the unit with the following information a Name and address of the company retu...

Page 18: ...tive or any equipment which may have been tampered with altered misused or been subject to unauthorized repair Software supplied either separately or in hardware is furnished on an As Is basis Vicon d...

Page 19: ...quarters Brunel Way Fareham PO15 5TX United Kingdom 44 0 1489 566300 Fax 44 0 1489 566322 Vicon Germany Kornstieg 3 D 24537 Neumuenster Phone 49 0 4321 8790 Fax 49 0 4321 879 97 Far East Office Unit 5...

Reviews: