


15
Image Configuration
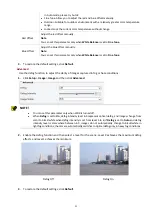
Image Adjustment
NOTE!
You may move the sliders to adjust settings or enter values in the text boxes directly.
Clicking Default will restore all the default image settings.
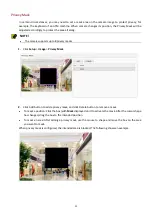
Setting the Scene
Set image parameters to achieve the desired image effects based on live video in different scenes.
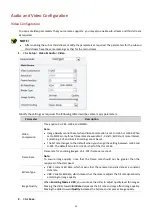
Click Setup > Image > Image.
The scene management page displays as follows; you can take the following steps to configure the scene.
1.
Click Scenes.
2.
Select a scene, and then set scene switching parameters. The following table describes some major
parameters.
Column
Description
Current
Indicates the scene that is being used.
Note:
Select an option button to switch to the scene and display the corresponding image
parameters for the scene.
The camera switches the current scene automatically when Enable Auto Switching is
selected.
Scene Name
Name of the current scene. The device provides several preset scene modes. When you
select a scene, the corresponding image parameters are displayed. You can adjust image
settings according to actual needs.
Indoor: recommended for indoor scenes.
WDR: recommeded for scenes with high-contrast lighting, such as window, corridor, front
door or other scenes that are bright outside but dim inside.
Custom: set a scene name as needed.
Auto Switching
Indicates whether to add a scene to the auto-switching list.
Note:
If Auto Switching is enabled, the system switches to a scene automatically when the
condition for switching to the scene is met. By default the auto-switching list includes the
default scene.
Setup
Click
to set conditions for auto-switching, including schedule and illumination. It means
that auto-switching is triggered only when meets the set conditions. A condition is invalid if
both the start and end values are set to 0.


