


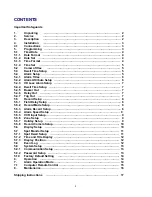


Programming Functions
All programming is done with the front panel keys. There are twenty keys on the front panel. The keys named
MENU, , ZOOM/-,
△
, SPOT/
▽
, SEQ/
◁
, CHANGE/
▷
,
and
SHIFT/ENTER
are used in programming
unit. The
TITLE, VCR,
and
ALARM
keys are not used in programming the unit. Functions of each key on the
front panel are described in Table 1.
z
Press
the
MENU
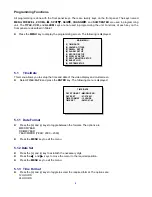
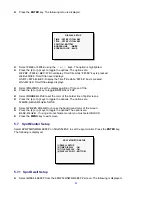
key to display the programming screen. The following is displayed:
MAIN MENU
(1) TIME/DATE
(2) CAMERA TITLES
(3) DWELL SETUP
(4) ALARM SETUP
(5) RECORD SETUP
(6) DISPLAY SETUP
(7) SPOT MONITOR SETUP
(8) EVENT LOG
(9) SYSTEM SETUP
5.1 Time/Date
This menu allows you to setup the time and date of the video display and multi-screen.
z
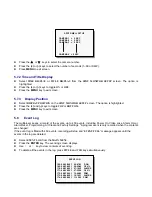
Select
TIME/DATE
and press the
ENTER
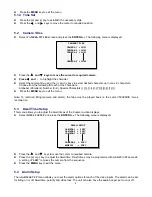
key. The following menu is displayed:
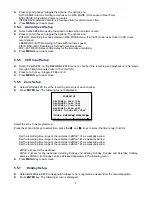
TIME /DATE
DATE FORMAT : MM/DD/YEAR
DATE SET : 01-27-2001
TIME FORMAT : 12 HOURS
TIME SET : PM 03:47:42
5.1.1 Date Format
z
Press
the
(+)
and
(-)
keys to toggle between the formats. The options are:
MM/DD/YEAR
DD/MM/YEAR
YEAR/MM/DD (YEAR: 2000 ~ 2099)
z
Press
the
MENU
key to exit the menu.
5.1.2 Date Set
z
Press
the
(+)
and
(-)
key to establish the necessary digit.
z
Press
the
◁
and
▷
keys to move the cursor to the required position.
z
Press
the
MENU
key to exit the menu.
5.1.3 Time Format
z
Press
the
(+)
and
(-)
keys to toggle to select the required format. The options are:
12 HOURS
24 HOURS
4