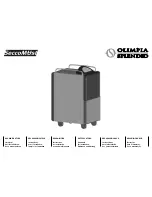
background image

4

5

COMPONENTS 

(See page 1)

1.   Carrying handle
2.   180° mist nozzle
3.   Water tank 
4.   Tank cap
5.   Base
6.   Power switch  and intensity control
7.   Pilot light
8.  Cleaning indicator
9.   VapoPad heater
10.  Power cord

FIRST TIME OF USE

Before using the unit for the first time, you should note the 

following points:
•  Remove all packing material from the unit. 
•  It is recommended that you disinfect your humidifier prior to 

first use. See cleaning Instructions.

•  Select a firm, level location at least 15 cm from any walls for 

proper airflow. 

•  Place the humidifier on a water resistant surface.

OPERATING INSTRUCTIONS
FILLING 

(See appendix A on page 2)

Remove the Water Tank by grasping handle and pulling straight 

up. Set aside (1).
•  Turn the Water Tank upside down so that the Tank Cap 

is facing up; unlock the Tank Cap by turning it counter-

clockwise and set aside (2).

•  Fill the Water Tank with clean, cool, tap water (3).
•  Replace the Tank Cap by turning clockwise (4) . Turn the 

Water Tank upright and check the Tank Cap for leaks. If any 

water drips from the Tank Cap, remove it and re-tighten. Use 

of very cold water may temporarily reduce the mist output. 

Never fill the humidifier with hot or warm water as this 

could cause damage and void your warranty.

  NOTE: When carrying the filled Water Tank, please use 

the handle and place your other hand under the tank for 

additional support.

•  Position the Water Tank in the humidifier and push into 

place. Some water will empty into the Base (5).

•  Once the filled tank has been positioned, do not attempt 

to move the humidifier. If it has to be moved, unplug the 

humidifier and remove the Water Tank first.

NOTE

: Everytime you switch the device on or every 3 days when 

the sound and light go on, press the indicator to acknowledge 

that the water tank has been cleaned. The 3 days reminder to 

clean the device will then reset.

POWER 

(See appendix B on page 2)

CAUTION: DO NOT PLUG IN THE HUMIDIFIER WITH WET 

HANDS AS AN ELECTRICAL SHOCK COULD OCCUR.

•  With the power switch in the OFF position, plug the filled 

humidifier into an outlet (1).

•  Press the Power Button to turn the device on. Pilot Light will 

illuminate (2).

•  The cleaning light and sound will go on when you switch the 

device on. Press the cleaning button to acknowledge that 

the water tank is cleaned, the sound and light to clean will 

turn off (3).

•  Set your desired mist output by pressing the arrows up or 

down. To operate on HIGH, press the arrow up to the highest 

setting (4).

•  Mist will not appear immediately; allow a few minutes for 

the water to fill the reservoir. 

•  When a comfortable humidity level is reached turn Power 

Switch to a lower setting. A comfortable humidity level 

is between 40-60%. To monitor your humidity level use 

a hygrometer such as the Vicks V70 2-in-1 Hygrometer & 

Thermometer (5).

•  The unit will shut off when it is out of water.
  Cleaning affects the time it takes for the auto shut-off to work.  
 

When dirty

 – time delay for auto shut-off takes longer


When clean

 – works appropriately. 

•  Turn the humidifier off before removing and refilling the 

Water Tank. When the Water Tank is empty and the water 

level in the base gets too low, the fan and nebulizer turn off.

VAPOPAD HEATER DIRECTIONS FOR USE 

(see appendix C on page 2)

•   Turn off and unplug your humidifier (1).
•   Open VapoPad door located below the power switch by 

pushing the button (2).

•   Insert VapoPad all the way in with angled end facing 

towards the product in the slot (3). Be careful not to touch 

the VapoPad with your hands (4). If your hands do come in 

contact with the pad, wash them thoroughly, as essential 

oils can be irritant to the skin.

•   Close the door, plug the unit back in and turn it on (5).

Note:

 As long as your humidifier is on, the VapoPad heater will 

also be activated. This area can be warm to the touch.
NEVER add essential oils or VapoPads directly into the water 

tank as this can result in degradation to the material.

WARNING: 


Pad may present a choking hazard. Keep out of reach of children 

and pets. H317 May cause an allergic skin reaction. P102 Keep 

out of reach of children. P302 + P352 IF ON SKIN: wash with 

plenty of soap and water. P333 + P313 If skin irritation or rash 

occurs: Get medical advice / attention.

Ingredients: eucalyptus oil, menthol, glycol, cedar leaf oil & others 

1 menthol VapoPad included.

IMPORTANT SAFETY INSTRUCTIONS 

Read through all the instructions before starting to use 

the appliance. Keep this manual in a safe place for future 

reference.

These instructions are also available on our website.  

Please visit www.helenoftroy.com/emea-en

WARNING: 

  Do not add essential oils to the tank.

•  Unplug the appliance during filling and 

cleaning. 

•  Read all instructions before using this 

humidifier. 

•  Always place this humidifier on a firm, flat 

and level surface. This humidifier may not 

work properly on an uneven surface. 

•  Place this humidifier in an area where it is 

not accessible to children. 

•  Do not place the humidifier near any heat 

sources such as stoves, radiators, and 

heaters. 

•  Do not use the humidifier outdoors.

•  If the supply cord is damaged, it must be 

replaced by the manufacturer, its service 

agent or similarly qualified persons in order 

to avoid a hazard.

•  The appliance can be used by children 

aged from 8 years and above and persons 

with reduced physical, sensory or mental 

capabilities or lack of experience and 

knowledge, if they have been given 

supervision or instruction concerning use of 

this appliance in a safe way and understand 

the hazards involved. Children shall not 

play with the appliance. Cleaning and user 

maintenance shall not be made by children 

without supervision.

•  To disconnect the humidifier, first turn 

controls to the OFF position, then grip the 

plug and pull it from the wall outlet. Never 

pull by the cord. 

•  Never tilt or attempt to move the 

humidifier while it is operating or filled 

with water. UNPLUG the humidifier before 

moving. 

•  This humidifier requires regular cleaning. 

Refer to the CLEANING instructions provided. 

Never clean the humidifier in any manner 

other than as instructed in this manual. 

•  Do not direct moisture flow directly at 

individuals, walls or furniture. 

•  When a humidifier is used in a closed 

room or small rooms, check periodically for 

proper ventilation, as excessive humidity 

can cause condensation stains on walls. 

•  Turn the humidifier OFF if you notice 

moisture on the inside of your windows. For 

proper humidity reading use a hygrometer, 

which is available in many hardware and 

department stores, or by ordering one from 

the manufacturer. 

•  Do not place the product directly on wood 

furniture or other surfaces that could 

be damaged by water or liquids. The 

manufacturer will not accept responsibility 

for property damage caused by spillage or 

leaking.

•  Micro-organisms that may be present in 

the water or in the environment where the 

appliance is used or stored, can grow in 

the water reservoir and be blown in the air 

causing very serious health risks when the 

water is not renewed and the tank is not 

cleaned properly every 3 days.

•  Be aware that high humidity levels may 

encourage the growth of biological 

organisms in the environment.

•  Do not permit the area around the humidifier 

to become damp or wet. If dampness 

occurs, turn the output of the humidifier 

down. If the humidifier output volume 

cannot be turned down, use the humidifier 

intermittently. Do not allow absorbent 

materials, such as carpeting, curtains, drapes, 

or tablecloths, to become damp.

•  Never leave water in the reservoir when the 

appliance is not in use.

•  Empty and clean the humidifier before 

storage. Clean the humidifier before next use.

•  This appliance must only be used with 

the power supply unit provided with the 

appliance.

•  The appliance is only to be used with the 

recommended vaporizing medium. The use 

of other substances may give rise to a toxic 

or fire risk.

ENG

LISH

Summary of Contents for CoolMist VUL565E

Page 1: ...Cool Mist Ultrasonic Humidifier VUL565E ...

Page 2: ...AŽIVAČ 33 Upute za uporabu IT UMIDIFICATORE A ULTRASUONI COOLMIST 38 Istruzioni d uso NL COOLMIST ULTRASONE LUCHTBEVOCHTIGER 43 Gebruiksaanwijzing NO ULTRASONISK LUFTFUKTER 48 Bruksanvisning PL NAWILŻACZ ULTRADŹWIĘKOWY COOLMIST 53 Instrukcja obsługi PT HUMIDIFICADOR ULTRASÓNICO COOLMIST 58 Manual do utilizador SA 67 SE COOLMIST ULTRALJUDSLUFTFUKTARE 68 Bruksanvisning SI HLADILNI ULTRAZVOČNI VLAŽIL...

Page 3: ...2 3 A B C 1 2 3 4 5 6 7 11 8 9 10 12 1 1 1 2 4 3 5 4 2 3 5 5 2 4 3 D E F 1 TSP 5ML 1 8L 1 1 1 6 6 6 8 7 3 3 7 8 2 2 2 5 5 4 3 5 4 4 ...

Page 4: ...poPads directly into the water tank as this can result in degradation to the material WARNING Pad may present a choking hazard Keep out of reach of children and pets H317 May cause an allergic skin reaction P102 Keep out of reach of children P302 P352 IF ON SKIN wash with plenty of soap and water P333 P313 If skin irritation or rash occurs Get medical advice attention Ingredients eucalyptus oil me...

Page 5: ...e Water Sensor with bare fingers as any fingerprints or residue can reduce mist output Do not immerse the Base in water To fill and power ON refer to Operating Instructions see Appendix A and B on page 2 STORAGE Follow cleaning instruction and dry product thoroughly DISPOSAL This appliance complies with EU legislation 2012 19 EU on end of life recycling Products showing the Crossed Through wheeled...

Page 6: ...eit ein angenehmes Niveau erreicht hat Eine Luftfeuchtigkeit von 40 60 wird im Allgemeinen als angenehm empfunden Verwenden Sie zur Messung der Luftfeuchtigkeit ein Hygrometer z B das WICK V70 2 in 1 Hygrometer und Thermometer 5 Schalten Sie den Luftbefeuchter aus bevor Sie den Wasserbehälter abnehmen und wieder auffüllen Wenn der Wasserbehälter leer ist und der Wasserstand im Unterteil zu weit si...

Page 7: ...en Tuch ab um gelöste Kalkablagerungen zu entfernen 8 Spülen Sie Wasserreservoir und Behälter aus bis der Essiggeruch verschwunden ist Es darf auf keinen Fall Wasser in die Lüftungsschlitze an der Rückseite der Basis oder an den Netzschalter gelangen Tauchen Sie die Basis KEINESFALLS in Wasser Wischen Sie das Reservoir vorsichtig mit einem sauberen weichen und angefeuchteten Tuch ab Verwenden Sie ...

Page 8: ...ikker brug af apparatet og forstår de dermed forbundne farer Børn må ikke lege med apparatet Rengøring og vedligeholdelse må ikke udføres af børn med mindre de er under opsyn Når du vil frakoble befugteren skal du først dreje betjeningsknappen til positionen OFF og derefter tage fat i stikket og trække det ud af stikkontakten Træk aldrig i ledningen Vip aldrig eller forsøg ikke at flytte befugtere...

Page 9: ...er i mere end 16 timer over en 24 timers periode og eller ikke mere end 2 puder over en 24 timers periode ANVISNINGER PÅ VEDLIGEHOLDELSE OG RENGØRING RENGØRING HVER 3 DAG Se appendiks D på side 3 Hver gang enheden tændes eller hver 3 dag vil rengøringsfunktionen lyse og bippe hvert 5 sekund for at minde brugeren om at rengøring er nødvendig Tryk på rengøringsindikatoren for at bekræfte at vandtank...

Page 10: ...NGERNE I GARANTIEN FORSØG IKKE SELV AT REPARERE BEFUGTEREN DETTE VIL MEDFØRE AT GARANTIEN BORTFALDER OG KAN FORÅRSAGE MATERIELLE SKADER ELLER PERSONSKADER Produktet er CE mærket og fremstillet i overensstemmelse med direktivet om elektromagnetisk kompatibilitet 2014 30 EU lavspændingsdirektivet 2014 35 EU RoHS direktivet 2009 125 EU og direktivet om energirelaterede produkter 2009 125 EU De teknis...

Page 11: ...a en cuenta los siguientes puntos antes de usar el humidificador por primera vez Retire todo el material de embalaje del humidificador Es recomendable que desinfecte el humidificador antes del primer uso Consulte las instrucciones de limpieza Elija una ubicación firme y nivelada situada como mínimo a 15 cm de la pared para garantizar una buena ventilación Coloque el humidificador en una superficie...

Page 12: ...ine cualquier resto de agua de él 4 Si los accesorios están instalados sáquelos y resérvelos NO limpie los accesorios ya que podrían dañarse Limpie minuciosamente el humidificador semanalmente con una solución de lejía y agua 5 ml de lejía en 1 8 litros de agua Rellene el depósito de agua parcialmente con esta solución 5 No lo toque durante 20 minutos 6 y a continuación agite con fuerza durante un...

Page 13: ...enkilön on vaihdettava se vaaratilanteiden välttämiseksi Tätä laitetta saavat käyttää myös vähintään 8 vuotiaat lapset sekä henkilöt joiden henkinen tai ruumiillinen suorituskyky on heikentynyt tai joilla ei ole kokemusta ja tietoa sen käytöstä jos heitä valvotaan tai he ovat saaneet opastusta laitteen turvallisesta käytöstä ja he ymmärtävät siihen liittyvät vaarat Lapset eivät saa leikkiä laittee...

Page 14: ...Jos ilmenee ihoärsytystä tai ihottumaa Hakeudu lääkäriin P333 P313 Ainesosat eukalyptusöljy mentoli glykoli setripuunöljy ja muita Mukana 1 VapoPad mentolityyny 36m Ei saa käyttää alle 36 kuukautta vanhoille vauvoille yli 16 tuntia 24 tunnin aikana ja tai enempää kuin kaksi tyynyä 24 tunnin aikana HOITO JA PUHDISTUSOHJEET PUHDISTUS 3 PÄIVÄN VÄLEIN Katso liite D sivulta 3 Aina kun laite kytketään p...

Page 15: ...ttujen ohjeiden mukaisesti siirtyy ostajalle Ostajan tai käyttäjän on itse arvioitava milloin ja kuinka kauan laitetta voi käyttää HUOMAUTUS JOS ILMANKOSTUTTIMEN KÄYTTÄMISESSÄ ILMENEE ONGELMIA KATSO TAKUUSTA OHJEITA ÄLÄ YRITÄ KORJATA ILMANKOSTUTINTA ITSE TÄMÄ MITÄTÖI TAKUUN JA VOI AIHEUTTAA AINEELLISIA TAI HENKILÖVAHINKOJA Tässä tuotteessa on CE merkintä ja se on valmistettu sähkömagneettisuutta k...

Page 16: ...cessaire pour l arrêt automatique est plus long Lorsque l appareil est nettoyé la fonction d arrêt automatique fonctionne correctement MODE D EMPLOI DU DIFFUSEUR DE VAPOPADS voir annexe C page 2 Éteindre et débrancher l humidificateur 1 Enlever le cache d accès au VapoPad situé sous le bouton marche arrêt en appuyant sur le bouton 2 Insérer la tablette VapoPad jusqu au bout L extrémité courbée doi...

Page 17: ...ir annexes A et B page 2 DÉSINFECTION HEBDOMADAIRE Voir Annexe F à la page 3 Débrancher l appareil de l alimentation secteur avant le nettoyage 1 Soulever le réservoir d eau de sa base 2 et vider toute l eau du réservoir 3 Retirer le bouchon du réservoir et vider l eau 4 Si des accessoires sont montés sur l appareil retirer les accessoires et les mettre de côté NE PAS nettoyer les accessoires Cela...

Page 18: ...e oštećen mora ga zamijeniti proizvođač serviser ili druga kvalificirana osoba kako bi se izbjegla opasnost Uređaj smiju upotrebljavati djeca u dobi od 8 godina ili starija i osobe smanjenih fizičkih osjetilnih ili mentalnih sposobnosti ili kojima nedostaje iskustva i znanja ako su pod nadzorom ili su upućene u sigurnu upotrebu ovog uređaja i svjesne su povezanih opasnosti Djeca se ne smiju igrati...

Page 19: ... Može izazvati alergijsku reakciju na koži P102 Čuvati izvan dohvata djece U slučaju dodira s kožom P302 P352 Oprati velikom količinom sapuna i vode P333 P313 U slučaju nadražaja ili osipa na koži zatražiti savjet pomoć liječnika Sastojci ulje eukaliptusa mentol glikol ulje lista cedra i drugi Uključen je 1 mirisni jastučić s mentolom VapoPad 36m Nemojte upotrebljavati za djecu mlađu od 36 mjeseci...

Page 20: ...liko dugo upotrebljavati uređaj NAPOMENA AKO IMATE POTEŠKOĆA S OVLAŽIVAČEM POTRAŽITE UPUTE U JAMSTVU NEMOJTE POKUŠATI SAMI POPRAVITI OVLAŽIVAČ TO ĆE PONIŠTITI JAMSTVO I MOŽE PROUZROČITI OŠTEĆENJA ILI OZLJEDE Ovaj proizvod nosi oznaku CE i proizveden je u skladu s Direktivom 2014 30 EU o elektromagnetskoj kompatibilnosti Direktivom2014 35 EUoniskomnaponu Direktivom2011 65 EU o ograničenju uporabe o...

Page 21: ...ore Serbatoio pulito tempo di attivazione corretto ISTRUZIONI PER L USO DEL TERMOVENTILATORE VAPOPAD vedi Appendice C a pagina 2 Spegnere e scollegare l umidificatore 1 Aprire lo sportello del VapoPad che si trova sotto l interruttore premendo il pulsante 2 Inserire VapoPad completamente all interno della fessura con l estremità ad angolo rivolta verso il prodotto 3 Fare attenzione a non toccare i...

Page 22: ...F a pagina 3 Scollegare dalla rete elettrica prima della pulizia 1 Sollevare il serbatoio dell acqua dalla base 2 e svuotare tutta l acqua presente nel contenitore 3 Rimuovere il tappo del serbatoio e svuotare il serbatoio dell acqua 4 Se gli accessori sono installati rimuoverli e conservarli NON pulire gli accessori La pulizia danneggia gli accessori Pulire accuratamente l umidificatore ogni sett...

Page 23: ...at niet bereikbaar is voor kinderen Zet de luchtbevochtiger niet in de buurt van warmtebronnen zoals fornuizen radiatoren en kachels Gebruik de luchtbevochtiger niet in de openlucht Als de stroomkabel is beschadigd moet deze om gevaar te voorkomen worden vervangen door de fabrikant een onderhoudstechnicus daarvan of een vergelijkbare gekwalificeerde persoon Dit apparaat kan worden gebruikt door ki...

Page 24: ...EBRUIKSAANWIJZINGEN VOOR DE VAPOPAD VERWARMER zie bijlage C op pagina 2 Schakel de luchtbevochtiger uit en trek de stekker uit het stopcontact 1 Open het klepje voor de Vapopad onder de aan uit schakelaar door op de knop te drukken 2 Leg de VapoPad met het puntig uiteinde naar het product gericht in de sleuf 3 Raak de VapoPad niet met uw handen aan 4 Als uw handen toch in contact komen met de Vapo...

Page 25: ...ng Deze garantie vervalt als het apparaat wordt geopend als er met het apparaat wordt geknoeid als het apparaat met andere onderdelen of accessoires wordt gebruikt of als er reparaties door niet geautoriseerde personen worden uitgevoerd Accessoires en verbruiksartikelen vallen niet onder de garantie Wanneer u hulp nodig hebt ga naar www helenoftroy com emea en support of gebruik de contactgegevens...

Page 26: ...tputen også være på Dette området kan være varmt Ha ALDRI eteriske oljer eller VapoPads duftputer direkte i vanntanken da dette kan føre til forringelse av materialet ADVARSEL Kan utgjøre en kvelningsfare Må holdes utenfor rekkevidden til barn og dyr Kan forårsake en allergisk hudreaksjon P102 VIKTIGE SIKKERHETSINSTRUKSJONER Les alle instruksjoner før du tar apparatet i bruk Legg denne håndboken p...

Page 27: ...kket og tøm alt vannen fra vanntanken 4 Hvis tilbehør er installert fjern tilbehører og sett det til side IKKE rengjør tilbehør Dette vil skade tilbehøret Rengjør luftfukteren hver uke med en løsning av klor og vann 5 ml klor i 1 8 liter vann Fyll vanntanken delvis med denne løsningen 5 La stå i tyve 20 minutter 6 og rist kraftig annenhvert minutt Tøm og skyll med rent vann til klorlukten er borte...

Page 28: ...czeń Uszkodzonyprzewódzasilaniamusizostać wymienionyprzezproducenta autoryzowany serwisproducentalubosobyoodpowiednich kwalifikacjach abyzapobiecporażeniu prądem Urządzenie może być używane przez dzieci w wieku od 8 lat oraz osoby o ograniczonych zdolnościach fizycznych sensorycznych lub umysłowych albo nieposiadające odpowiedniej wiedzy ani doświadczenia o ile są pod nadzorem lub otrzymały instru...

Page 29: ...ywa więcej czasu Gdy urządzenie jest czyste funkcja wyłączania działa prawidłowo INSTRUKCJA UŻYTKOWANIA PODGRZEWACZA WKŁADÓW VAPOPAD patrz załącznik C na stronie 2 Wyłącz nawilżacz i odłącz go od zasilania 1 Otwórz znajdującą się pod pokrętłem mocy pokrywę pojemnika na wkładki VapoPad naciskając przycisk 2 Wsuń wkładkę VapoPad do końca ściętym końcem skierowanym w stronę szczeliny na urządzeniu 3 ...

Page 30: ...ncji Akcesoria i materiały eksploatacyjne nie są objęte gwarancją Aby uzyskać pomoc techniczną należy odwiedzić witrynę www helenoftroy com emea en support lub skorzystać z danych kontaktowych serwisów na końcu instrukcji obsługi Niniejsza gwarancja obowiązuje wyłącznie w Europie Rosji na Bliskim Wschodzie i w Afryce Numery LOT i SN urządzenia są wydrukowane na etykiecie znamionowej na opakowaniu ...

Page 31: ...ra a função de desligar automático é maior Quando está limpo funciona adequadamente INDICAÇÕES DE UTILIZAÇÃO DO AQUECEDOR VAPOPAD ver o Anexo C na página 2 Desligue o humidificador e retire a ficha da tomada 1 Abra a porta do VapoPad localizada por baixo do interruptor de alimentação pressionando o botão 2 Insira o VapoPad até ao fim com a extremidade em ângulo virada para o produto dentro da ranh...

Page 32: ... Para encher e ligar a alimentação consulte as Instruções de Funcionamento ver o Anexo A e B na página 2 DESINFEÇÃO SEMANAL Consulte o Anexo F na página 3 Desligue a unidade da rede elétrica antes de limpar 1 Levante o depósito de água da base 2 e elimine toda a água do reservatório 3 Retire a tampa do depósito e drene a água do depósito de água 4 Se tiver acessórios instalados retire os acessório...

Page 33: ...mento ou desligue o humidificador Acumulação de resíduos minerais pó branco Foi utilizada água dura Utilize água destilada O indicador de limpeza e o sinal sonoro estão sempre ativos É normal que o sinal sonoro e a luz sejam ativados sempre que ligar a unidade para indicar que o humidificador tem de ser limpo regularmente Após realizar as orientações indicadas no manual do proprietário limpe profu...

Page 34: ...ة 2 الصفحة في ب ا ً ي أسبوع الكلسية القشور إزالة 3 الصفحة في E الملحق انظر 1 التنظيف قبل الكهربائية الطاقة مصدر عن الجهاز افصل الموجود الماء كل وأفرغ 2 القاعدة عن الماء خزان ارفع من ماء أي وتصريف الخزان غطاء بإزالة قم 3 الوعاء في ثم ورطبة ناعمة قماش بقطعة بمسحه وقم 4 الماء خزان استخدام كل بعد الفاتر بالماء الماء خزان اشطف إلى ف ّ ف المخ غير المقطر األبيض الخل من لتر 0 5 ف ِ أض محلول ورج موضعه إلى ...

Page 35: ...ر المؤشر على اضغط مالحظة أيام ثالثة كل أو الجهاز بتشغيل فيها تقوم مرة كل في تنظيفه التذكير تعيين إعادة بعدها وسيتم والمصباح الصوت تشغيل عند أيام ثالثة كل الجهاز بتنظيف الماء نفاد عند الوحدة تشغيل إيقاف سيتم يعمل حتى التلقائي اإليقاف يستغرقه الذي الوقت على النظافة تؤثر الزمني التأخير سيستغرق متسخة الوحدة تكون عند أطول ا ً ت وق التلقائي لإليقاف سليم نحو على التلقائي اإليقاف سيعمل نظيفة الوحدة تكون ع...

Page 36: ...luftfuktaren är påslagen Ytan kan vara varm att vidröra Tillsätt ALDRIG essensoljor eller VapoPad doftkuddar direkt i vattenbehållaren eftersom det kan leda till försämring av materialet VARNING Dynan kan utgöra en kvävningsrisk Förvara på behörigt avstånd från barn och husdjur Kan orsaka allergisk hudreaktion H317 Förvaras oåtkomligt för barn P102 Vid hudkontakt Tvätta med mycket tvål och vatten ...

Page 37: ... 4 Om tillbehör är installerade ta bort tillbehören och lägg dem åt sidan Rengör INTE tillbehören Det kommer att skada tillbehören Rengör luftfuktaren noggrant varje vecka med en lösning av blekmedel och vatten 5 ml blekmedel i 1 8 liter vatten Fyll vattentanken delvis med denna lösning 5 Låt stå i tjugo 20 minuter 6 och skaka kraftigt med några minuters mellanrum Töm och skölj med rent vatten til...

Page 38: ...ičnimi senzoričnimi ali psihičnimi sposobnostmi ter osebe s pomanjkanjem izkušenj in znanja če so bili deležni nadzora in navodil glede varne uporabe naprave ter se zavedajo nevarnosti do katerih lahko nepravilna uporaba vodi Naprava ni namenjena otroški igri Čiščenje in vzdrževanje naprave ne sme biti prepuščeno otrokom brez nadzora Če želite odklopiti vlažilec zraka upravljalnik najprej obrnite ...

Page 39: ...VODNEGAKAMNA glej dodatek D na strani 3 ČIŠČENJE NA VSAKE 3 DNI glej dodatek D na strani 3 Vsakič ko se naprava vklopi ali vsake 3 dni se zasveti funkcija čiščenja in piska vsakih 5 sekund da uporabnika opozori na zahtevano čiščenje Pritisnite indikator čiščenja da potrdite da je posoda za vodo očiščena Opomnik za čiščenje naprave se bo ponovno nastavil Lučka in zvočni signal se izklopita Če čišče...

Page 40: ...IH POŠKODB Ta izdelek nosi oznako CE in je izdelan v skladu z elektromagnetno direktivo 2014 30 EU direktivo o nizki napetosti 2014 35 EU direktivo RoHS 2011 65 EU in direktivo o energetskih izdelkih 2009 125 ES Tehnične specifikacije se lahko spremenijo VUL565E 220 240V 50 60Hz 25W SLOVENŠČINA ODPRAVLJANJE TEŽAV TEŽAVA MOŽEN VZROK KOREKTIVNI UKREPI Stikalo za vklop je v položaju On Vklopljeno luč...

Page 41: ...ak gelebilir Malzemenin bozulmasına neden olabileceğinden esansları veya VapoPad leri KESİNLİKLE doğrudan su tankına eklemeyin UYARI Ped boğulma tehlikesi yaratabilir Çocukların ve evcil hayvanların erişemeyeceği yerlerde tutun Alerjik cilt reaksiyonuna neden olabilir H317 Çocukların erişemeyeceği yerlerde saklayın P102 Cilt üzerindeyse Bol miktarda sabun ve suyla yıkayın P302 P352 ÖNEMLİ GÜVENLİK...

Page 42: ...e su çözeltisi kullanarak 1 8 litre su 5 ml ağartıcı nemlendiriciyi bütünüyle temizleyin Tankı bu çözelti ile tamamen doldurun 5 Her birkaç dakikada bir güçlü bir biçimde sallayarak 20 dakika bekletin 6 Boşaltın ve ağartıcı kokusu gidene kadar temiz su ile durulayın 7 Hazneyi çözeltide ıslatılmış yumuşak bir bez ile silin Devam etmeden önce alanı iyice durulayın 8 Nebülizör çevresinde mineral biri...

Page 43: ...imatlara uygun şekilde temizleyin Su Haznesi deterjanla yıkanmış Temiz suyla iyice durulayın Silerek kurulayın Su seviyesi çok düşük Su Haznesine su ekleyin Nebulizör veya fan çalışmıyor Garantiye bakın Nemlendiricinin ve pencerelerin etrafında yoğuşma oluyor Buhar yoğunluğu oda boyutuna fazla geliyor ya da mevcut nem düzeyi yüksek Buhar çıkış düzeyini azaltın ya da nemlendiriciyi kapatın Mineral ...

Page 44: ...3 Greece 30 211 180 94 56 Hungary 36 06 1 429 2216 Iceland 35 852 07 900 Ireland The Republic of 353 0 1 525 1809 Israel 1 800250221 Italy 39 02 3859 1183 Jordan 962 6 582 0112 3 4 5 Kuwait 965 1 88 55 22 Lebanon 961 1 696 999 Netherlands 31 0 78 201 8001 Norway 47 23 50 01 20 Poland 48 22 512 39 02 Portugal 351 21 060 8045 Qatar 974 4437 3644 Romania 40 213 520 167 Saudi Arabia 966 3 8692244 West...

Page 45: ...r matte text Minimum 80 gloss or matte text cover Page Count 88 Revision 2 Date 15JUL21 Release Date 29JUL21 Re release Date Special Instructions Colors Dielines Do not print Spot Colors Quality Requirement of Artwork and Quality Clarification Process of Artwork Printing Meet Eng QS 06 02 Cyan 0 Magenta 0 Yellow 0 Black 100 PMS XXXX PMS XXXX Helen of Troy Creative Services Marlborough MA 01752 USA...

Reviews: