40
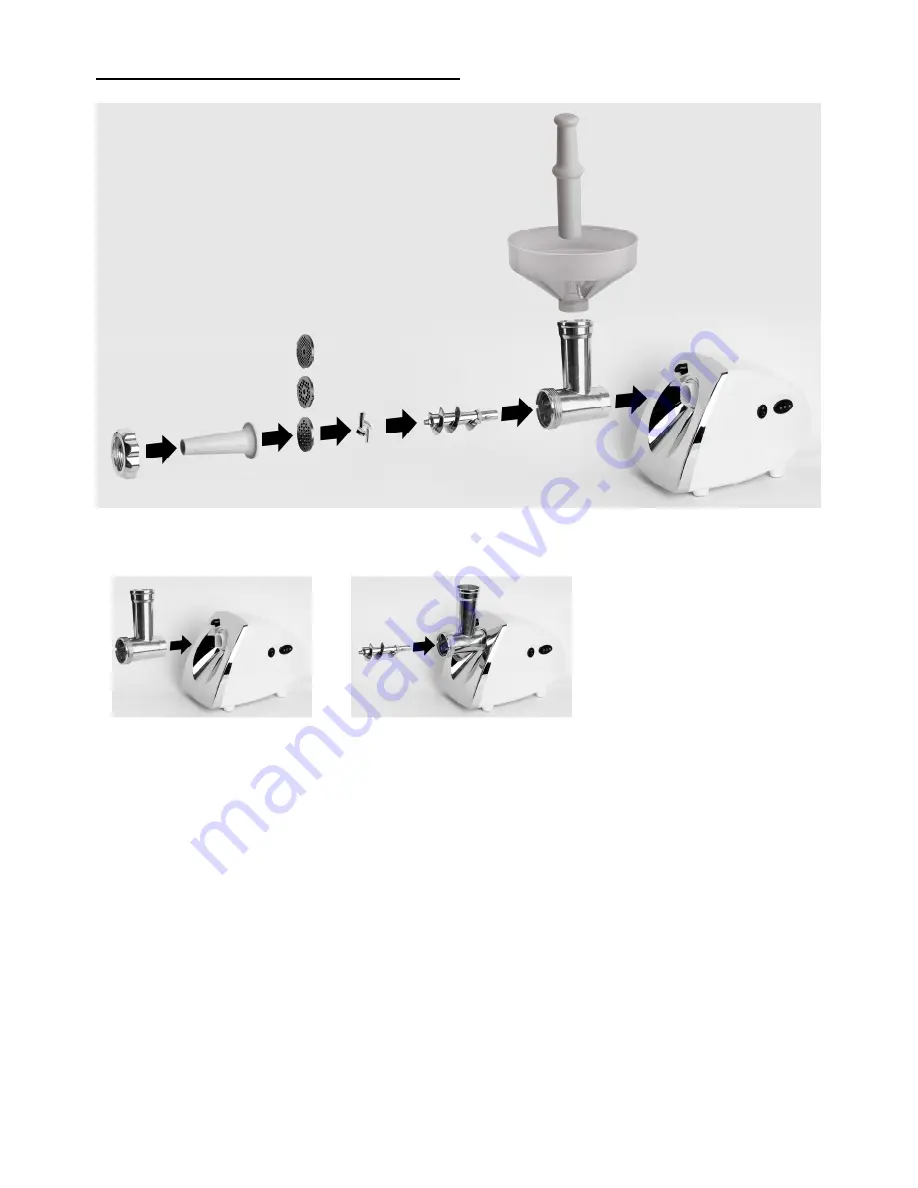
Assembling accessories for Sausages
Please follow the instructions below.
1.
Put the milling tube (6) in the inlet (5) on the main unit.
2.
Place and fit the metal feed screw (7) inside the milling tube (6).
Page 1: ...28 2 in 1 Electric Tomato Juicer Meat Grinder Model No THMGC500A Ref No 876 4409 INSTRUCTIONS MANUAL ...
Page 2: ...ver pull the cord to disconnect it 7 Do not use the cord as a handle 8 Do not let the cable resting on a hot surface or hanging on the edge of the table 9 Never wind the power cord around the motor unit after use as the high temperature of the motor may cause damage to the power cord 10 Do not use any accessories not recommended by the manufacturer It may cause injury and device destruction 11 Do ...
Page 3: ...r use the appliance if the accessories are not installed properly 35 Do not use the appliance if any accessory or damaged If any accessory is damaged be sure to replace it before using again the appliance 36 When the milling procedure is over check if the cutter blade cutting plate or the feed screw is damaged In this case there are probably pieces of the metal or plastic into the material that yo...
Page 4: ... The appliances are not intended to be operated by means of an external timer or separate remote control system WARNING This appliance is not intended for use by persons including children with reduced physical sensory or mental capabilities or lack of experience and knowledge unless they have been given supervision or instruction concerning use of the appliance by a person responsible for their s...
Page 5: ...ever place the appliance on a soft surface 6 Before using the device unfold the cord completely and make sure that it does not show any signs of damage 7 Ensure that the main voltage rating of your power supply corresponds to the voltage requirements of the appliance 8 Make sure that all parts of the device are properly mounted before using the appliance 9 After unit transportation or storage unde...
Page 6: ...ew metal 8 Feed screw plastic 9 Juicing strainer metal 10 Bracket for the plastic feet screw and metal juicing strainer 11 Regulator for peels juice separation 12 Exit spout for peels and spores 13 Nut 14 Juice collector tray 15 Bracket cover 16 Feed hopper 17 Food pusher 18 Cutter Blade 19 Cutting Plate 3 pcs for fine medium coarse cut 20 Sausage stuffer adaptor 21 Kubbe attachment ...
Page 7: ...on Normal Function Juicing Grinding Both switches ON R Switch and ON 0 R Switch should be in position ON for Normal Function Reverse Function This function is used ONLY for removing obstructions that appear during processing of food Never use the reverse function continuously or for long time Both switches ON R Switch and ON 0 R Switch should be in position R for Reverse Function ...
Page 8: ...iance is in operation Assembling the milling tube Put the milling tube 6 in the inlet 5 and turn it counterclockwise to lock in position Warning Install the milling tube properly a misplaced milling tube will result in a not sufficient type of milling quality and may cause weakening or damage to other accessories Disassembling the milling tube Press the release button 4 to unlock and turn the mill...
Page 9: ...in unit 2 Place and fit the metal feed screw 7 inside the milling tube 6 3 Place and fit the plastic feed screw 8 as an extension of the metal feed screw 7 4 Place the metal juicing strainer 9 inside the bracket 10 5 Put the bracket 10 on the milling tube 6 and make sure the plastic feed screw 8 is located inside the strainer ...
Page 10: ...the Juice collector tray 14 on the bracket 10 8 Put the bracket cover 15 on the bracket 10 9 Put the feed hopper 16 on the top of the milling tube 6 10 The appliance is ready for use Note For disassembling please use the above instructions in reverse order after you make sure the appliance is not connected to the power supply and is cooled down ...
Page 11: ...38 Assembling Meat Grinder accessories Please follow the instructions below 1 Put the milling tube 6 in the inlet 5 on the main unit 2 Place and fit the metal feed screw 7 inside the milling tube 6 ...
Page 12: ...fine medium coarse cut Use the cutting plate according to the desired result you need Warning Face the cutter blade cutting side to the cutting plate If the cutter blade is installed improperly it will not grind the food Warning Do not ever place 2 or 3 cutting plates together on the appliance 6 Put the feed hopper 16 on the top of the milling tube 6 7 The appliance is ready for use Note For disas...
Page 13: ...40 Assembling accessories for Sausages Please follow the instructions below 1 Put the milling tube 6 in the inlet 5 on the main unit 2 Place and fit the metal feed screw 7 inside the milling tube 6 ...
Page 14: ... 3pcs of cutting plates which are proper for fine medium coarse cut Use the cutting plate according to the desired result you need Warning Face the cutter blade cutting side to the cutting plate If the cutter blade is installed improperly it will not grind the food Warning Do not ever place 2 or 3 cutting plates together on the appliance 7 Put the feed hopper 16 on the top of the milling tube 6 8 ...
Page 15: ...42 Assembling accessories for kubbe Please follow the instructions below 1 Put the milling tube 6 in the inlet 5 on the main unit 2 Place and fit the metal feed screw 7 inside the milling tube 6 ...
Page 16: ...ies at the edge of the milling tube 6 Warning Do not over tighten 5 Put the feed hopper 16 on the top of the milling tube 6 6 The appliance is ready for use Note For disassembling please use the above instructions in reverse order after you make sure the appliance is not connected to the power supply and is cooled down ...
Page 17: ...BLY paragraph and make sure that all parts are installed correct and there is nothing blocking the ventilation openings on the main unit 4 Place a suitable bowl under the milling tube 6 5 Place a suitable bowl under the exit spout for peels and spores 12 6 Connect the power cord of the appliance to the power supply 7 Add the tomato pieces in the feed hopper 16 8 Press ON R Switch in position ON an...
Page 18: ...and use the reverse function by pressing both switches to position R in order to remove the obstruction before starting again If the obstruction is not removed please switch off the appliance disconnect from power supply disassemble the accessories and remove the obstruction WARNING Do not run the appliance for more than 10 minutes continuously After 10 minutes of continuous use switch OFF the app...
Page 19: ...SEMBLY paragraph and make sure that all parts are installed correct and there is nothing blocking the ventilation openings on the main unit 4 Place a suitable bowl under the milling tube 6 5 Connect the power cord of the appliance to the power supply 6 Add the meat slices in the feed hopper 16 7 Press ON R Switch in position ON and also ON 0 R Switch in position ON so that the appliance will start...
Page 20: ...he appliance wait till the screw stops rotating and use the reverse function by pressing both switches to position R in order to remove the obstruction before starting again If the obstruction is not removed please switch off the appliance disconnect from power supply disassemble the accessories and remove the obstruction WARNING Do not run the appliance for more than 10 minutes continuously After...
Page 21: ...cess follow the instructions below in order to use the appliance 1 Make sure the appliance is not connected to the power supply 2 Put the appliance on a flat and stable surface 3 Assemble the accessories for sausages and the feed hopper 16 on the appliance according to the instructions of the ASSEMBLY paragraph and make sure that all parts are installed correct and there is nothing blocking the ve...
Page 22: ...od stops the screw and blade rotation immediately switch OFF the appliance wait till the screw stops rotating and use the reverse function by pressing both switches to position R in order to remove the obstruction before starting again If the obstruction is not removed please switch off the appliance disconnect from power supply disassemble the accessories and remove the obstruction WARNING The mi...
Page 23: ...cted to the power supply 2 Put the appliance on a flat and stable surface 3 Assemble the kubbe attachment and the feed hopper 16 on the appliance according to the instructions of the ASSEMBLY paragraph and make sure that all parts are installed correct and there is nothing blocking the ventilation openings on the main unit 4 Place a suitable bowl under the milling tube 6 5 Connect the power cord o...
Page 24: ...e of food stops the screw and blade rotation immediately switch OFF the appliance wait till the screw stops rotating and use the reverse function by pressing both switches to position R in order to remove the obstruction before starting again If the obstruction is not removed please switch off the appliance disconnect from power supply disassemble the accessories and remove the obstruction WARNING...
Page 25: ... 13 14 15 16 17 18 19 20 21 Wash all accessories with warm not hot soapy water using a dish cloth Rinse thoroughly to remove any soapy residue Dry all accessories IMMEDIATELY right after washing and rinsing Note Gently grease the cutting plates 19 and the cutter blade 18 with cooking oil after washing and drying and keep them in this way so as to protect them from rust Do not put the accessories i...
Page 26: ...ECYCLING OF USED ELECTRICAL OR ELECTRONIC APPLIANCES This marking indicates that this product should not be disposed with other household wastes throughout EU To prevent possible harm to the environment or human health from uncontrolled waste disposal recycle it responsibly to promote the sustainable reuse of material resources To return your used device please use the return and collection system...