
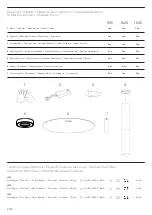


6/15
1
EN
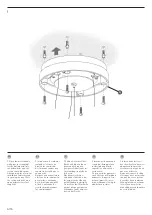
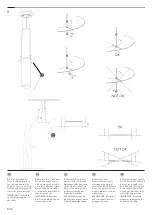
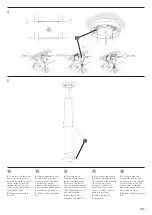
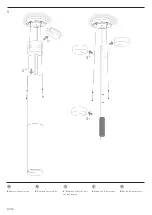
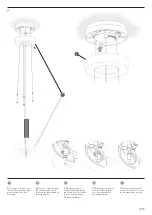
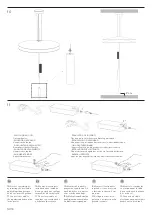
1.
Place the most suitable
wall plugs (not supplied)
for the wall material into
the drilled holes and the
screws that will be used.
After passing the electrical
installation cable through
its opening, fix tray (A) to
the ceiling using the most
appropriate screws (not
supplied).
IT
1.
Inserire nei fori praticati
i tasselli di fissaggio (non
inclusi) più adatti alla
superficie e alla vite che
verrà usata.
Dopo aver fatto passare il
cavo elettrico dell’impianto
attraverso l’apposito foro,
fissare il piatto (A) al so-
ffitto, utilizzando le viti più
adatte (non incluse).
ES
1.
Introducir en los taladros
realizados los tacos de
fijación (no suministra-
dos) más adecuados a su
superficie y tornillo que se
vaya a usar.
Después de pasar el cable
eléctrico de su instalación
por el orificio destinado
a ello, fijar la bandeja (A)
al techo, utilizando los
tornillos más adecuados
(no suministrados).
FR
1.
Insérez dans les trous
des chevilles (non fournies)
adaptées à la nature de
votre mur et au type de vis
que vous utiliserez.
Après avoir passé le câble
électrique de votre installa-
tion par l'encoche prévue
à cet effet, fixez le plateau
(A) au plafond, en utilisant
les vis (non fournies) les
mieux adaptées à la nature
de votre plafond.
D
1.
Führen Sie für die Ober-
fläche und die von Ihnen
genutzten Schrauben
geeignete Dübel (nicht im
Lieferumfang) in die Bohr-
löcher ein.
Nachdem Sie Ihr Ans-
chlusskabel durch die da-
für vorgesehene Öffnung
geführt haben, befestigen
Sie die Scheibe (A) mithilfe
der am besten geeigneten
Schrauben (nicht mitgelie-
fert) an der Decke.


