background image

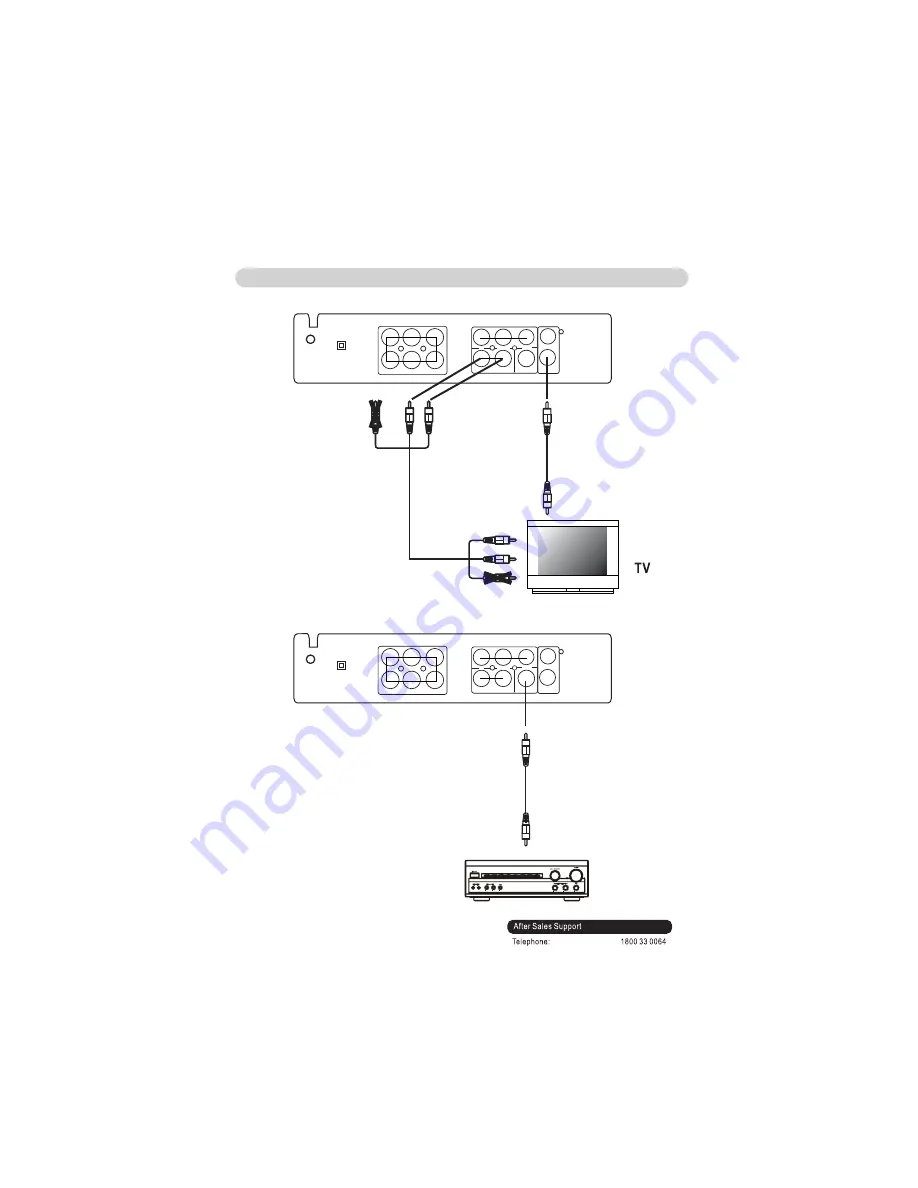
CONNECTION TO S-VIDEO/COAXIAL AUDIO OUTPUT JACKS 

-240V~

/ Hz

100

50 60

S

L

FL

CEN

SW

FR

SR

Y

P /

b Cb

VIDEO

L

R

S VIDEO

-

P /

r Cr

COAXIAL

-

-

AUDIO

Connection to TV through S-Video Output Jack ( S - Video Connection cable NOT included ):

-240V~

/ Hz

100

50 60

S

L

FL

CEN

SW

FR

SR

Y

P /

b Cb

VIDEO

L

R

S VIDEO

-

P /

r Cr

COAXIAL

-

-

AUDIO

Connection to External Amplifier (with built-in decoder) through Coaxial Output Jack 

( Coaxial Connection cable NOT included):

External Amplifier with built-in decoder

White

Red

Ye

llo

w

White

Red

Yellow

Note:

Audio Left = white,

Audio Right = red.

AV Cable

15

Summary of Contents for VIA51HT

Page 1: ...A ...

Page 2: ... ...

Page 3: ...Version April 2013 ...

Page 4: ...VIANO April 2013 version 1 0 ...

Page 5: ......

Page 6: ......

Page 7: ...led or defeated Avoid direct exposure to beam FCC NOTICE This equipment has been tested and found to comply with the limits for a Class B digital device pursuant to part 15 of the FCC Rules These limits are designed to provide reasonable protection against harmful interference in a residential installation This equipment generates uses and can radiate radio frequency energy and if not Installed an...

Page 8: ...ty If the provided plug does not fit into your outlet consult an electrician for replacement of the obsolete outlet Protect the power cord from being walked on or pinched particularly at plugs convenience receptacles and the point where they exit from the apparatus Only use attachments accessories specified by the manufacturer Do not install near any heat sources such as reaiators heat registers s...

Page 9: ... to perform safety checks to determine that the product is in proper operational condition 23 Wall or ceiling mounting The product should be mounted to a wall or ceiling only as recommended by the manufacturer 24 Damage requiring service Unplug this product from the wall outlet and refer service to qualified service personnel under the following conditions a When the power supply cord or plug is d...

Page 10: ...on a warm day Drops of water form on the outside of the glass In the same way moisture may condense on the optical pick up lens inside this unit one of the most crucial internal parts of the DVD player Moisture condensation occurs during the following cases When you bring the DVD player directly from a cold place to a warm place When you use the DVD player in a room where you just turned on the he...

Page 11: ...9 4 ...

Page 12: ...ut jack AUDIO Composite output jacks COAXIAL Digital audio output jack S VIDEO output jack AC Cord 7 HDMI 8 POWER 9 8 REMOTE RECEIVER 10 7 8 L R S VIDEO CAUTION CLASS 1 LASER PRODUCT SL FL CEN SW FR SR HDMI AUDIO AC 100 240V 50 60Hz 5 1 AUDIO OUTPUT Pb Cb Y Pr Cr VIDEO MODEL NO VIA51HT POWER SUPPLY AC 100 240V 50 60Hz POWER CONSUMPTION 20W MADE IN CHINA COAXIAL N1852 ON OFF POWER 4 9 ...

Page 13: ... 5 1 Audio Input jacks 4 5 6 Audio Output jacks POWER ON OFF switch Power cord HOME THEATRE SYSTEM 2 3 4 5 6 5 1 CHANNEL HOME THEATER SYSTEM WITH DVD PLAYER MODEL NO VIA51HT POWER SUPLY AC 100 240 50 60Hz POWER CONSUMPTION 20W MADE IN CHINA AC 100 240V 50 60Hz N1852 11 ...

Page 14: ...XT 16 OPEN CLOSE 17 MUTE 18 PROG Program 19 LANGUAGE 20 SUBTITLE 21 ZOOM 22 TITLE 23 A B 24 VOL Volume Up 25 MENU 26 VOL Volume Down 27 SLOW 28 L R Left Right channel 29 ENTER 30 STOP 31 PAUSE 32 PLAY 33 FWD Fast Forward Search 34 REV Reverse Search 35 OSD On Screen Display 36 CLEAR REMOTE CONTROL 11 12 13 14 15 6 3 5 3 1 2 3 4 5 6 7 8 9 10 31 32 33 16 17 18 19 20 21 22 23 24 25 26 27 28 29 30 34 ...

Page 15: ...BATTERY INSTALLATION REMOTE CONTROL directions Remote Control ment as the figure on right and the polarity markin battery door and lift it off 2 Install two 2 xAAA size 13 ...

Page 16: ...low White Red Yellow Note Audio Left white Audio Right red Note Video yellow Audio Left white Audio Right red CONNECTION TO TV THROUGH AV YUV OUTPUT JACKS Video Connection cable included YUV Connection cable NOT included Y P b Cb Pr Cr connection cable not included 240V Hz 100 50 60 SL FL CEN SW FR SR Y P b Cb VIDEO L R S VIDEO P r Cr COAXIAL AUDIO 14 ...

Page 17: ... Jack S Video Connection cable NOT included 240V Hz 100 50 60 SL FL CEN SW FR SR Y P b Cb VIDEO L R S VIDEO P r Cr COAXIAL AUDIO Connection to External Amplifier with built in decoder through Coaxial Output Jack Coaxial Connection cable NOT included External Amplifier with built in decoder White Red Yellow White Red Yellow Note Audio Left white Audio Right red AV Cable 15 ...

Page 18: ...Theatre System as Fig 1 below by the supplied Audio Connection cables 2 Connect the 5 Stella Speakers to the Home Theatre System main unit as Fig 2 below 3 You can also connect the external TV or Audio Player to the 2 1 input jacks on the Home Theatre System main unit as follows Fig 3 Fig 1 Fig 2 Fig 3 External audio source such like TV MP3 Player 16 ...

Page 19: ...ll start playback automatically 3 During playback Press the or buttons repeatedly to search for a specific section forward backward Press Play button to resume normal playback Press the or buttons repeatedly to skip to specific track Press button on the unit or Pause button on remote control to pause press button on the unit or the Play button on remote control to resume normal playback 4 Press ST...

Page 20: ...Repeat Off appear on the screen to turn off repeat mode Repeat Chapter RETURN PBC A B Repeat Playback In VCD PBC playback mode press to return to pervious menu To turn on off PBC Play Back Control function while in VCD ver 2 0 playback CLEAR To clear the inputs during setting During playback press the GOTO button the searching menu will pop up Using the Direction and Numeric buttons to select and ...

Page 21: ... twice to cancel the program playback 1 Press the Direction button repeatedly until Edit Mode was selected and highlighted then press the ENTER button enter to edit mode 2 Press the Direction button to highlight the desired tracks then press ENTER button to confirmed A will appear on the left side of the selected track 3 Repeat the same procedures until all the specific tracks were selected 4 Pres...

Page 22: ...scs Angle If appear on the screen it means more than one scenes available on the current DVD Press the ANGLE button repeatedly to select the desired scenes This function is not available on all discs Mute To temporarily mute the playback sound press the MUTE button Press again to resume normal playback VIDEO Press repeatedly to set the Video output modes to YUV P Scan or S Video in stop playback m...

Page 23: ...3 Using the Direction buttons to select and highlight the desired file then press the ENTER button to start playback Repeat During playback press the REPEAT button repeatedly to select Repeat Single Play the current track repeatedly Repeat Folder Play the tracks in the current folder repeatedly Resume to normal playback Notes 1 Disc loading period of the JEPG MP3 discs may be longer than loading D...

Page 24: ...d exit This is not available on all discs In Video Setup Page Press the Direction buttons to select View Mode TV System Video Out as desire then press the Direction button to enter Aspect Ratio 1 If is selected press the Direction button to enter Press the Direction buttons to select Aspect Ratio 4 3 or 16 9 to match the aspect ratio of your TV then press the Enter button to confirm your selection...

Page 25: ...he Direction button to enter press the Direction buttons to Original Auto Fit or Pan Scan Then press the Enter button to confirm your selections Press the SETUP button to save the setting and exit In Audio Setup Page Set to S Video if connected TV via S Video jack on the player and S Video jack on the TV TV also set to S Video input mode as the figure on page 10 1 If Audio Output is selected Set t...

Page 26: ...hen press the Enter button to confirm Press the SETUP button to save the settings and exit the screen Enter the four digit password by numeric buttons 0 9 1 If Use Default is selected press the Enter button to enter The Use Default setting menu will pop up Press the Direction button to select Yes Reset all settings to default settings or No then press the Enter button to confirm Press SETUP button...

Page 27: ...lines from the center of the disc to the outer edge of the disc Never wipe in circular motions Discs should be stored in their cases after each use to avoid damage Do not expose discs to direct sunlight high temperatures or dust etc Prolonged exposure or extreme temperatures can warp the disc Do not stick or write anything on either side of the disc Sharp writing Instruments or the ink may damage ...

Page 28: ...rect picture appears on the TV repeatedly Clean the disc Replace batteries Install batteries as the polarity markings inside battery compartment Aim the remote at the sensor Operate within 20 feet Move obstacle The unit does not start playback Some functions do not operate as stated Selected language is not being shown in the subtitles or spoken Subtitle are not working properly Angle cannot be ch...

Page 29: ... subject to change without notice 1Vp p 2Vrms 1KHz 0dB 655nm Class 1 DVD Linear Audio 20Hz 20KHz 48KHz 96KHz sampling CD Audio 20Hz 20KHz S N Ratio 70dB Remote Control DC 3V 2 x AAA size batteries included Contains 1 x User s Manual 1 x Home Theatre System with 5 Satellite Speakers 1 x Remote Control 3 x Audio connection cables 2 x AAA size batteries for remote control 1 x AV connection cable AC 1...

Page 30: ...April 2013 www vianotv com ...

Reviews: