


Link to Table of Contents
User Guide
68
User Manual
CorelDRAW X3 or X4
Note:
CorelDRAW X3 or X4 is compatible with Windows XP and Windows Vista. We also suggest not running it
with Windows 95/98. Therefore, we have only included setup instructions for Windows XP and Windows Vista.
Make sure that you have installed all Service Packs and software patches from Microsoft. Please contact
1.
Microsoft if you have any questions regarding these upgrades. ULS is not responsible for any problems
as a result from the usage of these patches.
If you have not already done so, install CorelDRAW on your computer, but do not open it yet.
2.
It is important that your version of CorelDRAW is updated with the latest patches and service releases. For
3.
the latest patches and updates go to CorelDRAW’s website at www.corel.com. Please contact CorelDRAW
if you have any questions regarding these upgrades. ULS is not responsible for any problems as a result
from the use of these patches.
The ULS Windows Printer Driver must be loaded before continuing. Please refer to the Installation and Setup
4.
Guide for your specific laser system, starting on page 200, for instructions on installing the driver. If you
have already installed the printer driver, you will need to re-insert the Software Installation CD-ROM back
into your CD drive at this time.
Using Windows Explorer, locate the file named “ADVANCED COLOR PALETTE.CPL” and “MD COLOR
5.
PALETTE.CPL” in the folder named “Color Palette” on the Software Installation CD-ROM and copy these
files over to the C:\Program Files\Corel\Corel Graphics SUITE X3 (13)\Languages\EN\Custom Data\Palettes
folder or C:\Program Files\Corel\Corel Graphics SUITE X4 (14)\Languages\EN\CustomData\Palettes folder.
Note:
ADVANCED COLOR PALETTE.CPL may not show up with a .CPL file extension. It may be listed as ULS
with “Control panel extension” shown as a detail.
Open CorelDRAW and start a new graphic.
6.
In the main menu at the top of the screen, click on “Window,” then “Color Palettes” and then click on “None.”
7.
Once again click on “Window,” then “Color Palettes” and then click on “Open Palette.”
If you have a VLS2.30, 3.50, 3.60, 4.60 or 6.60, double-click on "
t
MD COLOR PALETTE.CPL." The color palette
will now appear on the right side of the screen.
If you have a PLS3.75, 4.75, 6.75, 6.150D or ILS9.150D, 12.150D, double-click on “
t
ADVANCED COLOR
PALETTE.CPL.” The color palette will now appear on the right side of the screen.
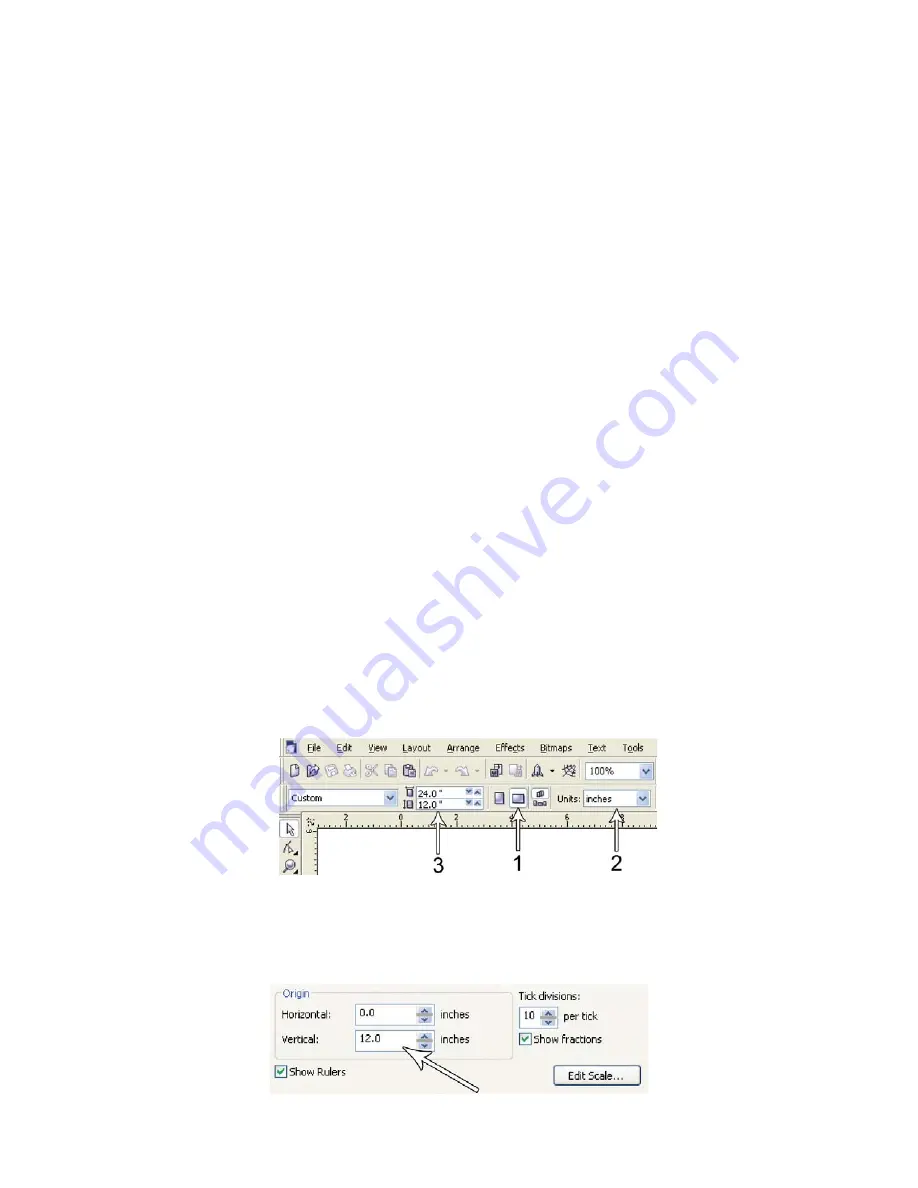
On the property bar, click on the landscape orientation (1). If you would like the drawing units in metric,
8.
choose millimeters from the drop down list (2). Now type in the page width and height that matches your
laser system (3).
Now you need to adjust the vertical ruler on the left side of the screen to match the rulers in the laser
9.
system. Double-click directly on the vertical (side) ruler. The “Options” dialog box will appear. In the
vertical origin box, type in the same height value as you did when you set up the page height in the
previous step. For example, 12 inches (305 mm) for a VLS3.60. If you would like the scale to be displayed
in tenths, choose “10 per Tick” in the “Tick Division” drop-down list box.
Summary of Contents for VLS3.60
Page 8: ... ...
Page 19: ...SAFETY Section 1 12 ...
Page 20: ...3DUW QLWLDO 6HWXS ...
Page 25: ......
Page 29: ...INSTALLATION Section 2 10 ...
Page 45: ...GRAPHICS SOFTWARE SETUP Section 3 14 ...
Page 49: ...MAKING A SAMPLE Section 5 4 ...
Page 50: ...3DUW DVHU 6 VWHP VVHQWLDOV ...
Page 51: ......
Page 82: ...BASIC MAINTENANCE Section 7 6 ...
Page 83: ...Part 3 Accessories ...
Page 84: ......
Page 101: ...Part 4 Advanced User ...
Page 102: ......


