background image


Installation Manual v1.16 

19 

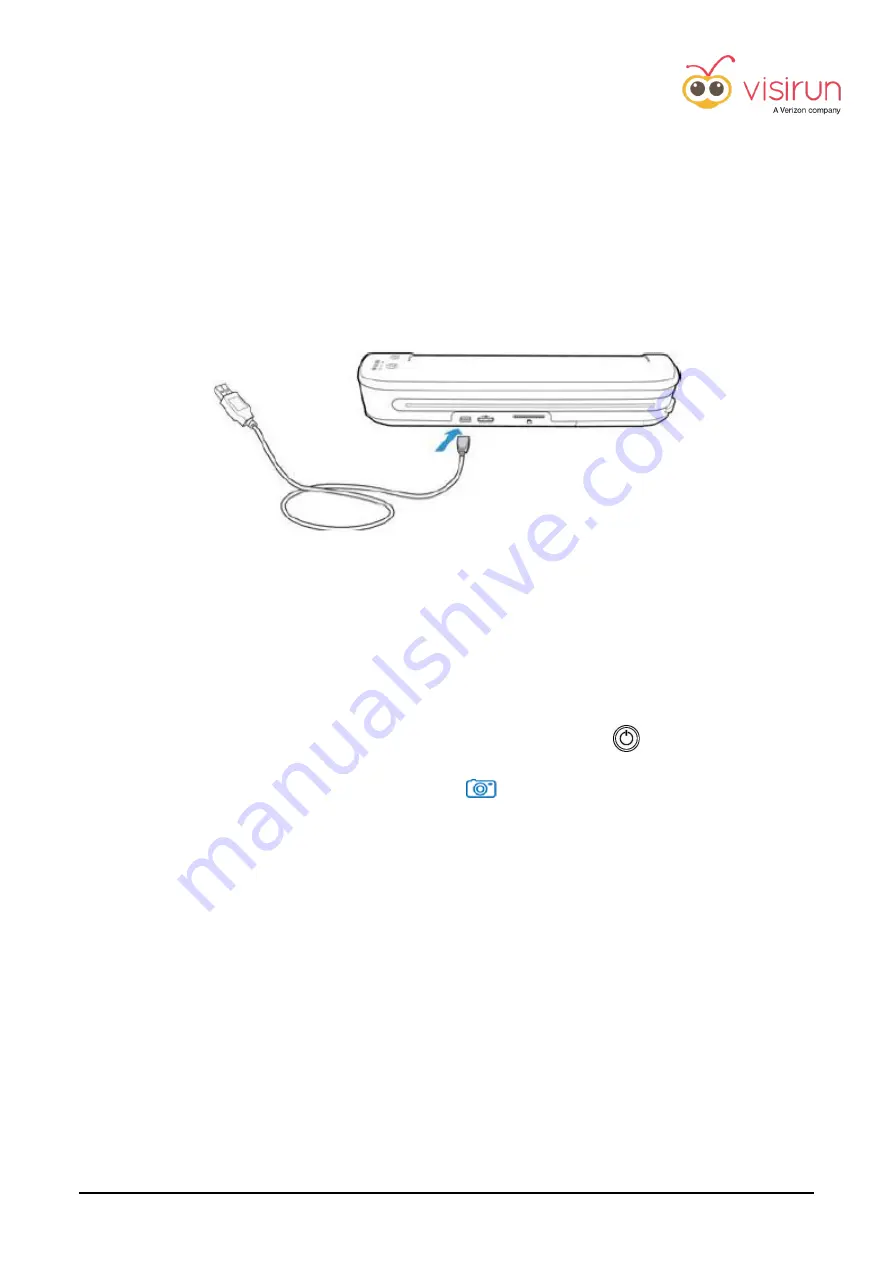
Mobile Document Scanner installation 

To complete the installation of the Mobile Document Scanner : 


Connect the 

5-pin


MOLEX to USB cable (3)

 to the 5-pin MOLEX socket of the GPS tracker. 


Connect the 

USB Scanner cable (2)

, plug the 

mini-USB connector to the scanner (1)

 and the 

other end to the 

5-pin MOLEX to USB cable (3)


-


The scanner will be charged by the tracker, it is not necessary to connect the scanner power 
adapter. 


How to use the Mobile Document Scanner 


Turn on the scanner: press and hold the power button for 3 seconds 


When  the 

blue  LED

 next to the  camera  icon 

  (scan  mode)  is  powered  on, the  scanner  is 

ready  for  document  acquisition. 

DO  NOT  CHANGE  scan  mode  because  the  default  one 

guarantees the best scan quality.  


Insert  a  document  face  up  in  the  paper  feed  slot,  aligned  to  the  left  side  of  the  scanner.  The 
scanner  detects  the  page  and  starts  to  feed  it  through  the  scanner  without  any  interaction. 

NOTE: You do not need to press any button to scan.


NEVER TURN THE SCANNER OFF MANUALLY

, the scanner will be automatically turned off at the 

end of the document acquisition process. 


NOTE 

Do not install the Mobile Document Scanner outside the driver's cab or expose to direct sunlight. 

Summary of Contents for Visirun B1N

Page 1: ...VISIRUN Installation Manual...

Page 2: ...Installation Manual v1 16 V I S I R U N InstallationManualv1 16...

Page 3: ...onnection and positioning 7 GPS tracker fastening 7 Installation check 8 GPS tracker activation 9 Optional connections 11 General connection schemes 13 Real time data from digital tachograph via K Lin...

Page 4: ...In case of airfreight remember to switch off the product It s forbidden to operate with cellular mobile devices during the flight C Inflammable substances Do not use the product nearby inflammable sub...

Page 5: ...able 3m length 3 Power cable 2m length with 16 pin MOLEX connector ready for connection to a permanent power source of 12 24V ignition connection digital inputs digital outputs and analog inputs prima...

Page 6: ...ard behind the radio inside the fuse compartment See the instructions on page 6 for GPS GSM combined Antenna connection and positioning Crash detection function The crash detection function is not ena...

Page 7: ...w months if not connected to a permanent power source e g cigarette lighter NOTICE In standard conditions the GREEN wire is connected to the RED power wire into the fuse holder To increase tracking pr...

Page 8: ...he tracker 2 Plug the PURPLE FAKRA GSM into the PURPLE socket on the back of the tracker NOTE For better signal reception place the rounded element next to the windshield for example onto the vehicle...

Page 9: ...l is properly acquired CENTRAL LED BATTERY ORANGE while charging the internal battery GREEN when battery is fully charged RIGHT LED GSM YELLOW flashes twice if it is properly communicating FOR AN ACCU...

Page 10: ...New vehicle form Vehicle name Vehicle s license plate Click the drop down gps device list and select the SERIAL NUMBER of the Visirun GPS tracker you have just installed Category Driver s phone number...

Page 11: ...nt to pair the just installed tracker with an existing vehicle 6 Click on the vehicle s name 7 Click on Pencil on the right of the gps device field and select the SERIAL NUMBER of the Visirun GPS trac...

Page 12: ...activation deactivation control 12 24V active 0V deactivated Door opening control anti robbery button digital input etc CN1 pin 5 7 e 10 connector CN2 pin 1 CN2 only on model B2 Temperature Control wi...

Page 13: ...and attendance management Kit On board Terminal GPS Navigator Tachograph Remote Download Kit B2 model only Mobile Document Scanner B2 model only The keypad and Operator s recognition and attendance m...

Page 14: ...Installation Manual v1 16 13 Generalconnectionschemes For detailed information about accessories installation refer to the provided additional documentation...

Page 15: ...data from digital tachographs including driver recognition and state The direct connection is available only for the B2 model 1 Connect pin 15 of the CN2 connector BLUE BLACK wire to pin 8 of the D c...

Page 16: ...each vehicles This kit is available only for the B2 model Connect the Remote Download cable according to the following scheme plug the red AMP connector into the C connector on the back of the Tachog...

Page 17: ...fe battery guaranteed to run 45 days The device is configured to minimize power consumption when external power is not present e g trailer detached from tractor It has a multi connector cable with pos...

Page 18: ...ems that can be damaged by magnetic field e g credit cards and ATM cards pacemakers defibrillators electric and electronic systems TVs laptop computers mechanical clocks loud speaker etc If installed...

Page 19: ...ent Scanner allows the driver to acquire paper documents that will be available as a digital copy in the Document section of Visirun The kit is available only for the B2 model and it is composed by 1...

Page 20: ...and hold the power button for 3 seconds When the blue LED next to the camera icon scan mode is powered on the scanner is ready for document acquisition DO NOT CHANGE scan mode because the default one...

Page 21: ...PLv2 1 find a copy of the licese at https www gnu org licenses lgpl 2 1 html You may obtain the complete Corresponding Source code from us for a period of three years after our last shipment of this p...

Page 22: ...Installation Manual v1 16 21...

Page 23: ...Installation Manual v1 16 22...

Page 24: ...Installation Manual v1 16 23...

Page 25: ...Installation Manual v1 16 24...

Page 26: ...Installation Manual v1 16 25...

Page 27: ...Installation Manual v1 16 26...

Page 28: ...Installation Manual v1 16 27...

Page 29: ...Installation Manual v1 16 28...

Page 30: ...Installation Manual v1 16 29...

Page 31: ...Installation Manual v1 16 30 Page intentionally left blank...

Page 32: ...Installation Manual v1 16 31 Page intentionally left blank...

Page 33: ...Installation Manual v1 16 32 Page intentionally left blank...

Page 34: ...Installation Manual v1 16 33 www visirun com Customer Care helpdesk visirun com 39 0 532 52570 Monday Friday 9 18 fax 39 0 532 1920231...

Reviews: