background image


030-300505 Rev. A 

85 

     April 2007 

User Guide

VersaLink Wireless Gateway (Model 327W)

14.3


  Port Forwarding 

 
To access the Port Forwarding screen, from the top navigational menu, select 

Firewall Settings.

 Then select 

Port 

Forwarding

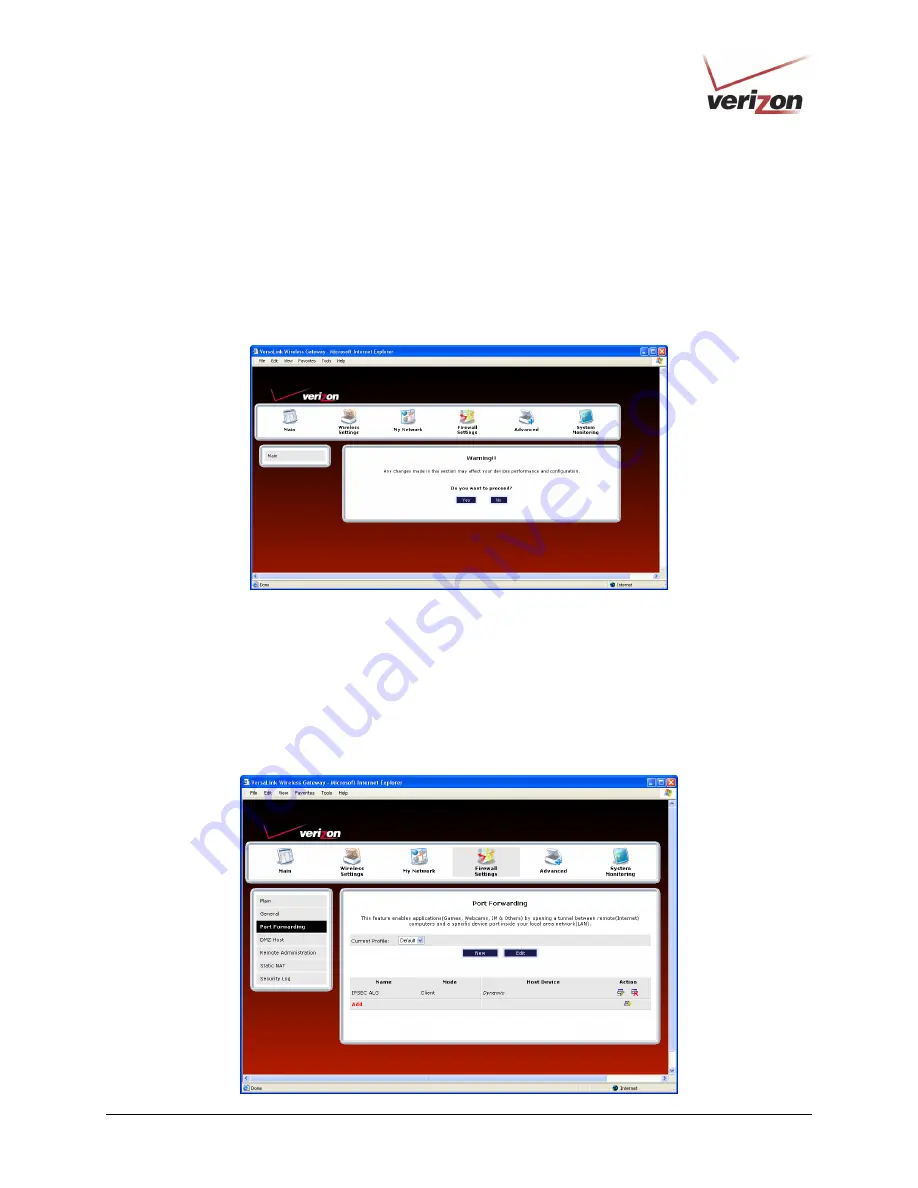
 from the menu options at the left of the screen. A warning screen will display the following message: 


Any changes made in this section may affect your device’s performance and configuration. 
Do you want to proceed? 

 
Click 

Yes

 to proceed. 


If you clicked 

Yes

, in the preceding warning screen, the following 

Port Forwarding

 screen will be displayed. 

This feature enables applications (Games, Webcams, IM & Others) by opening a tunnel between remote (Internet) 
computers and a specific device port inside your local area network (LAN). 
 
The 

Port Forwarding

 screen allows you to do the following: 


Edit connection profiles, create new connection profiles 


Configure port forwarding services: predefined, customized, and port forwarding/port triggering services 


Summary of Contents for VERSALINK 327W

Page 1: ...030 300505 Rev A 1 April 2007 VERSALINK WIRELESS GATEWAY MODEL 327W USER GUIDE...

Page 2: ...gging on to VersaLink 15 7 2 Changing the Password 16 8 CONFIGURING YOUR BROADBAND CONNECTION 19 8 1 Confirming Your DSL Connection 19 8 2 Setting Up an Account Profile 20 8 3 Connecting to the Intern...

Page 3: ...Gateway 121 15 4 Users 122 15 5 QOS 123 15 6 Remote Administration 124 15 7 ATM Loopback 125 15 8 Detect WAN Configuration 127 15 9 DNS Server 129 15 10 Configuration File 132 15 11 Firmware Upgrade 1...

Page 4: ...erfaces such as Wireless 802 11b g ADSL Ethernet and the following optional features UPLINK E1 Alternate WAN uplink port Layer w 2 QOS with VLAN tagging HotSpot Simultaneous public private network sup...

Page 5: ...tter in order to meet the FCC RF exposure guidelines Making changes to the antenna or the device is not permitted Doing so may result in the installed system exceeding RF exposure requirements This de...

Page 6: ...nals allowed to be connected to a telephone interface The termination on an interface may consist of any combination of devices subject only to the requirement that the sum of the Ringer Equivalence N...

Page 7: ...4 0 98 SE Macintosh OS X or Linux installed 64 MB RAM 128 MB recommended 10 MB of free hard drive space 10 100 Base T Network Interface Card NIC Internet Explorer 5 5 or later or Netscape Navigator 7...

Page 8: ...nnected to the associated port Solid Green Link Established Flashing Green Wireless LAN activity is present traffic in either direction WIRELESS OFF Router power is OFF or No Link Solid Green Good DSL...

Page 9: ...er connector DC 12V barrel OFF ON power switch Wireless 802 11b g SMA connector and antenna VersaLink Gateway Rear View 5 3 Connector Descriptions The following chart displays the Router s connector t...

Page 10: ...ateway Power Supply RJ 45 Ethernet cable straight through yellow RJ 11 Phone cable Verizon CD ROM containing User Guide in PDF format Wireless antenna 6 3 Microfilters ADSL signals must be blocked fro...

Page 11: ...ired depending on the installation method you are using Ethernet cables and filters can be purchased at your local computer hardware retailer 6 VersaLink supports simultaneous use of 10 100 Base T Eth...

Page 12: ...uter s INTERNET LED is solid green Solid green indicates that an Internet link has been established Flashing green indicates the presence of IP traffic Congratulations You have completed the Ethernet...

Page 13: ...ss interface is functioning properly 11 After you have logged on to your account and established an Internet connection as explained later in section 8 check to see if VersaLink s INTERNET LED is soli...

Page 14: ...e VersaLink s POWER LED is solid green This indicates that VersaLink is powered on 6 Check to see if the ETHERNET LED is solid green Solid green indicates that the Ethernet connection is functioning p...

Page 15: ...ink To access VersaLink your PC must be configured for DHCP Refer to your Windows help screen for information on configuring your computer for DHCP At your PC click Start then Help to access the Windo...

Page 16: ...urther instructions IMPORTANT 1 The User Settings screen allows you to use admin as your administrator name your administrator name can match your user name However this screen does not allow you to u...

Page 17: ...April 2007 User Guide VersaLink Wireless Gateway Model 327W After you have entered the desired values click Apply If you clicked Apply the following pop up screen will appear Click OK to allow the cha...

Page 18: ...een the following screen will appear This is the main page of your Router s Web pages also referred to in this document as the home page You can access this page by clicking Main in the navigational m...

Page 19: ...must have active DSL service before the Router can synchronize with Verizon s equipment To determine if the Router has established a DSL link do any of the following In the My Modem panel of the Main...

Page 20: ...ou are connecting to the Internet via PPP please proceed to section 8 2 to configure your Router s broadband connection settings After you have configured the broadband settings and connected to the I...

Page 21: ...lished an Internet connection with Verizon Throughout this User Guide the following icons are used to indicate clicking actions that you can take with your mouse to configure the Router s settings Ico...

Page 22: ...nection Add Click the Add link to add additional profiles to your Router Edit Click the Edit icon for My Connection to set up your connection profile My Connection is the name of the default connectio...

Page 23: ...e Router to automatically establish a PPP session when you log on or if the PPP session goes down The Router s factory default setting is Always On If you enable the Router s timeout feature the Route...

Page 24: ...selected the Router will automatically save the account password If you want the Router to prompt you for the account password select Manual as the connection type and then click the bottom option bu...

Page 25: ...iefly display connecting this means that the Router is establishing a PPP session After Router s establishes a PPP session the PPP Status field will display Up Congratulations You can now browse the I...

Page 26: ...e home page click the connected link next to Internet Status The following DSL Connection screen will appear Click disconnect to end your PPP session If you clicked disconnect the following pop up scr...

Page 27: ...When you are ready to end your DSL session simply turn off the Router via the power switch on the Router s rear panel NOTE When you are ready to exit the Router s interface click the X close in the u...

Page 28: ...acintosh computers must use the Router s Ethernet installation Refer to section 6 Installing the Hardware for details 9 1 Opening the System Preference Screen After you have connected the Router to th...

Page 29: ...wing screen will appear In the field labeled Name your new location change the text from Untitled to Westell Click OK 9 5 Selecting the Ethernet Configuration After clicking OK in the preceding screen...

Page 30: ...Preferences 2 In the System Preferences screen click the Network icon The Network screen will appear 3 In the Configure field in the Network screen select Built in Ethernet 4 View the IP address fiel...

Page 31: ...el 327W 9 7 Accessing Your Router In your Internet Explorer Web browser address bar type http dslrouter Next press Enter on your keyboard The Modem Secure screen will appear Please proceed to the Mode...

Page 32: ...ow the changes to take effect in the Router NOTE If you need help go to the Quick Links section in the home page and then click Verizon Help Clicking this link takes you to Verizon s OnLine Help site...

Page 33: ...ternet service provider ISP click Main in the top navigational menu The following home page will appear The home page allows you to view connection information reported by your Router and to quickly a...

Page 34: ...onnect to Verizon The username and password are provided by Verizon Internet IP Address This is a WAN IP address that has been assigned to your Router by Verizon You will receive the WAN IP address on...

Page 35: ...k this button to go to the default page of your Web browser Clicking this button will take you to the browser s default page However if your PPP session is down you do not have Internet access To brow...

Page 36: ...ide VersaLink Wireless Gateway Model 327W 12 WIRELESS SETTINGS If you click Wireless Settings in the top navigational menu the following screen will appear This screen allows you to you configure the...

Page 37: ...r to communicate with VersaLink that is the SSID used in the wireless network adapter must be identical to VersaLink s SSID The default SSID for VersaLink is the serial number of the unit located belo...

Page 38: ...516 This string 30 characters or less is the name of your wireless network To connect to the Router the SSID on a computer s wireless card must match the SSID on the Router You can change the SSID to...

Page 39: ...The Router supports 64 40 bit 128 104 bit or 256 232 bit WEP encryption Key Code Enter the key code values in this field ASCII If you are using an ASCII key code the number of characters entered into...

Page 40: ...r 256 bit WEP encryption If WEP is selected any station can connect to the Router as long as its SSID matches the Router s SSID WPA Selecting WPA allows you to enable a pre shared key for home network...

Page 41: ...ttings screen select one of the following options to secure your wireless traffic WEP Selecting this option button allows you to enable a WEP key for wireless security WEP is the recommended setting W...

Page 42: ...key is treated as either a string of text ASCII characters or a set of hexadecimal Hex characters The number of text characters must be either 5 for 40 64 bit encryption 13 for 128 bit encryption or...

Page 43: ...th the RADIUS server using EAP TLS over 802 1x a standard for passing extensible authentication protocol EAP for authentication purposes EAP is used to communicate authentication information between t...

Page 44: ...ve entered your values and clicked Apply in the WPA screen the following pop up screen will appear The pop up screen indicates that wireless access may be interrupted Click OK to continue NOTE Wireles...

Page 45: ...oadcast is enabled any computer or wireless device using the SSID of ANY can see the Router To prevent this from happening click the Disable option button This will disable SSID Broadcast so that only...

Page 46: ...er By enabling the Access List you can permit or restrict wireless access to the Router based on specific MAC addresses To limit access to the Router using the MAC address of specific wireless devices...

Page 47: ...o the Router Blocked This allows a computer to remain in the table but it is not allowed access to the Router MAC Address The MAC address assigned to the computer that you want to allow access to A ha...

Page 48: ...s may be interrupted Click OK to continue NOTE Wireless access to the Router may be interrupted and wireless stations may require reconfiguration If you clicked OK in the pop up screen the following s...

Page 49: ...played This screen allows you to limit access to your Router based on technology type From the drop down menu select the desired setting Then click Apply to allow the settings to take effect 11b only...

Page 50: ...ragmentation Threshold Any MSDU or MPDU larger than this value will be fragmented into an MPDU of the specified size RTS Threshold RTS CTS handshaking will be performed for any data or management MPDU...

Page 51: ...e Responses Always Off ERP is not used Always ON ERP is used Local STA s If there are any associated stations than do not support ERP a protection algorithm is used to prevent contention Dynamic Simil...

Page 52: ...ddress The IP address assigned to your computer IP Address Allocation The method by which your computer receives its IP address MAC Address The Media Access Controller the hardware address assigned to...

Page 53: ...our local network The device from which you will access files must have file sharing enabled If the device has a firewall turned on you will not be able to access shared files from the device 13 1 2 V...

Page 54: ...esired select an icon from the New Icon drop down menu to assign a different icon to this device Next click the Rename Device button to allow the changes to take effect Click Back to return to the My...

Page 55: ...ick the Enable Application link to set up applications for your service profile This feature enables applications Games Webcams IM Others by opening a tunnel between remote Internet computers and a sp...

Page 56: ...ection settings in the Network Connections screen click the Broadband Connection DSL link The Basic DSL Configuration screen will appear Refer to section 13 2 1 for details about this feature To acces...

Page 57: ...ections virtual connections are defined by data The VPI VCI and account parameters are provided by Verizon IMPORTANT You should not change the VPI VCI settings unless instructed by Verizon If you chan...

Page 58: ...ing VC Protocol Settings The following sections discuss your virtual connection VC settings A virtual connection VC identifies a connection through the service provider s ATM network to Verizon IMPORT...

Page 59: ...box contains a check mark When this setting is enabled the Router will allow Broadcast IP packets to from the WAN When this setting is disabled box is cleared the Router will block Broadcast IP packet...

Page 60: ...Cs list click the collapse icon NOTE 1 A VC s Status field must display Enabled before you can edit its VC settings 2 The actual values displayed in the following screen may vary depending on the netw...

Page 61: ...irtual Channel Indicator value for a particular VC which is defined by your Service Provider PCR Factory Default 100 Peak Cell Rate PCR The maximum rate at which cells can be transmitted across a virt...

Page 62: ...uration The interval between LCP Echo after no response Tunneling Factory Default Enable If Enabled this option allows PPP traffic to be bridged to the WAN This feature allows you to use a PPPoE shim...

Page 63: ...he Router is configured for PPPoA protocol After you have made the appropriate changes to VC 1 Configuration screen click Apply to continue If you clicked Apply in the preceding screen the following p...

Page 64: ...ridge To configure the Router s protocol settings for Bridge access to the VC 1 Configuration screen as explained earlier in section 13 2 2 1 Editing VC Protocol Settings At the VC 1 Configuration scr...

Page 65: ...get a WAN IP address through DHCP or can be assigned statically NAT will use the global address assigned to the modem Bridge Proxy Bridge Proxy Bridge is the process in which the modem acts as a proxy...

Page 66: ...must disable the Router s DHCP server By disabling the DHCP server and using Bridge protocol Bridge mode you will allow the computer to receive its IP address directly from the ISP s DHCP server not f...

Page 67: ...e Bridge Protocol Classical IPoA Internet Protocol over ATM Asynchronous Transfer Mode This is an ATM encapsulation of the IP protocol Bridge A bridge is a layer 2 device that connects two segments of...

Page 68: ...the Bridge Mode drop down menu the following screen will appear Enter the desired values in the fields provided and then click Apply VC 1 Bridge Protocol Routed Bridge Mode DHCP Client Allows you to...

Page 69: ...fields provided and then click Apply VC 1 Bridge Protocol Proxy Bridge Mode Gateway Displays the Router s IP address DNS Primary Provided by your Service Provider DNS Secondary Provided by your Servi...

Page 70: ...Enabled VPI This field allows you to change your VPI Virtual Path Indicator value for a particular VC which is defined by your Service Provider VCI This field allows you to change your VCI Virtual Ch...

Page 71: ...nous Transfer Mode This is an ATM encapsulation of the IP protocol VC Status The protocol status is Enabled IP Address Displays the IP network address that your modem is on Subnet Mask Displays the su...

Page 72: ...WAN Uplink port This mode allows you to use the Router as an Ethernet Gateway for example connecting to a cable modem or to another ADSL device that provides WAN access In WAN Uplink mode the Router...

Page 73: ...on the rear of the Router is enabled and is the WAN uplink to another ADSL device through which you will make your Internet connection Remember you must click Apply to allow the settings to take effec...

Page 74: ...p screen will be displayed The Router must be reset to allow the new configuration to take effect Click OK to continue If you clicked OK the following screen will appear After a brief delay the home p...

Page 75: ...to allow the settings to take effect in the Router NOTE 1 When using the optional UPLINK E1 port Ethernet LAN connection is limited to E2 E3 and E4 The UPLINK feature is optional and if it is disabled...

Page 76: ...twork For Ethernet network to function properly only one active path can exist between two stations When Spanning Tree Protocol is enabled two bridges are used to interconnect the same two computer ne...

Page 77: ...o the Router configured for WAN Uplink mode Be sure that you have selected WAN Uplink port from the drop down menu in the VersaPort screen To set the Uplink protocol to PPPoE from the Protocol drop do...

Page 78: ...r the box By default Tunneling is Enabled 4 Set the desired Spanning Tree setting to enable the setting click the box to place a check mark in the box or to disabled the setting click to clear the box...

Page 79: ...terminated LCP Echo Duration The interval between LCP Echo transmissions with responses LCP Echo Retry Duration The interval between LCP Echo after no response Tunneling Factory Default Enabled To dis...

Page 80: ...in this section refer to the Router when it is configured for WAN Uplink mode In the VersaPort screen be sure that you have selected WAN Uplink port from drop down menu To set the Uplink protocol to R...

Page 81: ...CP Client to allow the Router to obtain an IP address automatically from your service provider Click the bottom option button labeled disable DHCP Client to allow the Router to accept static IP addres...

Page 82: ...e In the Quick Links section of the home page click Verizon Help Clicking this link takes you to Verizon s OnLine Help site where you can access additional information about your DSL Router To change...

Page 83: ...you selected in the General screen click Edit to go to the User Defined Firewall Rules screen IMPORTANT It is recommended that you do not change the settings in this screen If you need to reset your R...

Page 84: ...Router The Router s security level will automatically switch to Custom Security NOTE The information displayed in this screen will depend on the level of security you have selected After you have clic...

Page 85: ...ce s performance and configuration Do you want to proceed Click Yes to proceed If you clicked Yes in the preceding warning screen the following Port Forwarding screen will be displayed This feature en...

Page 86: ...llow the instructions in this section To edit a connection profile in the Port Forwarding screen click the Current Profile drop down menu and then select the name of the profile that you want to edit...

Page 87: ...Click Apply to allow the change to take effect The name you entered should now be displayed in the Current Profile drop down menu Notice that Default is no longer displayed NOTE If you reset your Rou...

Page 88: ...the new profile follow the instructions in this section To create a new connection profile in the Port Forwarding screen click the Current Profile drop down menu and then select A New Service Profile...

Page 89: ...Gateway Model 327W For example My First Service Profile is the name that has been entered in the Profile Name field Click Apply If you clicked Apply the following screen will be displayed The Current...

Page 90: ...reate new service profiles and customize them to your preference Your Router contains a list of predefined Port Forwarding services and you can select any service from this list By selecting your spec...

Page 91: ...ing screen click the Current Profile drop down menu and then select the name of the profile to which you want to add services Next click Add If you clicked Add the following New Port Forwarding Rule s...

Page 92: ...he option button that describes how you want the service to be activated Host Allows the unsolicited inbound traffic to a particular PC on the LAN Dynamic Enables inbound traffic based on specific out...

Page 93: ...drop down menu Next click Add and then repeat the preceding steps 1 through 4 To view the details of a service you have added in the Action field click the details icon To delete a service from your...

Page 94: ...aLink Wireless Gateway Model 327W 14 3 3 3 Creating a Customized Port Forwarding Service To create a customized port forwarding service click Add in the Port Forwarding screen If you clicked Add the f...

Page 95: ...the Router s firewall settings Make sure that the Router s firewall is set to Medium Security or lower to take advantage of all the port forwarding features Firewall settings take precedence over por...

Page 96: ...u must click Apply to allow the settings to take effect Port Forwarding Service Protocol TCP Transmission Control Protocol UDP User Datagram Protocol Global Port Start The WAN side TCP UDP start port...

Page 97: ...ill appear at the bottom of the list under User Defined Services 7 Select how the service will be activated Host allows unsolicited inbound traffic to a particular PC on the LAN Dynamic enables inboun...

Page 98: ...saLink Wireless Gateway Model 327W If you clicked Apply the following screen will appear The Port Forwarding service has been added to the list of active services To add additional port forwarding ser...

Page 99: ...Router s firewall is set to Medium Security or lower to take advantage of all the port forwarding features Firewall settings take precedence over port forwarding services configured in the Router For...

Page 100: ...the name of the port forwarding service for which you are configuring specific Port Triggering rules 3 Enter the desired Global Port Start Global Port End Local Port Start and Local Port End values in...

Page 101: ...ervice Global Port Start The WAN side TCP UDP start port Global Port End The WAN side TCP UDP end port Local Port Start The local LAN side TCP UDP start port Local Port End The local LAN side TCP UDP...

Page 102: ...d in Step 2 the name will appear at the bottom of the list under User Defined Services 6 After you have selected the service click Apply to allow the service to be added to the Router s list of active...

Page 103: ...vice If you have created a port forwarding or port triggering service and have added it to your Router s list of active services at the Port Forwarding screen you can do one of the following Click the...

Page 104: ...WAN assigned IP address By enabling DMZ the selected device becomes visible on the Internet Network Address Translation NAT and Firewall rules do not apply to the device configured for DMZ If you are...

Page 105: ...tual device name may differ from the name displayed in this screen If you clicked Enable in the preceding screen the following pop up screen will appear The Router must be reset to allow the new confi...

Page 106: ...in the submenu options at the left of the screen Next click Yes in the warning screen The following DMZ Host screen will be displayed This screen shows that DMZ Host is currently enabled for the selec...

Page 107: ...l appear The Router must be reset to allow the new configuration to take effect Click OK to continue If you clicked OK the following screen will appear After a brief delay the home page will be displa...

Page 108: ...ing Remote Administration screen will appear Follow the steps below to configure Remote Administration in your Router NOTE The User Name and Password should be at least 4 characters long and should no...

Page 109: ...Router is reset to factory defaults Disable Timeout Click this box a check mark will appear to activate the Disable Timeout feature This means that once you enable Remote Access it will remain on unti...

Page 110: ...lowing message Remote access is currently enabled After 20 minutes of inactivity or on reboot remote access will be automatically disabled After 20 minutes of inactivity or on reboot Remote Access wil...

Page 111: ...will appear The Static NAT screen allows you to configure your Router to work with the special NAT services When the Router is configured for Static NAT any unsolicited packets arriving at the WAN wil...

Page 112: ...030 300505 Rev A 112 April 2007 User Guide VersaLink Wireless Gateway Model 327W The following screen shows that Static NAT has been enabled for the device you selected...

Page 113: ...0 300505 Rev A 113 April 2007 User Guide VersaLink Wireless Gateway Model 327W 14 6 2 Disabling Static NAT To disable Static NAT if it has been previously enabled click Disable in the Static NAT scree...

Page 114: ...this section may affect your device s performance and configuration Do you want to proceed Click Yes to proceed If you clicked Yes in the warning screen the following Security Log screen will appear...

Page 115: ...al rule is set up under Firewall rules Alert Displays a description of the logged event Details Displays details about logged event If you clicked Settings in the preceding Security Log screen the fol...

Page 116: ...h as IP address distribution firmware upgrades etc IMPORTANT This section assumes that you have active DSL and Internet service If you select Advanced in the top navigational menu a warning screen wil...

Page 117: ...discussed in the following sections 15 1 Diagnostics In the Advanced screen click Diagnostics The following screen will appear Using this screen you can run the following diagnostics tests To run a DN...

Page 118: ...ependent on VersaLink s firewall settings If your firewall is set to Medium or High you will not be able to PING You must set your firewall security setting to Low or None Diagnostics DSL VersaLink ch...

Page 119: ...nput box Possible Responses Success VersaLink has successfully obtained the resolved address The IP address is shown below the host name input box No Response VersaLink has failed to obtain the resolv...

Page 120: ...re the Router to its factory default settings To restore the Router click the Restore Defaults button IMPORTANT If you click Restore Defaults any settings that you have configured in the Router will b...

Page 121: ...n will be displayed Follow the instructions explained in section 7 1 Logging on to the Router to log on to your Router 15 3 Reboot Gateway In the Advanced screen click Reboot Gateway This screen allow...

Page 122: ...not an authorized user you will not be able to change the values in this screen The Router cannot be configured unless an authorized user is logged on Contact your network administrator for further in...

Page 123: ...Wireless Gateway Model 327W 15 5 QOS In the Advanced screen click QOS This screen allows you to configure Quality of Service parameters in the Router Select the desired Quality of Service settings and...

Page 124: ...he following 1 Type the desired user name 2 Type the desired password NOTE The password should be at least 4 characters long and should not exceed 32 characters Do not type a blank space or asterisks...

Page 125: ...the Disable Timeout feature click this box a check mark will appear Clear the box to deactivate this feature Enable Remote Access Default deactivated Click this box a check mark will appear to activat...

Page 126: ...ill be displayed Click OK to continue If you clicked OK in the preceding screen the following pop up screen will appear The Router must be reset to allow the new configuration to take effect Click OK...

Page 127: ...have not established an Internet connection with Verizon the Router will report Detection Disabled Confirm that you have Internet connection with Verizon If problems persist contact Verizon To check y...

Page 128: ...Wireless Gateway Model 327W If you clicked Enable Continuous Retries the following pop up screen will appear Click OK to continue If you clicked OK the following screen will appear If want to disable...

Page 129: ...Some ISP s may require the name for identification purposes This field allows you to enter a Domain Name for your Router To add a Domain Name in the field under User Assigned DNS type in your new dom...

Page 130: ...ess Gateway Model 327W If you clicked ADD DNS Entry the following screen will appear Type the Host Name and IP Address in the fields provided Then click Apply to continue For example the following scr...

Page 131: ...del 327W If you clicked Apply the following screen will be displayed This screen shows that the Host Name and IP Address have been added to the DNS server If you want to delete a DNS entry click the d...

Page 132: ...er s current configuration NOTE Backup settings are stored in a separate area of flash not to an external backup source Do one of the following Click Save Configuration File to back up the Router s cu...

Page 133: ...irmware update file The path will appear in the Check at URL field Click check for web updates to retrieve the firmware update file and display any available update information You must be connected t...

Page 134: ...your Router s power and do not navigate to other Web pages until the upload has completed Click Browse and then navigate to the location of the upgrade file the path will appear in the window Next cl...

Page 135: ...oad has completed the following screen will appear Please wait a brief moment while your Router is being reset After the Router has been reset the home page will appear Confirm that you have a DSL lin...

Page 136: ...r Router on the LAN To enable UPnP in your Router do the following 1 Click the UPnP Enable box a check mark will appear in the box 2 Click Apply to allow the change to take effect 3 Click OK in the po...

Page 137: ...dress eth0 is the local LAN interface lo0 is the loopback interface mainPPP is the WAN interface Destination The IP address or subnet of the Route Gateway Indicates were to send the packet if it match...

Page 138: ...ppear Enter the appropriate values in the fields and then click Apply 15 14 IP Address Distribution In the Advanced screen click IP Address Distribution The following screen will appear IP Address Dis...

Page 139: ...s You can use any number from 0 to 254 in this address End IP Address Factory Default 192 168 1 47 This field displays the last IP address that the DHCP server will provide The DHCP End Address must b...

Page 140: ...creen will refresh and the previously saved settings will remain active IMPORTANT 1 Whenever you change the settings in a screen the screen will display the changes however you must click Apply to all...

Page 141: ...ink Private LAN Private LAN DHCP Server Enable Default Enabled If this box contains a check mark this enables DHCP addresses to be served from the Private LAN pool Private LAN Enable Default Enabled I...

Page 142: ...Seconds value in the DHCP Lease Time field Minutes must be between 0 and 59 Check the Minutes value in the DHCP Lease Time field Hours must be between 0 and 23 Check the Hours value in the DHCP Lease...

Page 143: ...c LAN to bypass the NAT interface Public LAN IP Address Provides a Public IP Address if the service provider does not automatically provide one Public LAN Subnet Mask Provides a Public Subnet Mask if...

Page 144: ...e Subnet Check the value in the DHCP End Address field End Address is below the Start Address Check the value in the DHCP End Address field Lease time must be greater than 10 seconds Check the values...

Page 145: ...will appear Confirm that you have a DSL link and that your PPP Status displays UP 15 17 VLAN Configuration In the Advanced screen click VLAN Configuration The following screen will appear When VLAN i...

Page 146: ...N Port VLAN ID This allows you to assign a VLAN ID to the port Possible Responses 1 through 8 VLAN Priority This allows you to set the VLAN priority for the port Possible Responses 0 through 7 Outgoin...

Page 147: ...col automatically discovers routes and builds routing tables If you change any settings in this screen click Save to save the settings If you click Reset this screen will refresh and display the previ...

Page 148: ...e modem advertises itself as the default Gateway i e the default route Border Gateway Filtering Factory Default Enabled If this box is cleared Disabled the modem will not summarize subnets into a sing...

Page 149: ...el 327W 16 SYSTEM MONITORING If you click System Monitoring in the top navigational menu a warning screen will display the following message Any changes made in this section may affect your device s p...

Page 150: ...Number VersaLink s serial number Broadband Connection Status The status of your Internet connection Up Internet connection established Down No Internet connection established Broadband IP Address Vers...

Page 151: ...rmance and configuration Do you want to proceed Click Yes to proceed If you clicked Yes in the Warning screen the following screen will appear From this screen you can access various logging and monit...

Page 152: ...ing The following screen will be displayed At the Logs drop down menu do any of the following Select All to list both Connection and System logs Select Connection to list all events related to connect...

Page 153: ...ottom of the logs screen to view all the logged events After you have viewed the logs do any of the following Click Close to close the logs page and to return to the Advanced Status screen Click Clear...

Page 154: ...age click Printable Format The following screen will appear Click File Save As from the menu options and then save the file to the desired location At the Save Web Page dialog box select a destination...

Page 155: ...ity Settings page and edit your wireless settings Refer to section 12 1 for additional details on this feature Click the WAN PPPoE link to go to the Advanced DSL Configuration page and edit your conne...

Page 156: ...ction MAC Address The Media Access Controller the hardware address assigned to the deviced by the manufacturer IP Address The Router s LAN and WAN Braodband IP Addresses Subnet Mask Displays the Route...

Page 157: ...the Wireless link to go to the Basic Security Settings page and edit your wireless settings Refer to section 12 1 for additional details on this feature Click the Close button to return to the Advance...

Page 158: ...ut Discard Packets The number of outbound packets discarded Out Non Unicast Packets The number of non Unicast packets transmitted on the interface Out Unicast Packets The number of Unicast packets tra...

Page 159: ...et Status This field will display your Ethernet information that was received IN or sent OUT in packets on your Ethernet port ATM Network Address This field will display your VPI and VCI values which...

Page 160: ...s The following screen will be displayed Click the Clear button to clear all counts and statistics not just latency counts Clicking Clear does not affect the Router s configuration QOS must be enabled...

Page 161: ...Displays the interval in milliseconds for averaging the peak offered rate Committed Burst ms Displays the interval in milliseconds for averaging the committed offered rate Total Packets Received Displ...

Page 162: ...er software version number Vendor ID Code The CPE Vendor s ID code for their chipset Line Mode The operational mode Modes supported are No Mode Multi Mode T1 413 Mode G DMT Mode and G LITE Mode Data P...

Page 163: ...099 TCP 5190 TCP Asheron s Call 9000 9013 UDP 28800 29000 TCP Battlecom 2300 2400 TCP UDP 47624 TCP UDP Battlefield 1942 UDP 14567 22000 23000 to 23009 27900 28900 Black and White 2611 2612 TCP 6667 T...

Page 164: ...P ICUII Client 2000 2038 TCP 2050 2051 TCP 2069 TCP 2085 TCP 3010 3030 TCP ICUII Client Version 4 xx 1024 5000 TCP 2050 2051 TCP 2069 TCP 2085 TCP 3010 3030 TCP 2000 2038 TCP6700 6702 TCP 6880 TCP 120...

Page 165: ...2 Choose Properties 3 In the Target field you ll see a line like C Program Files Quake III Arena quake3 exe 4 Add the Quake III net_port command to specify a unique communication port for each system...

Page 166: ...he UWeb WebServer section of the server ini file set the ListenPort to 8080 and ServerName to the IP assigned to the Gateway from Verizon USENET News Service 143 TCP VNC Virtual Network Computing 5500...

Page 167: ...talled 64 MB RAM 128 MB recommended 10 MB of free hard drive space USB Version 1 1 or higher compliant bus Internet Explorer 5 5 or higher or Netscape Navigator 7 x or higher Computer operating system...

Page 168: ...opyright and other proprietary notices Except as authorized under this paragraph no copies of the SOFTWARE or any portions thereof may be made by you or any person under your authority or control 2 Li...

Page 169: ...inst the other party regarding the subject matter hereof the prevailing party shall be entitled to recover in addition to any other relief granted reasonable attorney fees and expenses of litigation 8...

Page 170: ...reless Gateway Model 327W 21 PUBLICATION INFORMATION Verizon VersaLink Wireless Gateway Model 327W Document Part Number 030 300503 Rev A 2007 Verizon All rights reserved All trademarks and registered...

Reviews: