background image

User guide

PREVIOUS   

|

   CONTENTS   

|

   NEXT

One Talk

—W60B user guide

17

Call history

Call history lets you view a history of up to 100 

calls, including lists of all calls, missed calls, 

placed calls and received calls. Each call history 

list is sorted by date and time of the call, starting 

with the latest call entry.
You can check the detailed information of an 

entry in the call history. If the name and number 

associated with call is in your handset directory, 

the list displays the party’s name instead of the 

number. You can dial a call, add an entry to the 

local directory or blacklist, or delete entries  

from the call history.

Viewing call history on your handset

1.  Press the 

History

 soft key.

2.  Use  


or 


 to switch among 

All Calls

Missed 

Calls

Placed Calls

 and 

Received Calls

.

3.  Use  


or


 to highlight a desired entry.

4.  Press the 

Options

 soft key and select 

Detail


to view the details of the selected call.

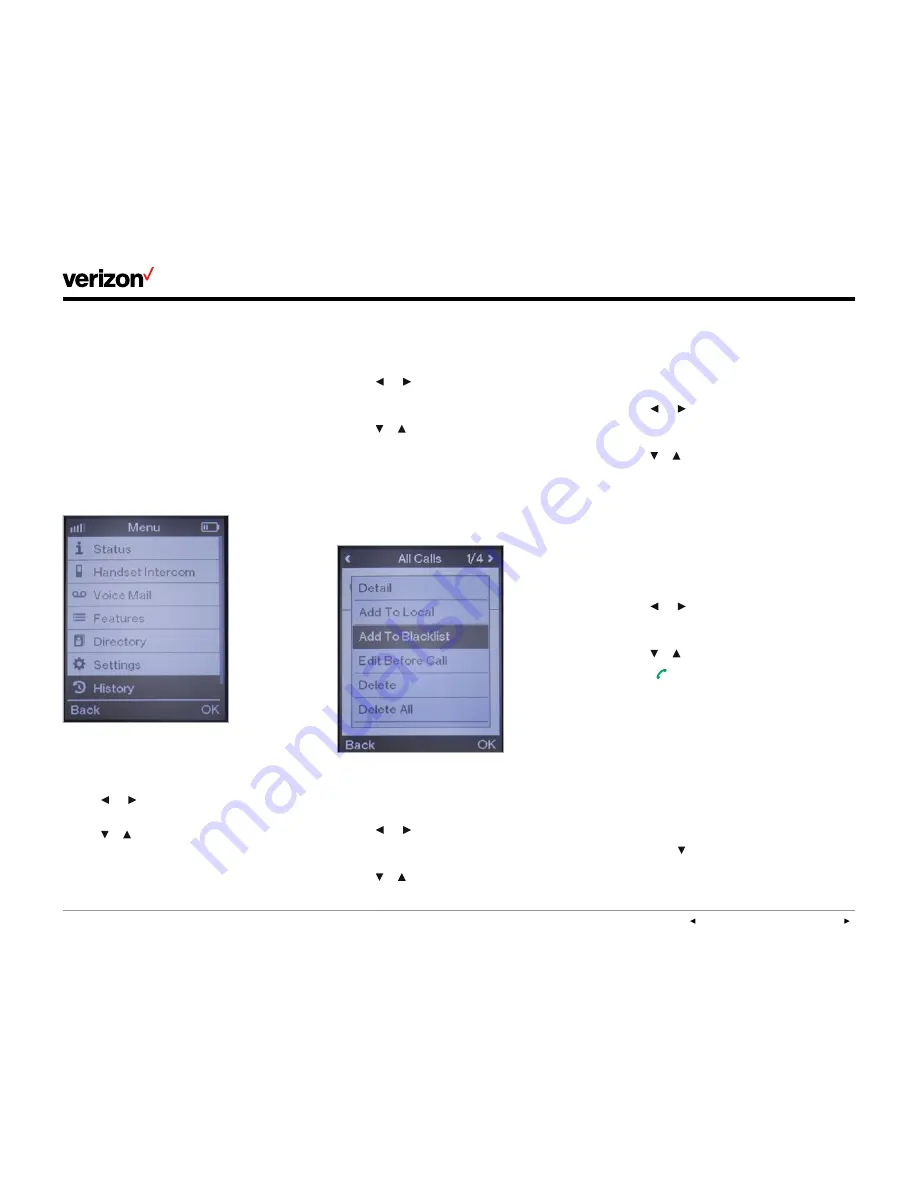
Adding an entry to the blacklist from call 

history

1.  Press the 

History

 soft key.

2.  Use  


or 


  to switch among 

All Calls

Missed Calls

Placed Calls

 and  

Received Calls

.

3.  Use  


or


 to highlight the desired entry.

4.  Press the 

Options

 soft key and select  

Add To Blacklist

.

5.  When the LCD screen prompts “Are you sure?,” 

press the 

Yes

 soft key to add the selected 

entry to the blacklist or the 

No

 soft key  

to cancel.

Deleting a single entry from call history

1.  Press the 

History

 soft key.

2.  Use  


or 


  to switch among 

All Calls

Missed Calls

Placed Calls

 and  

Received Calls

.

3.  Use  


or


to highlight a desired entry.

4.  Press the 

Options

 soft key and select 

Delete


to delete the entry.

Deleting all entries in a call history list

1.  Press the 

History

 soft key.

2.  Use  


or 


  to switch among 

All Calls

Missed Calls

Placed Calls

 and  

Received Calls

.

3.  Use  


or


 to highlight a desired entry.

4.  Press the 

Options

 soft key and select  

Delete All

.

5.  When the LCD screen prompts “Delete All?,” 

press the 

Yes

 soft key to delete all entries in 

the selected list or the 

No

 soft key to cancel.

Placing a call from call history

1.  Press the 

History

 soft key.

2.  Use  


or 


  to switch among 

All Calls

Missed Calls

Placed Calls

 and  

Received Calls

.

3.  Use  


or


 to highlight a desired entry.

4.  Press   to call the number.

Contact management

You can store up to 100 contacts in the handset’s 

local directory. You can store a name, office 

number, mobile number and extension associated 

with each contact. You can place calls directly  

to any contacts stored in your local directory.  

You can also set up speed dial numbers for  

your contacts. 

Adding contacts to your directory

1.  Press the  


directory shortcut key.

2.  Press the 

Options

 soft key and press  

the 

OK

 soft key for the highlighted  

Summary of Contents for One Talk W56HV

Page 1: ...One Talk from Verizon DECT IP Phone W60B Base Station and W56HV Handset User guide ...

Page 2: ...stering additional handsets 7 Mobile phone numbers 7 De registering handsets 7 Selecting a base station 7 Renaming a base station 8 Handset user interface 8 Checking system status 8 Base station status 8 Handset status 8 Line status 8 Getting to know your handset 9 Hardware components and shortcut keys 9 Getting to know your base station 10 Hardware components 10 Icon descriptions 11 Understanding...

Page 3: ...king keypad 14 Basic Call Features 15 Placing calls 15 Answering and ending calls 15 Redialing last number 15 Muting and un muting calls 15 Placing calls on hold and resuming calls 15 Moving calls 15 Transferring calls 15 Forwarding calls 15 Conference calling 16 Parking calls 16 Call history 17 Viewing call history on your handset 17 Adding an entry to the blacklist from call history 17 Deleting ...

Page 4: ...directory 18 Deleting contacts 18 Speed dialing 18 Blacklist 19 Shortcuts 20 Other calling features 20 Call waiting 20 Do Not Disturb DND 20 Anonymous call rejection 21 Placing internal handset intercom calls 21 Troubleshooting 22 Base station issues 22 Handset status and issues 22 Registration issues 22 Call issues 22 Paging issues 22 Audio issues 22 Display issues 22 Update and reset issues 23 R...

Page 5: ... Important customer information 24 WEEE warning 24 Customer feedback 24 GNU GPL information 24 Copyright 24 Warranty 24 Important 911 emergency response information 25 Declaration of conformity 25 Important safety precautions 25 Danger electric shock and fire 26 ...

Page 6: ... the base station The base station can be set up on your desktop using the base stand or mounted on a wall MA C SN MA C SN Desktop setup option MAC SN MAC SN 59mm 59mm Wall mount setup option Connecting the base station to power and Ethernet You have the option to power your base station with either AC power wall outlet or Power over Ethernet PoE Your system administrator will advise you which opt...

Page 7: ...e stations press the OK navigation key select Settings Registration Register Handset and repeat steps 2 through 5 above Be sure to choose a base station that is not already selected or else it will overwrite the existing selection Mobile phone numbers A mobile telephone number can only be registered to a single base station and a base station can only support a single mobile telephone number Also ...

Page 8: ...ficate status Radio fixed part identity RFPI Network information Do the following to check the base station status 1 Press to enter the main menu 2 Select Status Base 3 The LCD screen will display the base station status information and the Network option a Use or to scroll through and view the status information b To view the network information select Network and press the Enter soft key Handset...

Page 9: ... arrow keys Navigates menu options as well as the following Left arrow decreases ringer volume Right arrow increases ringer volume Up arrow places an intercom call to other handsets Down arrow accesses contact directory 9 OK key Enters menu and confirms menu actions 10 Call key Initiates and answers calls in earpiece mode Also lets you view the last number dialed and then redial that number Item D...

Page 10: ...low flashing green Base station is in registration mode Solid green At least one handset is registered to base station Off Base station is powered off or no handsets are registered to it 3 Network status LED Indicates the network status Slow flashing green Network is unavailable Solid green Network is available Off Base station is powered off 4 Power indicator LED Indicates base station power stat...

Page 11: ...ns Description 1 2 3 5 4 The internal registration number of the handset Earpiece mode on Earphone mode on Speaker mode on Keypad lock Voice mail Silent mode on Call forward Contact icon Received calls Missed call Placed calls Icons Description Call hold Call mute Conference call Do not disturb Intercom call Shared line is idle Available line idle ...

Page 12: ...percase all lowercase or numbers Language preferences The default language of the handset is English Do the following to check the language 1 Press to enter the main menu 2 Select Settings Language Date and time By default the date and time displayed on your handset is obtained from the Simple Network Time Protocol SNTP server Volume adjustment Use or to adjust the ringer volume when the handset i...

Page 13: ... silent mode When silent mode is on the handset will not ring when receiving incoming calls but you will still see the incoming call information on the LCD screen Silent mode is useful if you do not want to be disturbed To switch silent mode on Hold down until the LCD screen displays All Ring Tones Off The icon will appear on the status bar indicating silent mode is now on To switch silent mode of...

Page 14: ...to configure the keypad light 1 Press to enter the main menu 2 Select Settings Display Keypad Light 3 Press the Change soft key to check or uncheck the Keypad Light checkbox Voice mail setup 1 Press to enter the main menu and select Voice Mail Call Voice Mail Follow the voice prompt to set up and listen to your voice mails Locking and unlocking keypad You can lock the handset keypad to keep keys f...

Page 15: ...p soft key to switch between two calls Note When a call is on hold placing the handset in the charging cradle will not end the call Moving calls If your One Talk number is shared with other devices when you are on a live call you can move the call from your handset to your mobile device or tablet and vice versa without disconnecting To move a call from a handset to another smartphone or handset sh...

Page 16: ...conference call can place an active conference call on hold with the handset by pressing the Options soft key and selecting Hold This only places that party on hold The other parties in the conference will continue on the conference call as before Ending a conference call Only the conference initiator can end a conference call This is done by pressing or the End soft key If any other party presses...

Page 17: ...ress the Yes soft key to add the selected entry to the blacklist or the No soft key to cancel Deleting a single entry from call history 1 Press the History soft key 2 Use or to switch among All Calls Missed Calls Placed Calls and Received Calls 3 Use or to highlight a desired entry 4 Press the Options soft key and select Delete to delete the entry Deleting all entries in a call history list 1 Pres...

Page 18: ... 2 Press or to highlight the desired contact 3 Press the Options soft key and select Edit 4 Edit the values in the appropriate Name Number Mobile and Extension fields 5 Press the Save soft key to save your edits Deleting contacts You can delete a single contact or all your contacts from your directory Do the following to delete a single contact 1 Press the directory shortcut key 2 Press or to high...

Page 19: ...g a speed dial number 1 Press to enter the main menu 2 Select Settings Telephone Speed Dial 3 When the LCD screen displays all the available speed dial keys use or to highlight the desired speed dial key that already has an assigned number 4 Press the Options soft key and select Clear Key to delete the assigned speed dial number Blacklist You can store up to 30 contacts in a handset s blacklist Yo...

Page 20: ...llows Shortcut key Default feature assignment Left soft key History Right soft key Line status Handset intercom Directory Volume down Volume up Do the following to change a shortcut feature assignment on a handset 1 Press to enter the main menu 2 Select Settings Shortcut 3 When the LCD screen displays the changeable shortcuts and their current assigned features use or to highlight the shortcut you...

Page 21: ... 3 When the LCD screen displays the names of all the registered handset names and the All Handsets option use or to highlight the desired handset name 4 Press or the OK soft key to make the call Placing an internal call to all registered handsets 1 Press to enter the main menu 2 Select Handset Intercom 3 When the LCD screen displays the names of all the registered handset names and the All Handset...

Page 22: ...e information Make sure that Always Forward is not enabled Refer to the Call forwarding section of this user guide for more information I hear noise during calls Make sure you are not using the handset or base station in an area with high electrical interference Try placing the base station and handset in areas far away from sources of high electrical interference Make sure the handset is not too ...

Page 23: ...registration LED will illuminate in sequence The system PIN and all individual settings will reset to factory defaults Handset registrations will also be cleared after the base station resets Menu structure Menu Structure Status Base Call Voice Mail Set Key 1 Handset Phone Number Handset Intercom Voice Mail Call Forward Anonymous Call Rejection Do Not Disturb Forward To Voice Mail Start stop Log C...

Page 24: ...Equipment WEEE as unsorted municipal waste so that such WEEE can be collected separately Customer feedback We are striving to improve our documentation quality and we appreciate your feedback Email your opinions and comments to docsfeedback yealink com GNU GPL information Yealink W60 DECT IP phone firmware contains third party software under the GNU General Public License GPL Yealink uses software...

Page 25: ...llation This equipment generates uses and can radiate radio frequency energy and if not installed and used in accordance with the instructions may cause harmful interference to radio communications However there is no guarantee that interference will not occur in a particular installation If this equipment does cause harmful interference to radio or television reception which can be determined by ...

Page 26: ... electric shock and fire Electric current from power telephone and communication cables is hazardous and could result in electric shock and or fire Learn more For more information visit www onetalk com Network details coverage maps at vzw com 2017 Verizon UG1381217 ...

Reviews: