4
Record the Asset Guard serial number (ESN) found on the device label and the
trailer’s identification number.
CAUTION:
Remember to mount Asset Guard in a location it will not be damaged
by stacking or by normal operation. Choose a location that is rust free and level
on a cross member that the lanyard can wrap around or a hole can be drilled to
extend it through.
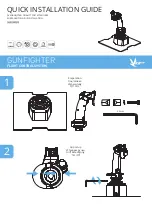
1. Clean mounting surface where magnets will contact frame member.
• For dirt and grease use acetone
• For rust or loose paint use a wire brush and acetone
2. Mount device and ensure all four (4) magnets are engaged.
3. If required, drill 1/4” hole in frame member, remove any shavings and pass
lanyard through; otherwise, loop lanyard around the frame member.
(Safety glasses / eye protection recommended)
4. Feed threaded link through lanyard loops and lanyard clip.
5. Apply blue Loctite to threaded link threads.
6. Tighten threaded link with two Crescent wrenches.
Record the Asset Guard serial number (ESN) found on the device label and the
trailer’s identification number.
CAUTION:
Remember to mount Asset Guard in a location it will not be damaged
by stacking or by normal operation.
1. Mount Asset Guard on top left or right door between the locking rods at
the base of the corrugated well in a rust free and level position.
2. Level device in mounting area with label facing down.
3. Mark all four (4) mounting holes.
4. At each marked location, drill a 3/16” hole.
(Safety glasses / eye protection recommended)
5. Apply RTV sealant inside the mounting holes.
6. Feed mounting screws from inside container door.
7. Mount device on screws and tighten nuts.
8. If using magnetic mount option follow magnetic mount instructions and
loop lanyard around locking bar.
Heavy Equipment Magnetic Mount Chassis Installation
Heavy Equipment Chassis Installation