background image

33

Menu Settings (Cont.)

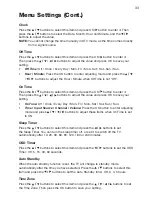
Clock

Press the 

 /   

buttons to select this item and press OK/   button to enter it. Then 

press the 

 /   

buttons to select the Date, Month, Hour and Minute, and the

   /   

buttons


to adjust the value.  

NOTE:

  You cannot change the time manually in DTV mode, as the time comes directly 

from a signal source.

Off Time

Press the 

 /   

buttons to select this item and press the OK/   button to enter it. 

Then press the 

 /   

/

   /   

buttons


to adjust the value and press OK to save your 

setting.

• 

Off Time:

 Off / Once / Every Day / Mon~Fri / Mon~Sat / Sat~Sun / Sun.

• 

Hour / Minute:

 Press the OK button to enter adjusting mode and press the 

 /   

/

   /   

 buttons to adjust the Hour / Minute when Off Time is not “Off”.

On Time

Press the 

 /   

buttons to select this item and press the OK/   button to enter it. 

Then press the 

 /   

/

   /   

buttons


to adjust the value and press OK to save your 

setting.

• 

On Time:

 Off / Once / Every Day / Mon~Fri / Mon~Sat / Sat~Sun / Sun.

• 

Time / Input Source / Channel / Volume:

 Press the OK button to enter adjusting 

mode and press 

 /   

/

   /   

buttons to adjust these items when On Time is set 

to ON.

Sleep Timer

Press the 

 /   

buttons to select this item and press the

   /   

buttons


to set 

the Sleep Timer. You can turn the sleep timer off, or set it to switch off the TV 
automatically after 10, 20, 30, 60, 90, 120, 180 or 240 minutes.

OSD Timer

Press the 

 /   

buttons to select this item and press the

   /   

buttons


to set the OSD 

Timer: Off, 5, 15, 30, 60 seconds.

Auto Standby

When the auto standby function is set, the TV will change to standby mode 
automatically after the time you have selected. Press the 

 /   

buttons to select this 

item and press the

   /   

buttons


to set the Auto Standby time:  Off, 3, 4, 5 hours.

Time Zone

Press the 

 /   

buttons to select this item and press the

   /   

/

   /   

buttons


to set 

the Time Zone. Then press the OK button to save your setting.

Summary of Contents for V55UHDS

Page 1: ...55 4K ULTRA HD LED LCD TELEVISION MODEL V55UHDS ...

Page 2: ...Instruction 11 Wall Mounting Instructions 12 Antenna 13 Front and Rear Panel Layout 13 Rear Controls 14 Remote Control 19 Getting Started 22 Power Connection Getting Started 22 First Time Powering on Your TV OSD Language 23 Using the Main menus in DTV mode 24 Selecting an Input Source 24 Channel Selection 24 Volume Control 25 Picture and Sound Mode 25 Information Display 25 Menu Settings 26 PICTUR...

Page 3: ...le of Contents Cont MOVIE 38 MUSIC 38 PHOTO 39 USB Multimedia Playback Formats 40 EPG Electronic Program Guide 41 Recording PVR Function 42 FAQs 45 Specifications 47 Responsible Disposal 48 Warranty Card 51 ...

Page 4: ... fire The mains plug is used as the power disconnect device and shall remain readily accessible and operable Protect the cord Do not bend twist or kink the power cord excessively Do not allow anything to rest on or roll over the power cord and antenna cable Doing so may cause a fire or an electric shock Do not run the power cord near heat producing appliances such as radiators stoves or irons The ...

Page 5: ...ces such as radiators stoves or other audio visual equipment including amplifiers that produce heat Environments This TV is not warranted for use in unreasonably hot cold or humid environments Location This TV is designed for indoor fixed location use only It must not be used in portable or mobile applications as vibration or excessive forces may damage the unit Antenna Install the antenna away fr...

Page 6: ...he outlet may cause damage to the cord resulting in fire or electric shock Batteries When removing batteries from the remote control make sure to keep them out of reach of infants and children Seek medical attention immediately if a child has swallowed a battery Usage restriction This product is not intended for use by persons including children with reduced physical sensory or mental capabilities...

Page 7: ...se of fixed image program material can cause a permanent after image on the screen This background image is viewable on normal programs in the form of a stationary fixed image This type of irreversible screen deterioration can be limited by Reduce the brightness contrast setting to a minimum viewing level Do not display any fixed image for an extended periods of time Turn the power off when not in...

Page 8: ...re used in the operation of this television receiver Do not remove the cabinet back from your set Refer servicing to qualified service personnel To prevent fire or electrical shock hazard do not expose the television receiver to rain or moisture Do not drop or push objects into the television cabinet slots or openings Never spill any kind of liquid on the television receiver Do not block the venti...

Page 9: ...riod of time it is advisable to disconnect the AC power cord from the AC outlet Avoid exposing the television receiver to direct sunlight and other sources of heat Do not stand the television receiver directly on other products which give off heat e g video cassette players and audio amplifiers Do not place naked flame sources such as lighted candles on or near the television If the television is ...

Page 10: ...ions on page 4 1 x 55 Ultra HD Smart LED LCD Television 1 x Remote Control 1 x Left Base Stand 1 x Right Base Stand 2 x AAA Batteries 1 x Instruction Manual 1 x Quick Start Guide 1 x Mini AV Cable 1 x Y Pb Pr Adaptor Cable 4 x BM4 0 20mm Screws Once all the accessory items have been accounted for prepare a location where you can attach the TV base stand to the body of the TV You will need to arran...

Page 11: ... being ed e Stand with TV bottom and then force of stand until the TV is fully seated on d the included screws with a screw ug the power plug first when installing ving the TV Stand oid any damage to this TV contact more partner for assistance when g or removing the TV stand STAND INSTALLATION 1 Align the stands with the bottom of the TV Use the BM4 0 20mm Screws to attach the stands to the bottom...

Page 12: ...screen s surface Do not put pressure on the TV screen at any time as this may damage the LCD screen 2 Removing the TV base stand and neck brackets by removing the screws 3 Use 4 x M6 size screws not included and fix them onto your wall mounting bracket not included via the four VESA standard holes on the back panel of the TV NOTE No wall mounting bracket is included with this TV Please also refer ...

Page 13: ...ayout Front View Back View 1 LED display screen 2 Remote control sensor Power indicator In standby mode the indicator light is red when switching on the unit the light will turn blue 3 Vol Button Press to increase decrease the volume or move left right 4 CH Button Press to select next previous channel or move up down 5 Menu button Enter the menu settings page 6 SOURCE button Press to select the in...

Page 14: ...HDMI device such as a gaming console or A V receiver ARC in HDMI 3 only HDMI1 1 4 Upscaling to 4K 30hz source need 1080P Support 4K 30hz HDMI2 1 4 Upscaling to 4K 30hz source need 1080P Support 4K 30hz HDMI3 1 4 Upscaling to 4K 30hz source need 1080P Support 4K 30hz HDMI4 2 0 Support 4K 60fps not support upscaling 4 RF Connect the antenna 5 Optical Out Connect to an external digital audio device v...

Page 15: ...SOURCE button on the remote control Installation Cont HDMI CONNECTION LAN CONNECTION HDMI cable Not included Use HDMI cable to connect the unit with other devices to receive high definition multimedia signal Use a LAN cable not included to connect 7 Headphone output 8 Mini Y Pb Pr Input Component Supports both SD and HD High Definition picture quality 9 Mini AV Input COMPOSITE 10 USB Input Connect...

Page 16: ...included to connect the unit with amplifier or other audio decoding devices for coaxial audio signal output COAXIAL CONNECTION OPTICAL CONNECTION USB CONNECTION USB Memory Device Not included Use coaxial cable not included to connect the unit with amplifier or other audio decoding devices for coaxial audio signal output Use coaxial cable not included to connect the unit with amplifier or other aud...

Page 17: ...r of the device as shown in the image below Make sure the cable colours match the connector colours NOTE As your TV contains a mini Y Pb Pr and a mini AV terminal you may need to use the special adaptor cable supplied with a 3 5mm head on one end and 3 female RCA terminals on the other end to connect this TV with external devices 13 YPbPr CONNECTION NOTE As your TV contains a mini YPbPr and a mini...

Page 18: ...to connect this TV with external devices For basic connection use the composite Audio L R white red and CVBS yellow cable to connect the unit with other devices AV cable Not included AV adaptor cable Included COAXIAL CONNECTION OPTICAL CONNECTION USB CONNECTION USB Memory Device Not included Use coaxial cable not included to connect the unit with amplifier or other audio decoding devices for coaxi...

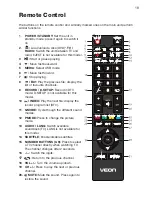
Page 19: ...rite channels 9 RECORD D SETUP Record in DTV mode D SETUP is not available for this model 10 INDEX Play the next file display the record program list DTV 11 S MODE Cycle though the different sound modes 12 PMODE Press to change the picture mode 13 AUDIO LANG Switch available soundtrack TV LANG is not available for this model 14 SUBTITLE Enable disable subtitles 15 NUMBER BUTTONS 0 9 Press to selec...

Page 20: ...TLE EXIT Exit from the main TV menu displayed on the screen TITLE is not available for this model 27 INFO Display information of the current program 28 OK Confirm selection 29 Press the LEFT RIGHT UP DOWN button to navigate the on screen menus and adjust the system settings to your preference Press OK to confirm your selection 30 SOURCE Switch the input source 31 EPG D MENU Display electronic prog...

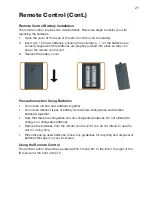
Page 21: ...g Batteries Do not use old and new batteries together Do not use different types of battery for example Manganese and Alkaline batteries together Note that there are chargeable and non chargeable batteries Do not attempt to charge non chargeable batteries Remove the batteries from the remote control unit if you do not intend to use the unit for a long time When disposing used batteries follow any ...

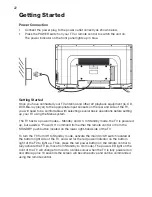
Page 22: ...TV has two power modes Standby and On In Standby mode the TV is powered up but awaits a Power On command from either the remote control or from the STANDBY push button located on the lower right hand side of the TV To turn the TV from Off to Standby mode activate the main On Off switch located at the bottom right side of the TV and wait for the red power indicator on the bottom right of the TV to ...

Page 23: ...n and the available OSD language for your TV is English Country Press the buttons to select this option and the available country selection is New Zealand Tuning Mode Press the to select this option and press the buttons to select tuning TV Your TV will now scan through all the analogue TV ATV and digital TV DTV channels that it can receive using the connected antenna This process may take several...

Page 24: ...ce You can select an input signal source by pressing the SOURCE button on the remote control or control panel of your TV You can choose from the following input sources if you have your audio and video devices connected to your TV DTV ATV Composite or AV 1 2 Component Y Pb Pr HDMI 1 2 3 4 When you switch on this TV for the first time you need to select the language and the country to search all th...

Page 25: ...ed TV channels Favourites List While viewing a channel press the FAV button on the remote control to enter the Favourites List menu Press the buttons to select the channel and press OK to watch it To add a channel to the Favourites List go to MENU select Channels and press OK Select Program Edit and press OK Press the buttons to select a channel and press the FAV button Press the FAV button again ...

Page 26: ... to display the main menu page Press Exit to quit PICTURE menu Press buttons to select PICTURE menu and press OK to enter submenu Press buttons to select each submenu option and press buttons to adjust selection then press OK to confirm Press the MENU button to go back to the previous menu page Press EXIT button to exit current menu Menu Settings ...

Page 27: ...ss Saturation Press the buttons to adjust the picture saturation Sharpness Press the buttons to adjust the picture sharpness Colour Temp Press the buttons to select this item and press the buttons to select the desired colour temperature Standard Warm and Cold This item is used to adjust the optimum color temperature for suitable viewing Aspect Ratio Press the buttons to select this item and press...

Page 28: ...o change the sound mode directly The values for Treble and Bass can only be adjusted in Personal sound mode Treble Press the buttons to adjust the treble value between 0 100 Bass Press the buttons to adjust the bass value between 0 100 Balance Press the buttons to select this item and press OK to enter the submenu Then press the buttons to balance your left and right speakers from 50 to 50 Auto Vo...

Page 29: ...select this item and press the buttons to adjust this item if TV picture display and sound doesn t work simultaneously S PDIF Delay Press the buttons to select this item and press the buttons to adjust this item if TV picture display and sound doesn t work simultaneously CHANNEL Menu Press the buttons to select CHANNEL menu and press OK to enter the submenu Press the buttons to select each submenu...

Page 30: ...the OK button to enter the submenu Press the buttons to select the channel then press the OK button to start searching Channel Edit Press the buttons to select this item and press the OK button to enter the submenu Press the buttons to high light desired channel Press the RED the button to delete the current channel Press the YELLOW button and the buttons to move the current channel Press the BLUE...

Page 31: ... enter submenu Press the BLUE button to edit preset reminder Press the YELLOW button to add new reminder Press the GREEN button to sort by Time or Channel Name Press the RED button to delete the highlighted option LOCK Menu Press the buttons to select LOCK menu and press OK to enter the submenu Press the buttons to select each submenu option and press the buttons to adjust selection then press OK ...

Page 32: ...e GREEN button to block it Parental Guidance Press the buttons to select this item and press OK to enter the submenu Then press the buttons to select the desired parental guidance level OFF 4 18 Press the OK button to confirm Key Lock The Key Lock is used to lock unlock TV buttons Press the buttons to select this item and press the buttons to turn it on off TIME menu Press the buttons to select TI...

Page 33: ...adjust the value and press OK to save your setting On Time Off Once Every Day Mon Fri Mon Sat Sat Sun Sun Time Input Source Channel Volume Press the OK button to enter adjusting mode and press buttons to adjust these items when On Time is set to ON Sleep Timer Press the buttons to select this item and press the buttons to set the Sleep Timer You can turn the sleep timer off or set it to switch off...

Page 34: ...ss the buttons to select this option and the available OSD language for your TV is English Audio Language Press the buttons to select this item and press the OK button to enter it Then press the buttons to select the desired audio language Subtitle Language Press the buttons to select this item and press the OK button to enter it Then press the buttons to select the desired subtitle language Subti...

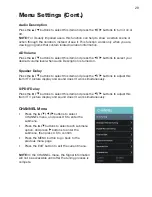
Page 35: ... only for programs that contain related caption information Blue Screen Press the buttons to select this item and press the buttons to turn it on off When this function is switched on the screen background will turn blue at very weak or no signal condition PVR File System Press the buttons to select this item and press the OK button to enter the submenu Press the buttons to select the desired opti...

Page 36: ...ns to select this item and press the OK button to enter the submenu Press the buttons to select each submenu option and press the buttons to adjust settings To Use the HDMI CEC Function Make sure the HDMI device Amplifier etc is connected correctly Press the SOURCE button on the unit or remote control to select HDMI input source Device List Display all available devices HDMI CEC Turn on off HDMI C...

Page 37: ... the OK button to enter submenu Press the buttons to select desired file and press the OK button to start playback Press the EXIT button to exit playback and return to the previous menu Once you are inside the multimedia submenu press the buttons to select the RETURN icon on top left corner of the submenu page and press the OK button to go to the main MULTIMEDIA menu page like showing below image ...

Page 38: ...to start playback During movie play back press the MENU button to dismiss or recall the tool bar Press the buttons to select desired control options and press the OK button to confirm it Press the EXIT button to exit playback and return to the previous menu MUSIC Press the buttons to select MUSIC in the MULTIMEDIA menu and press the OK button to enter it Press the buttons to select desired file an...

Page 39: ... and press the OK button to confirm it Press the EXIT button to exit playback and return to the previous menu Remote operations when playing multimedia files Press the button on remote control to play or pause playing Press the button on remote control to stop playing Press the button on remote control to move fast backward Press the button on remote control to move fast forward Press the button o...

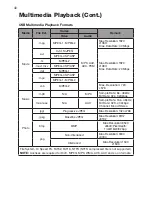
Page 40: ...Resolution 720 x576 Music mp3 N A MP3 Sample Rate 8k 48kHz Bit Rate 32k 320kbps m4a aac N A AAC Sample Rate 16k 48kHz Bit Rate 32K 442kbps Channel Mono Stereo Photo jpg Progressive JPEG Max Resolution 1024 x768 jpeg Baseline JPEG Max Resolution 8192 x8192 bmp BMP Max Resolution 6500 x6500 Pixel Depth 1 4 8 16 24 32 bpp png Non Interlaced Max Resolution 3000 x3000 Interlaced Max Resolution 1500 x15...

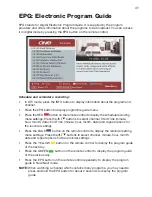
Page 41: ...ct channel Start Time minute hour month date End Time minute hour month date and repeat options for the recorder settings Press the BLUE button on the remote control to display the reminder setting menu settings Press the buttons to select channel minute hour month date and repeat options for the reminder settings Press the YELLOW button on the remote control to display the program guide of the ne...

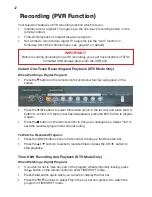
Page 42: ...ress the EXIT button to display it again Press the button on the remote control to bring up a dialogue box Select Yes to save the recorded program and stop recording To Watch a Recorded Program Press the INDEX button on the remote control to bring up the Recorded List Press the buttons to select a recorded file and press the OK button to start playback Time Shift Recording And Playback DTV Mode On...

Page 43: ... file recorded can only be used in this TV Do not copy it to any other device When you are in time shift recording mode you may experience some difficulty with a scheduled recording at different times without removing the USB recording device You will need to remove the USB device as it is required to reset after each recording to protect the device from damage If you see the message DISK NOT READ...

Page 44: ... by Copyright and use of the recordings are restricted to private use only Any other use of the whole or any part of the recorded material including Commercial Use Advertising Adapting Copying Exhibiting Issuing Copies Unauthorised Lending Public Performance Diffusion Re setting Hiring and Editing Broadcasting making the same available to or via the Internet or wireless technology or authorising a...

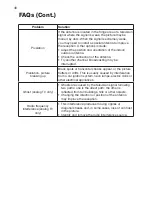
Page 45: ...adcast in black and white The remote control does not work Change the batteries Check that the batteries are installed correctly Ensure the TV is connected to the mains power No picture normal sound Adjust the brightness and contrast Broadcasting may be interrupted Normal picture no sound Press the VOL button to increase the volume Press MUTE to restore sound if the volume is set to mute Change th...

Page 46: ...breaking up Black spots or horizontal streaks appear or the picture flutters or drifts This is usually caused by interference from a car ignition system neon lamps electric drills or other electrical appliances Ghost analog TV only Ghosts are caused by the television signal following two paths one is the direct path the other is reflected from tall buildings hills or other objects Changing the dir...

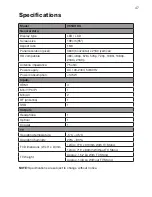
Page 47: ...75 ohm Power supply AC 100 240V 50 60Hz Power consumption 145W Inputs HDMI 4 Mini Y Pb Pr 1 Mini AV 2 RF Antenna 1 USB 1 Outputs Headphone 1 Optical 1 Coaxial 1 TV Operating temperature 5 C 45 C Operating humidity 20 80 TV Dimensions W x H x D mm 1244 x 773 x 310mm With TV Stand 1244 x 719 x 83mm Without TV Stand TV Weight Approx 15 2 kg With TV Stand Approx 14 8 kg Without TV Stand NOTE Specifica...

Page 48: ...reach and are safely disposed of Please ensure they are offered for recycling rather than throwing these materials away Television Set At the end of its working life do not throw this TV set out with your household rubbish An environmentally friendly method of disposal will ensure that valuable raw materials can be recycled and used again Electrical and electronic items contain materials and subst...

Page 49: ...49 Notes ...

Page 50: ...50 Notes ...

Page 51: ...51 Notes ...

Page 52: ...rchased second hand All production orders have quality inspections In the unlikely event of a deficiency please contact the retailer from which this product was purchased WARRANTY FOR APPLIANCES USED COMMERCIALLY LIMITED TO 90 DAYS Type of Appliance Model No Purchase Date Product Purchased From Your Name Address Phone Number IMPORTANT Please retain this warranty card along with your purchase recei...

Reviews: