background image

- 24 -

USING THE TV

Connect a TV antenna or CATV cable or Satellite system to the TV antenna terminal before
searching TV  channels

Manual Searching for TV Channels

1. Press the TV MENU button, then press the   button to TV CHANNEL

SETTING.

2. Press the   button to select ANTENNA. Use the   or   button to select Air

or CATV.

3. Use the   button to select Auto Scan.
4. Press the ENTER button to enter sub menu of Auto Scan.
5. Use the   button to select “Start to Scan” in the sub menu.
6. Press the ENTER button to start the search for TV channels.
7. The screen will show the first received channel when auto search is

completed.

Watching Television

Viewing a television station after the auto/manual search for channels.
1. Press the FUNCTION button to TV mode.
2. Press the   CH   buttons to select a channel, or press the number button on the remote to select the

channel you want to watch.

• For channels 1 to 9, enter one-digit channel number.
• For channels 10 to 99, enter the two-digit channel number.
• For channels 100 or over, enter three-digit channel number.

Note:
• When a channel is selected, the channel number is displayed on the top right corner of the screen. This

number will disappear after a few seconds.
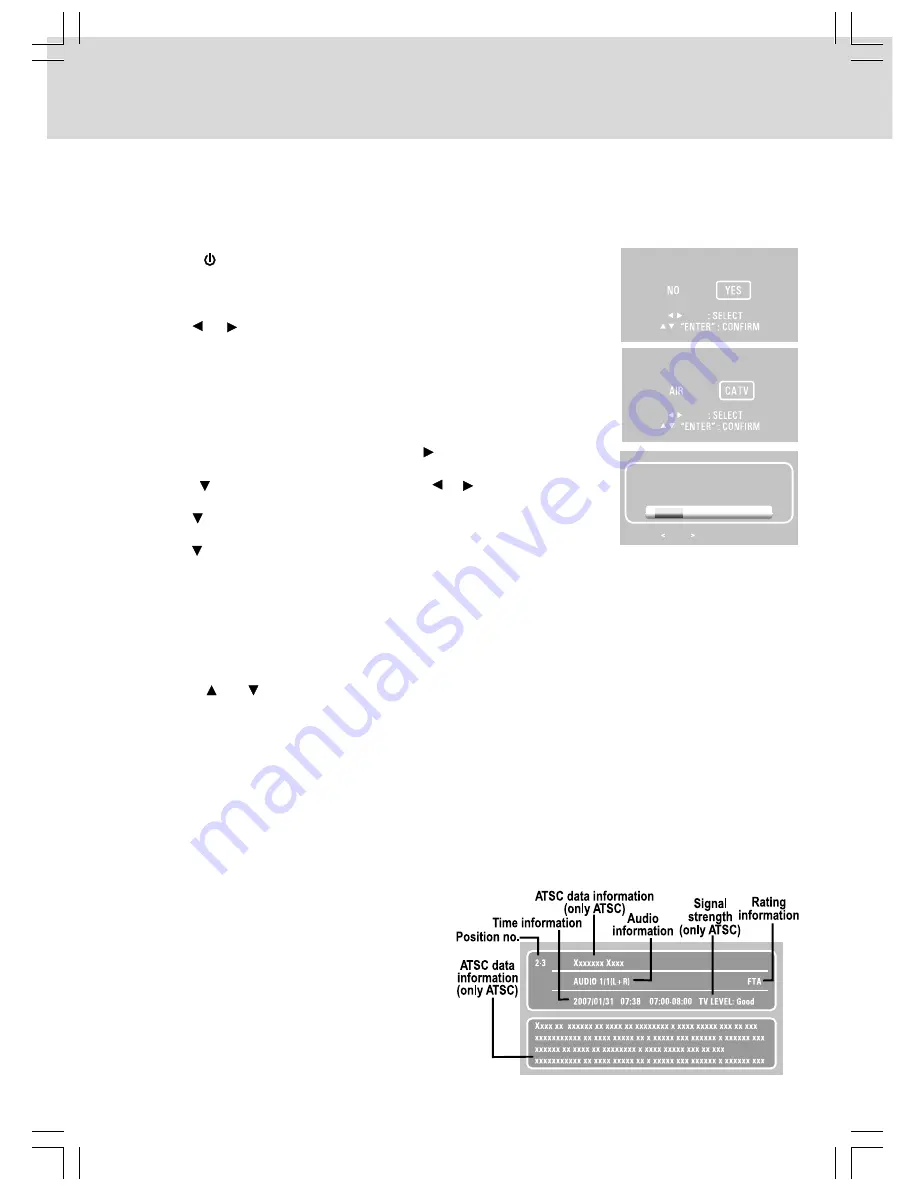
ATSC TV  mode:
Press the DISPLAY button, the upper window will
pop up, then press the DISPLAY  button again,
the lower window will pop up. Press the DISPLAY
button once to exit.

NTSC TV  mode:
Press the DISPLAY button, the upper window will
pop up, then press the DISPLAY  button once to
exit.

Searching for TV channels automatically (Only appears to the first time Power ON)

1. Connect the TV antenna.
2. Connect the AC power cord.

3. Press the 

 ON/OFF button to turn on the unit.

4. Press the DVD/TV/RADIO button (the FUNCTION button on the remote)

to select TV mode.

5. Press the ENTER button to proceed with auto scan.
6. Use the   or   button to select “CATV” or “AIR”, then press the ENTER

button to start auto scan.

7. The unit will immediately search all channels for those with adequate

signal strength and store those channels with signals in memory. The unit
will take a short minutes to finish auto scan and after this is completed, the
unit will switch to the first channel found.

• When MUTE is pressed, the sound is mute and the “

L O

” indicator always blinks on the LCD display

until MUTE is pressed again or VOL is pressed.

Proceed with auto scan?

Please select Antenna type

RF CH

13

PRESS MENU TO EXIT AUTO SCAN

Found

0

Summary of Contents for KLV39120

Page 1: ...itchen LCD TV DVD Combo PREV TUNING NEXT LAST CH STOP BAND PLAY PAUSE VOLUME ENTER STANDBY ON MUTE FUNCTION DVD MENU TV MENU ANGLE SUBTITLE SOUND RETURN EXIT PICTURE DISPLAY GOTO AUDIO MTS REPEAT MEMO...

Page 2: ...ping or splashing and that no objects filled with liquid such as vases shall be placed on the apparatus On Condensation When left in a heated room where it is warm and damp water droplets or condensat...

Page 3: ...ergy and if not installed and used in accordance with the instructions may cause harmful interference to radio communications However there is no guarantee that interference will not occur in a partic...

Page 4: ...our outlet consult an electrician for replacement of the obsolete outlet 10 Protect the power cord from being walked on or pinched particularly at plugs convenience recep tacles and the point where th...

Page 5: ...e Guide 7 9 Mounting Instructions 10 11 Connections 12 13 Connecting the TV Antenna 12 Connecting the Unit to a TV or other Video Equipment 12 Connecting the AM LOOP Antenna and FM Wire Antenna 12 Plu...

Page 6: ...D Titles Chapters and Tracks DVDs are divided into titles and chapters If the disc has more than one movie on it each movie would be a separate title Chapters are sections of titles Audio CDs are divi...

Page 7: ...M batteries Always remove batteries as soon as they become weak Batteries shall not be exposed to excessive heat such as sunshine fire or the like Weak batteries can leak and severely damage the remot...

Page 8: ...wing 7 DVD MENU Button Press to enter the main menu of the DVD you are watching 8 CURSOR Buttons Use to highlight selections on a screen and make adjustments to certain settings CH CH buttons Use to c...

Page 9: ...vance TUNING Buttons Fast reverse playback Fast forward playback TUNING Scans all available radio stations NEXT Button Selects next titles chapters or tracks on a disc LAST CH Button Press to switch r...

Page 10: ...firm selections in TV mode 9 SET CLOCK Button Use to set the current time 10 DVD TV RADIO Button Use to select DVD TV or RADIO mode 11 TIMER Button Use to set the cooking timer 12 PREV NEXT ADJUST But...

Page 11: ...h which will go completely through your cabinet bottom and extend at least 3 8 past the bottom of your cabinet overhang b This unit includes three sets of four spacers of various lengths The spacers c...

Page 12: ...you wear safety glasses while drilling to prevent eye injuries 4 For wood cabinets you may want to mark the hole locations with a nail pressed gently but firmly into the wood so that a slight impressi...

Page 13: ...your TV or other video equipment 1 2 TV antenna To the TV ANT IN terminal Video cable not supplied yellow TV or other Video Equipment VIDEO IN Connecting the AM LOOP Antenna and FM Wire Antenna Conne...

Page 14: ...turn completely around CONNECTIONS Plugging in the Unit Plug the AC power cord into the wall outlet a Before plugging in the power cord make sure the voltage of the unit matches your local voltage b P...

Page 15: ...e on many DVDs Manufactured under license from Dolby Laboratories Dolby and the double D symbol are trademarks of Dolby Laboratories SOUND SYSTEM Press the ON OFF button to turn the unit on and the DV...

Page 16: ...Press the buttons to select your desired time from 1 99 minutes Press the TIMER button repeatedly to select time 10 15 30 45 60 75 90 minutes Press and hold the buttons to fast forward reverse the co...

Page 17: ...ress the PLAY button Each time you press the PAUSE button the picture advances one frame Stopping Playback Press the button at the location where you want to interrupt playback To resume playback at t...

Page 18: ...is pressed within a few seconds playback continues without changing the current subtitle This function can only be used for discs on which subtitles have been recorded in multiple languages On some D...

Page 19: ...on to confirm The unit will start playback about 3 seconds later Notes If the time numbers you entered is not permited by the DVD after you press the ENTER button it will restore to You should re ente...

Page 20: ...tton until the indicator displays on the screen Repeating a Title You can play the same title repeatedly 2 While the disc is playing press the REPEAT DISC button until the indicator displays on the sc...

Page 21: ...he button to select Clear All then press the ENTER button All the programs will be cleared 3 Press the PLAY button to resume normal playback Notes Some discs may not permit memory playback operation T...

Page 22: ...s on the remote to select Edit mode then press the ENTER button 2 Use the or button to select Program view then press the ENTER button The programmed tracks files appear on the left side of the window...

Page 23: ...ubtitle language from the selection on the disc menu Audio 1 Press the SETUP button in stop mode 2 Press the button Use the or button to select Audio 3 Press the button Use the or button to make adjus...

Page 24: ...ss the button then press the ENTER button 4 Use the or button to select YES then press the ENTER button The original setting will be restored The unit will exit setting menu automatically and reload t...

Page 25: ...layed on the top right corner of the screen This number will disappear after a few seconds ATSC TV mode Press the DISPLAY button the upper window will pop up then press the DISPLAY button again the lo...

Page 26: ...r Adjust the color of the picture Sound Setting 1 Press the TV MENU button 2 Use the or button to select SOUND SETTING 3 Use the or button to select the options Sound Mode Bass Treble Balance Audio La...

Page 27: ...button 2 Use the or button to select MISC SETTING 3 Use the or button to select the options Language Color Mode Restore Setting 4 Use the or button to make adjustment The screen will change to your s...

Page 28: ...e or button to enter the number or letter 3 Use the or button to move and edit for the next character 4 After editing press the DISPLAY button and the Channel Channel Label will be shown on the screen...

Page 29: ...l or the TUNING buttons on the remote until the tuner starts searching for a station then release After tuning in a station the search stops The search may not stop at a station with a very weak signa...

Page 30: ...disc has been inserted The unit and disc region number are incom patible Condensation may have formed inside the unit due to a sudden change in tem perature Wait about an hour for it to clear and try...

Page 31: ...nzine thinner cleaning fluid or other chemicals Do NOT use compressed air to remove dust Important Note Before transporting the unit remove the disc from the disc compartment Cleaning the Disc A defec...

Page 32: ...carded or damage to product or parts caused by misuse accident improper operation or maintenance or use in violation of instructions provided with the product or to product which has been altered or m...

Reviews: