background image

E - 7

TV ANTENNA

CONNECTIONS

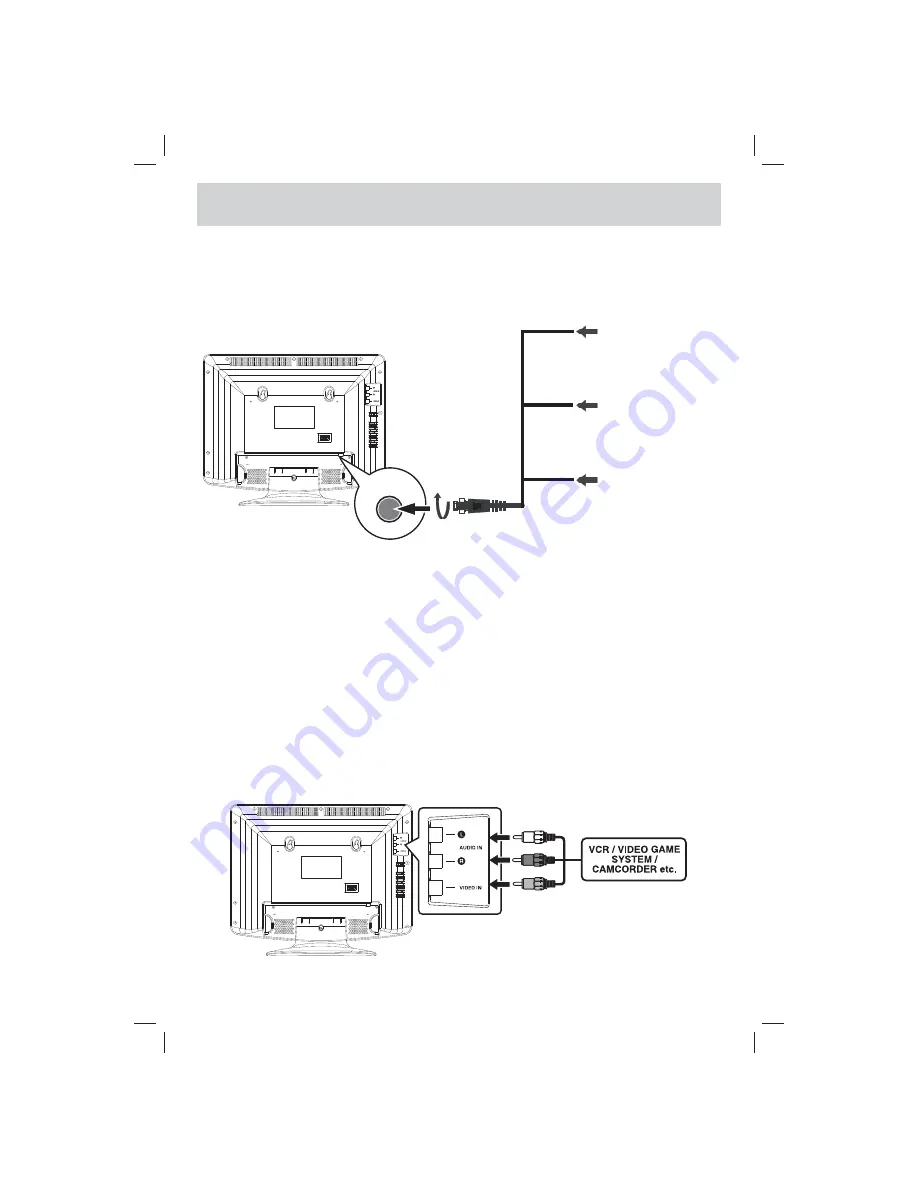
CONNECTING A TV ANTENNA

To view television channels correctly, a signal must be received from one of the following sources:

-  An indoor or outdoor aerial antenna
-   A cable system
-  A satellite system

NOTE
For optimal reception of over-the-air TV broadcasts, we recommend that you use an external fi xed 
antenna. If using an indoor antenna, please ensure that you purchase an antenna with suffi cient 
ability to receive signals in your home. Orientation and location of the antenna is typically critical for 
best results – you may fi nd that placement of the antenna near a window, or in an elevated location, 
improves performance.

To TV Antenna 

terminal

To Home Antenna terminal

COAX Cable
(If not using a Cable 
box)

Combination VHF / 
UHF antenna
(ATSC / NTSC signal)

Separate VHF or UHF 
antenna
(ATSC / NTSC signal)

CONNECTING TO A VCR / CAMCORDER / VIDEO GAME SYSTEM / CABLE / SATELLITE 
SYSTEM

Connect an AUDIO / VIDEO cable (not included) as shown:

Make sure you connect a cable from the AUDIO/VIDEO OUT jacks of the other equipment to AUDIO 
VIDEO IN jacks of this unit.

NOTE
Please refer to the connected equipment’s user manual for more information.

To AUDIO /VIDEO 

IN jacks

To AUDIO / VIDEO 

OUT jacks

PLV76156S7_ENG_IB_UL_091221.indd   7

PLV76156S7_ENG_IB_UL_091221.indd   7

12/22/2009   10:46:11

12/22/2009   10:46:11

Summary of Contents for 15" LCD TV PLV7615H

Page 1: ...NUAL Need More Help DO NOT RETURN THIS PRODUCT TO THE STORE Please visit online help at http www venturer com PLV7615H PLV76156S7_ENG_IB_UL_091221 indd 16 PLV76156S7_ENG_IB_UL_091221 indd 16 12 22 2009 10 49 32 12 22 2009 10 49 32 ...

Page 2: ...it and receiver Connect the unit into an outlet on a circuit different from that to which the receiver is connected Consult the dealer or an experienced radio TV technician for help Shielded cables must be used with this unit to ensure compliance with the Class B FCC limit This television receiver provides display of television closed captioning in accordance with Section 15 119 of the FCC rules S...

Page 3: ... of the obsolete outlet 10 Protect the power cord from being walked on or pinched particularly at plugs convenience receptacles and the point where they exit from the apparatus 11 Only use detachments accessories specified by the manufacturer 12 Use only with the cart stand tripod bracket or table specified by the manufacturer or sold with the apparatus When a cart is used use caution when moving ...

Page 4: ...the ENTER or button to select Air Cable STD Cable HRC Cable IRC or Cable Auto 5 Use the button to highlight Auto Scan then press the ENTER or button to confirm 6 The unit will immediately search all channels for those with adequate signal strength and store those channels with signals in memory The unit will take a few minutes to finish auto scan and after this is completed the unit will switch to...

Page 5: ...e control is not going to be used for a long time remove the batteries to avoid damage caused by battery leakage corrosion Do not mix old and new batteries Do not mix ALKALINE standard CARBON ZINC or rechargeable NICKEL CADMIUM batteries Always remove batteries as soon as they become weak Weak batteries can leak and severely damage the remote control WARNING Do not dispose of batteries in a fire B...

Page 6: ...ST CH Press to switch repeatedly between the last two channels displayed 7 STANDBY ON Button Press to turn ON the unit or put it in STANDBY OFF mode 8 FUNCTION Button Press to switch between TV AV HDMI 9 LCD MODE Button PresstoSelectfrompresetscreendisplaysettings to match the type of show you are watching 10 CH CH Buttons Press to select the channel upward or downward 11 NUMERIC Buttons Press to ...

Page 7: ...TV channels 6 VOL VOL controls Adjusts the volume level and highlights selections Left Right on the TV menu screen 7 Color LCD screen 8 Built in speakers 9 Remote sensor Point the remote control here Standby indicator 10 Removable stand 11 Power cord 12 HDMI IN jack 13 Headphones jack 14 TV ANTENNA terminal Connects a TV antenna or CATV cable 7 10 9 14 13 11 2 3 6 4 5 1 8 12 PLV76156S7_ENG_IB_UL_0...

Page 8: ... that placement of the antenna near a window or in an elevated location improves performance To TV Antenna terminal To Home Antenna terminal COAX Cable If not using a Cable box Combination VHF UHF antenna ATSC NTSC signal Separate VHF or UHF antenna ATSC NTSC signal CONNECTING TOAVCR CAMCORDER VIDEO GAME SYSTEM CABLE SATELLITE SYSTEM Connect an AUDIO VIDEO cable not included as shown Make sure you...

Page 9: ...DVD players DTV set top boxes and other digital AV devices HDMI has the capability to support standard enhanced or high definition video plus standard to multi channel surround sound audio HDMI features include uncompressed digital video a bandwidth of up to 2 2 gigabytes per second with HDTV signals one connector instead of several cables and connectors and communication between the AV source and...

Page 10: ...D WARNING The LCD Display is very fragile and must be protected at all times when removing the base stand Be sure that no hard or sharp object or anything that could scratch or damage the LCD display comes into contact with it Do NOT exert pressure on the front of the unit at any time because the screen could crack 1 Disconnect all cables or cords connected to the unit 2 Lay the unit down on a fla...

Page 11: ... the MENU button 2 Use the or button to select Audio setting 3 Press ENTER or button to highlight Audio Mode then use the or button to select other options Audio Language MTS Bass Treble Balance 4 Use the ENTER or button to make adjustment 5 Repeat steps 3 to 4 to adjust other options 6 To exit the TV SETUP MENU and return to the normal screen press the MENU button Audio Mode Select from preset au...

Page 12: ...kip Channel Labels Antenna Cable HRC SETUP MENU 1 Press the MENU button 2 Use the or button to select Setup setting 3 Press ENTER or button to highlight Time Setting then use the or button to select other options Time Setting Sleep Timer Password Setting Parental Control Closed Caption OSD Language Reset 4 Use the ENTER or button to make adjustment 5 Repeat steps 3 to 4 to adjust other options 6 T...

Page 13: ...sed Caption Closed Caption Digital Closed Caption Digital Caption Style Service1 CC1 Off MAINTENANCE MAINTENANCE CLEANING THE UNIT Be sure to turn the unit off and disconnect the AC power cord before cleaning the unit Wipe the unit with a dry soft cloth If the surfaces are extremely dirty wipe clean with a cloth which has been dipped in a weak soap and water solution and wrung out thoroughly Then ...

Page 14: ...re the antenna or audio video source device is working properly Make sure all cables are firmly connected Check for local interference No picture or sound Make sure there are no unshielded electrical devices nearby that are causing interference Turn the unit off for 30 minutes then try it again Colored patches of picture Specifications and appearance are subject to change without notice As concern...

Page 15: ...nd to any product or parts which have been lost or discarded or damage to product or parts caused by misuse accident improper operation or maintenance or use in violation of instructions provided with the product or to product which has been altered or modified without authorization of Venturer or to products or parts thereof which have had the serial number removed or changed Out of Warranty In t...

Page 16: ...INCH Printed in China 811 761591W050 16 3 13 3 8 5 11 7 8 5 7 8 3 3 4 2010 VENTURER Electronics Inc PLV76156S7_ENG_IB_UL_091221 indd 15 PLV76156S7_ENG_IB_UL_091221 indd 15 12 22 2009 10 46 19 12 22 2009 10 46 19 ...

Reviews: