background image


Head Office: Fleming Way, Crawley, West Sussex, RH10 9YX. Tel: 01293 526062 Fax: 01293 551188 
 

UK NATIONAL CALL CENTRE

, Newton Road, Crawley, West Sussex, RH10 9JA


SALES ENQUIRIES: 


Tel: 0844 8560590  

Fax: 01293 565169


TECHNICAL SUPPORT: 

Tel: 0344 8560594  

Fax: 01293 532814 

 
For details of the warranty and returns procedure please refer to 

www.vent-axia.com

 or write to Vent-Axia Ltd, Fleming Way, Crawley, RH10 9YX 


477981 C 


0219 

The


Guarantee 


Applicable only to products installed and used in the United Kingdom, France, Germany & Netherlands.  For details of guarantee outside the United 

Kingdom contact your local supplier. 


Vent-Axia guarantees its products for two years from date of purchase against faulty material or workmanship.  In the event of any part being found 

to be defective, the product will be repaired, or at the Company’s option replaced, without charge, provided that the product:- 


Has been installed and used in accordance with the instructions given with each unit. 


Has not been connected to an unsuitable electricity supply. (The correct electricity supply voltage is shown on the product rating label 
attached to the unit). 


Has not been subjected to misuse, neglect or damage. 


Has not been modified or repaired by any person not authorised by the company. 


IF CLAIMING UNDER TERMS OF GUARANTEE 

Please return the complete product, carriage paid to your original supplier or nearest Vent-Axia Centre, by post or personal visit.  Please ensure 

that it is adequately packed and accompanied by a letter clearly marked “Guarantee Claim” stating the nature of the fault and providing evidence of 

date and source of purchase. 


The guarantee is offered to you as an extra benefit, and does not effect your legal rights 


Summary of Contents for LuminAir Kit H

Page 1: ...188110A LuminAir T 188210A LuminAir H 188610A PLEASE READ ALL INSTRUCTIONS CAREFULLY BEFORE STARTING INSTALLATION VEUILLEZ LIRE ATTENTIVEMENT TOUTES LES INSTRUCTIONS AVANT DE D MARRER I INSTALLATION B...

Page 2: ......

Page 3: ...Horizontal ducts should be arranged to slope slightly downwards away from the Fan I This appliance is not intended for use by persons including children with reduced physical sensory or mental capabi...

Page 4: ...e the Bezel from the unit as this may damage its clip fastenings 5 4 Loosen the two screws on the Lamp Housing until the Securing Clamps allow sufficient clearance to accomodate the ceiling thickness...

Page 5: ...ally when the unit is switched on by means of a remote switch eg a light switch The fan will run for an adjustable preset period between 3 and 25 minutes after the lamp is turned off via the remote sw...

Page 6: ...pour traiter de l air humide un pi ge condensation doit tre install Les conduits horizontaux doivent tre l g rement inclin s vers le bas dans le sens oppos au ventilateur I Cet appareil n a pas t con...

Page 7: ...du LuminAir et de son contr leur et installez les conduits des c bles 4 4 Mod les LuminAir H Outre les instructions ci dessus reportez vous aux instructions de montage et de c blage fournies avec l h...

Page 8: ...7 V rifiez deux fois le c blage en vous assurant que toutes les connexions sont soigneusement effectu es Remontez le contr leur dans son bo tier Ne serrez pas trop les vis et faites attention de ne pa...

Page 9: ...en an denen er m glicherweise f r l ngere Zeit einem direkten Wasserstrahl ausgesetzt wird H Im Falle des Einsatzes von Impellern zur Abfuhr von feuchter Luft sollte eine K hlfalle installiert werden...

Page 10: ...und Steuertransformator betr gt 0 40 C 4 3 Montagestelle f r Ventilator Lampeneinheit und Steuertransformators festlegen und die Kabelkan le vorbereiten 4 4 Modell LuminAir H Zus tzlich zu den vorsteh...

Page 11: ...eliefert die Verbindung zwischen LuminAir und Steuertransformator sollte aber in einer f r Netzspannung ausgelegten Verteilerdose oder hnlichem erfolgen 7 7 Die Verkabelung zweimal berpr fen und siche...

Page 12: ...latoren worden gebruikt in vochtige ruimtes moet een waterslot worden ingebouwd Horizontale buizen moeten lichtelijk schuin worden geplaatst weg van de ventilator I Personen inclusief kinderen die weg...

Page 13: ...ID BEVESTIGEN 5 1 Maak in het plafond een gat van 110 mm waarin de LuminAir moet worden bevestigd Montagegaten met een diameter van 130mm 5 2 Boor de bevestigingsgaten indien deze moeten worden gebrui...

Page 14: ...n een voor netspanning gekwalificeerde aansluitdoos worden gemaakt 7 7 Controleer de bedrading tweemaal om u ervan te overtuigen dat alle aansluitingen goed bevestigd zijn Sluit de transformator regel...

Page 15: ...Fig 1 LuminAir L Ref No 188110A Fig 2 LuminAir T Ref No 188210A Fig 3 LuminAir H Ref No 188610A 12V 50Hz 12VDC 12V 50Hz 12VDC 12VDC 12V 50Hz...

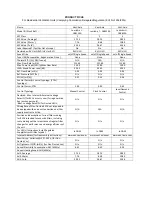
Page 16: ...Factor CTRL 1 00 0 95 0 65 Control Typology Manual Control Clock Control Local Demand Control Declared Max Internal External Leakage Rates for BVUs or carry over for regenerative heat exchangers only...

Page 17: ......

Page 18: ......

Page 19: ......

Page 20: ...und to be defective the product will be repaired or at the Company s option replaced without charge provided that the product Has been installed and used in accordance with the instructions given with...

Reviews: