background image


1.Wheel size in INCH

Circumference = Diameter x 25.4 x 3.1416 

2.Wheel size in MM

Circumference = Diameter x 3.1416

9

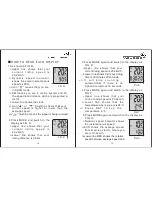
F U NC T IO NS OF VS - 213 & VS - 2131

Wheel  Cir .

(

mm

)

Dimens ion marked in the wheel

B U T T O NS

1.MODE

2.SET

16X1.75X2 
20X1.75X2
24X1    3/8   A
24X1.75X2
26X1
26X1.5

47-305
47-406
37-540
47-507
23-571
40-559

1272
1590
1948
1907
1973
2026

DST

RTM

SPD

TEMP

AVS

RES

MXS

ODO

F unc tions

F unc tions

dis pla y

dis pla y

Speed
Time
Distance
Riding time
Thermometer 
Average speed

Maximum speed

Scan

Auto on/off

Total riding distance

Relative speed

Pressing the MODE button will change the display to show.

Speed/Clock/Distance/Riding time/Temperature/Average

Speed/Relative Speed/Maximum Speed/Odometer/Scan Mode.

2) Setting the Function of : Metric system /

Imperial system, wheel circumference, clock setting

First Method :

Use a tape measure to measure the diameter of the front

bike wheel and then caluclate the circumference of the 

wheel as follows:

How to measure the wheel circumference

Second Method:

If the wheel dimensions are marked on the wheel or tyre, 

refer to the table below and locate the wheel circumference

(mm) according to the dimensions marked on the wheel.

The SET button is used for Resetting Distance/Riding Time

Average Speed and Max Speed.

During the SETUP mode, the SET button is used to change

values during installation.

Summary of Contents for VS 213

Page 1: ...u te r Wireless Cycle Computer INSTALLATION AND OPERATION MANUAL I III II I I II 213 Bracket Computer 2131 Bracket Sensor 213 2131 Bracket Seat Cable Ties Rubber slip VS 2131 wired VS 213 wireless Wir...

Page 2: ...racket seat Use two cable ties to fix the bracket seat on the bike as Figure C P art I I Magnet P art III Wireless 213 Sender FIG A FIG B FIG C FIG D FIG E 2 3 Sensor rubber slip short Magnet This arr...

Page 3: ...to remove the computer from the cycle lightly press the bracket lever and push the computer out along the bracket rail Part II Magnet Installation Fasten the magnet with screw to the spoke of the whee...

Page 4: ...ion If necessary adjust the position or angle of the computer and sensor Fig I Screw Sensor lock belt Bolt Fig J Rubber slip Tighten up Tighten the screw clockwise Loose it anticlockwis VS 2131 WIRED...

Page 5: ...on will change the display to show Speed Clock Distance Riding time Temperature Average Speed Relative Speed Maximum Speed Odometer Scan Mode 2 Setting the Function of Metric system Imperial system wh...

Page 6: ...559 54 559 57 559 37 590 37 584 20 571 32 630 28 630 40 622 47 622 40 635 37 622 18 622 20 622 44 559 23 622 25 622 28 622 32 622 37 622 40 622 2072 2089 2114 2133 2105 2086 1954 2199 2174 2224 2268...

Page 7: ...d proceed to next FIG P Setting the Speed unit Wheel circumference and Clock The bike circumference unit is mm When in 12H format PM is displayed for afternoon When the computer has been installed and...

Page 8: ...e speed from exercise start to where you are is 10 2km h iii Lower line RES shows the relative speed between average speed and HOW TO R E A D EA C H DIS P L AY 1 As shown in FIG Q i Upper line shows t...

Page 9: ...e The electromagnetic interference from some devices can cause an inaccurate read out 16 17 instantaneous speed is 10 0km h In that case your current speed is faster 10 0km h than the average speed If...

Page 10: ...on Faulty speed display other strong signals interfering Display inaccurate speed and distance Re set the circumference Incorrect setting of wheel circumference For more information on Veloset product...

Reviews: