background image


杭州威狐智能科技有限公司


Hangzhou VeloFox Intelligent Technology Co,. Ltd. 

文件编号


版本号


1.01 


16


/


27


no power output from the motor, and disabled assist level switch. Power assist level is displayed as 

OFF or 0.


To  get  out  of  low-voltage  mode,  reset,  and  increase  the  voltage  above  low-voltage  value  and 

battery capacity above 5%. 

Percentage of battery power

C

and power level table 

Require battery % info from BMS or controller


SOC 

Battery level 

Description 

80% 

 SOC 


Full battery level 5 


60% 

 SOC < 80%


Level 4 


40% 

 SOC < 60%


Level 3


20% 

 SOC < 40%


Level 2 


10% 

SOC < 20%


Level 1 


5% 

 SOC < 10%


Level 0 


0% 

 SOC < 5%


Level 0 and icon blink at 1Hz 


Remarks about battery indicator


When there is a battery communication error


1.


Display will estimate the power according to the voltage and show the battery level 

accordingly


2.


No battery percentage information shown


3.


Range information will not be displayed


4.


If the voltage is lower than the low-voltage value, the effect of the current on voltage needs to be 

considered when converting to voltage at 0 current 

Summary of Contents for DM03

Page 1: ...angzhou VeloFox Intelligent Technology Co Ltd 文件编号 版本号 1 01 DM03 Display Functionality Introduction Product Name Intelligent OLED Display Product Model DM 03 Signature Date Editor Leo Liao 2020 06 17 Checked Approved ...

Page 2: ...公司 Hangzhou VeloFox Intelligent Technology Co Ltd 文件编号 版本号 1 01 第2 页 共 27页 版本修订历史 Version No Reviser Date Revision content V1 01 Leo Liao 2020 06 17 Initial version Leo Liao 2020 07 27 Update display coding rules ...

Page 3: ... 11 5 Button definition 12 5 1 Button name 12 5 2 Definition of button operation 12 6 Basic function operation 13 6 1 Turn on off the display 13 6 2 Assist level switch 13 6 3 Information switch 14 6 4 Light control function 14 6 5 Speed information switch 15 6 6 Walk assist function 15 6 7 Battery power indicator and assist power output 15 7 Setting Function 17 8 Advanced setting functions 19 War...

Page 4: ...Tempered glass screen with 2 5D chamfered edge 1 3 inch high brightness B W monochrome OLED screen Enlarged operating space plus ergonomic button design IP65 waterproof level excellent for outdoor use Built in Bluetooth function compatible with CAN BUS and UART communication Service Tool function for fast firmware upgrade parameter setting and easy maintenance 3 Range of application Suitable for a...

Page 5: ...andlebar size ofφ22 2mm 5 Display coding rules As shown as above picture Product Model The hardware version number C CAN U UART last 2 digits means version number The code of manufacture factory M0 M1 M2 The year and week of manufacture The Production serial number 23 5mm 1 3 OLED 22 2mm 63 5mm ...

Page 6: ... 60 C Storage temperature 30 C 80 C Waterproof level IP65 2 Function overview Four buttons ergonomic design Selective digital and icon power assist gear for high visibility Parameter character value 2 digits reserved forfdigitsreserved Parameter character value wheel size 700C 70 27 5 27 27 5 27 Parameter character value speed limit information range from 04 to 46 00 no speed limit Parameter chara...

Page 7: ...tion and control Mileage Subtotal mileage TRIP total mileage ODO Walk assist function Parameters setting and advanced setting Error code indication 3 Installation Open the display locking clip set the display in the left handlebar standard handlebar size Φ22 2 Adjust to a position easy to operate using M3 hex set to screws and tighten Tightening torque 0 8N m Note Damage caused by excessive torque...

Page 8: ...oot interface Boot logo interface is displayed for 3 seconds after display is turned on When the communication connection is established display enters the main interface which shows information obtained from the controller All data displayed is following communication protocol provided by the customer ...

Page 9: ... matrix display meets the need for customization of the boot interface and UI interface 4 3 Function interface introduction Boot interface and basic function interface Boot logo interface is displayed for 3 seconds after display is turned on When the M button Power button Adjust button 5 Pin Plug Basic interface Boot logo interface customization available upon request Battery indicator Headlight i...

Page 10: ...After 9999 9 KM is exceeded the decimal point is not indicated and a 5 digit mileage value is displayed directly with a maximum value of 99999km After the maximum value is exceeded the value is shown as the actual mileage value deducted by 100 000 Data on function interface I can be cleared by a key operation Function interfaceⅡ The function interface II mainly displays mileage information includi...

Page 11: ...ed display area Setting interface Within 10s after turning on display long press M button to enter setting interface short press to switch between setting interfaces In any setting interfaces short press M to enter parameter editing state which offers two modes picking and selecting The picking mode is indicated by triangle cursor on the right and selecting mode is indicated by parameter shown on ...

Page 12: ...utton Turn on off the display Adjust button Adjust the assisting power level during riding and switch functions Long press the adjust buttons to perform specific function operation Mode button Switch interface functions and enter into parameter setting interface 5 2 Definition of button operation Operation Type Description Adjust up mode Adjust down power Setting interface level 1 menu page ...

Page 13: ...ff long press button when display is on until display is turned off If the rider does not perform any operation on the display within set shutdown time while speed is 0 and current is less than 1A then display will be turned off automatically Set shutdown time is self defined by user 6 2 Assist level switch During normal working state short press buttons to switch assist level and change assist mo...

Page 14: ...hen basic interface will be automatically returned to after 5 s no operation on M button Function interface I displays the average speed maximum speed and subtotal TRIP mileage Function interface II displays the endurance mileage and total mileage The switching process of each interface as shown below If BMS communication is not supported display cannot obtain accurate RANGE information and the va...

Page 15: ...isplay gets back to the basic interface Walk assist interface shown as below 6 7 Battery power indicator and assist power output Battery power information is divided into battery bar indication and remaining percentage indication When battery power is normal battery capacity is divided into 5 bars Before communication is established battery percentage is not displayed and the power bar is full and...

Page 16: ...oller SOC Battery level Description 80 SOC Full battery level 5 60 SOC 80 Level 4 40 SOC 60 Level 3 20 SOC 40 Level 2 10 SOC 20 Level 1 5 SOC 10 Level 0 0 SOC 5 Level 0 and icon blink at 1Hz Remarks about battery indicator When there is a battery communication error 1 Display will estimate the power according to the voltage and show the battery level accordingly 2 No battery percentage information...

Page 17: ...s M button to enter parameter editing state the triangle cursor on the right side indicates parameter picking state Except for the first level parameter setting mode is indicated by parameters shown on white background as shown below Short press button to edit parameters Long press M button to confirm parameter selection Long press M button again to exit and return to previous page In any interfac...

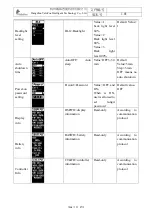
Page 18: ...lue OFF 5 30 min Default Value 5min Step 5 min OFF means no auto shutdown Power on password setting Psword Password Value OFF and ON When is ON user is allowed to set 4 digit password Default value OFF Display info DSPIFO display information Read only According to communication protocol Battery info BATIFO battery information Read only According to communication protocol Controller Info CTLIFO con...

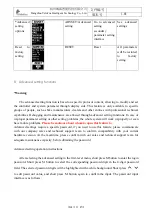
Page 19: ...ter setting or other setting problems the whole system will work improperly or even have failure problems Please be cautious about whom to open this feature to Advanced settings require a specific password if you need to use this feature please communicate with our company sales and technical support team to confirm compatibility with your current hardware version At the meantime please confirm wi...

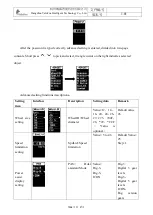
Page 20: ...ject Advanced setting functions descriptions Setting item Interface Description Setting data Remark Wheel size setting WheelDI Wheel diameter Value 12 14 16 20 24 26 27 27 5 700C 28 29 CCF value is optional Default value 26 Speed limitation setting SpdLtd Speed limitation Value 5 to 46 Default Value 25 Step 1 Power assist display setting PAS Pedal assistant Mode Value Dig 3 Dig 5 ICON Dig 3 Digita...

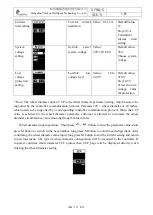
Page 21: ...tected by motor Power assist magnet number P Sensor PAS sensor Value 1 64 Default value 12 Step 1 Power assist magnet number Power Assist Magnet direction Direc PAS sensor direction Value F or R F Forward R Reversed Signal direction of sensor can be adjusted corresponding to right or left instalation Slow acceleration Slow ACC slow acceleration Value 0 3 Default value 0 Number of poles for power a...

Page 22: ... protocol Parameter 29 wheel diameter of 29 inches which needs to be supported by a corresponding controller communication protocol When the CCF value is selected for the wheel diameter parameter customer is allowed to customize the wheel diameter circumference value four digit length value in mm Wheel diameter input operation Short press button to enter the parameter value short press M button to...

Page 23: ...age TRIP average speed and maximum speed 10s after display is turned on when display is at function interface I long press M button to show data clearance window short press button to select accordingly To remove the pop up clearance window long press M button or remain no operation for 30s After clearance the subtotal mileage TRIP is 0 average speed and max speed is 0 ODO information can t be cle...

Page 24: ...osition Check if the throttle turned back 05 shown at speed throttle failure Check throttle 07 shown at speed overvoltage protection Check battery voltage 08 shown at speed failure of motor s hall signal wire Check motor 09 shown at speed failure of motor s phase wire Check motor 11 shown at speed failure of the motor s temperature sensor Check controller 12 shown at speed failure of the current s...

Page 25: ...ard end plug in The standard outlet needs to match the corresponding conversion wire Velofox has set a corresponding standard for conversion wire length and interface standards If the standard setting cannot be met specially customized conversion wires are required DM03 offers two modes of outlet board end plug in and non board end plug in The non board end plug in mode is a conventional way for d...

Page 26: ...n wire of display 3 Brown VCC Power wire of display 4 Green RX Data receiving wire of display 5 Black GND GND of display 6 reserve reserve 11 2 Standard conversion wire specifications Adaptor C2H Adaptor C2J C Package specifications Standard delivery in double corrugated box packaging Inner layer is double corrugated septum plus EPE foam product bag ...

Page 27: ...68mm L W H D Note In the use of the display pay attention to the security do not plug the display in and out the when the power is on Try to avoid exposure in harsh environments like heavy rain heavy snow and strong sunlight When the display can t be used normally it should be sent to repair as soon as possible ...

Reviews: