background image


_______________________________________________________________________________________________________________________________________________________ 


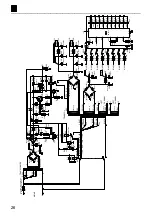
26 

R106

15/5W

BC547C

T1

LD2

L-93WEGW

D1

1N4148

RY3

VR5V122C

R4

1K

7V5

ZD1

C27

470u

5A SLOW @ 100-120VAC

F1

MAINS

N

L

C28

470u

7

R36

1K5

RED

9

SW1

4

18

LD4

RED

R76

330K/0.5W

4

BIAS8

0.275

LD3

RED

R49

12K

R47

1K5

8

ADJ

V-

2

1

BIAS1

BIAS4

BIAS3

BIAS2

BIAS5

BIAS7

BIAS6

C39

220u/450V

C41

220u/450V

RY5

VR10V121C

R8

2K2

BC547C

T2

LEFT

LEFT

CHANNEL

CHANNEL

50V/0.1A

BLUE

BLACK

0

120

GREEN

GRAY

GRAY

6.3V/7A

f2

f1

f2

YELLOW

6.3V/7A

GREEN

f1

VIOLET

RY4

VR10V121C

245

D2

1N4148

RED

YELLOW

300V/1.3A

RED

R5

22K

-VL

R10

22K

C30

100u/100V

D9

1N4007

D8

1N4007

-VR

C31

47u/100V

C29

47u/100V

D13

1N5408

D10

1N4007

D7

1N4007

D11

1N5408

R79

10K/1W

R78

10K/1W

D14

1N5408

R81

680K/1W

D12

1N5408

R6

220K

BC516

T4

C24

100u

GREEN

R35

1K5

R37

560

LD1

L-56BHD

D19

1N4007

ZD2

C23

4u7

C25

470u

D18

1N4148

R9

220K

D17

1N4007

D16

1N4148

R7

2K2

0.475

0.425

LD11

RED

LD10

RED

LD9

RED

0.375

0.325

LD5

RED

LD6

RED

LD7

GREEN

LD8

GREEN

LD12

RED

3

R48

33K

1

R74

330K/0.5W

2

3

R73

330K/0.5W

R75

330K/0.5W

4

2

3

R71

330K/0.5W

R72

330K/0.5W

R69

330K/0.5W

NC

0.4

LM3914

RHI

RLO

6

REF

7

0.35

16

17

0.3

14

15

SIG

5

MODE

9

0.45

12

13

11

10

0.5

R82

15K/1W

R80

15K/1W

1

C42

220u/450V

R70

330K/0.5W

SW2

C40

220u/450V

+V3R

C38

100u/400V

V+

+V

+V3L

+V1R

C37

100u/400V

+V1L

+V

R77

270/1W

BC547C

T3

D21

1N4007

D20

1N4007

D15

1N4148

SI

TRANSFORMER

TRANSFO2

C34

100u

R108

15/5W

R105

15/5W

R107

15/5W

C26

470u

OFF

ON

D22

1N4148

D23

1N4148

230

100

0

D4

1N4007

D5

1N4007

D6

1N4007

D3

1N4007

R3

470

C

SW3

2.5A SLOW @ 230-245VAC

12VAC/2.5VA

D26

1N4007

D25

1N4148

D24

1N4148

12VDC

-50VDC

-50VDC

415VDC

365VDC

365VDC

245

120

D

B

A

BROWN

100

ORANGE

230

Summary of Contents for K4040

Page 1: ...nt with LED indication Removable bottom for easy access and service High quality capacitors and components Gold plated input and speaker terminals Standby function Soft start circuit for power transfo...

Page 2: ...2 3 Aranciato Laranja Naranjado Oranssi Orange Orange Orange Orange Orange Orange Oranje 3 4 Giallo Amarelo Amarillo Keltainen Gul Gul Gul Gelb Yellow Jaune Geel 4 5 Verde Verde Verde Vihre Gr n Gr n...

Page 3: ...___________________________________________________________________________________________________________________________________________ 3 VELLEMAN KIT NV Legen Heirweg 33 9890 Gavere Belgium http...

Page 4: ...amping factor 100Hz 10 We reserve the right to make changes ASSEMBLY STEPS Required tools to assemble the kit Use a small soldering iron of max 40W Use thin 1mm solder do not use any flux Use a small...

Page 5: ...used to connect the input signal via two RCA sockets via two holes at the rear of the cabi net 1 CAPACITORS C q C1 47nF 473 0 047 2 CINCH RCA CONNECTOR Mount them as straight and square as possible a...

Page 6: ...to the corresponding isle on the PCB using a small piece of jumper wire IMPORTANT Make the connection exactly as shown in the figure otherwise the small piece of wire could touch the bottom of the cab...

Page 7: ...INS VOLTAGE SELECTION For 100V mains input mount A A For 120V mains input mount B B For 230V mains input mount C C For 240V mains input mount D D REMARK Strike out the NOT used mains voltage indica ti...

Page 8: ...D15 1N4148 q D16 1N4148 q D17 1N4007 q D18 1N4148 q D19 1N4007 q D20 1N4007 q D21 1N4007 q D22 1N4148 q D23 1N4148 q D24 1N4148 q D25 1N4148 q D26 1N4007 5 ZENER DIODES Check the polarity ZD CATHODE...

Page 9: ...42 100K 1 0 4 B q R43 220K 2 2 4 B q R44 100K 1 0 4 B q R45 220K 2 2 4 B q R46 100K 1 0 4 B q R47 1K5 1 5 2 B q R48 33K 3 3 3 B q R49 12K 1 2 3 B q R50 220K 2 2 4 B q R51 10K 1 0 3 B q R52 100K 1 0 4...

Page 10: ...q R89 180 1 8 1 B q R90 180 1 8 1 B q R91 180 1 8 1 B q R92 180 1 8 1 B q R93 180 1 8 1 B q R94 180 1 8 1 B q R95 180 1 8 1 B q R96 180 1 8 1 B q R97 10 1 0 0 B q R98 10 1 0 0 B q R99 10 1 0 0 B q R1...

Page 11: ...___ 11 10 IC SOCKETS Check the position of the notch IC 1 q IC1 18P 11 REED RELAYS Check the position of the notch PIN 1 1 RY q RY1 VR05R121 q RV2 VR05R121 12 RESISTOR TRIMMERS vertical type RV q RV1...

Page 12: ...1 SW Check that switch 1 corresponds to pin 1 q SW2 DS 4P q SW3 DS 4P 16 CAPACITORS C Check the minimum voltage q C3 100p 400V q C4 100p 400V q C5 22n 630V 0 022 q C6 22n 630V 0 022 q C7 470n 0 47 47...

Page 13: ...k the polarity C q C23 4u7 q C24 100u q C25 470u q C26 470u q C27 470u q C28 470u q C29 47u 100V q C30 100u 100V q C31 47u 100V q C32 47u q C33 47u q C34 100u 18 PCB CONNECTOR With the holes facing th...

Page 14: ...___________________________ 14 20 POWER RELAYS The various relays have leads that correspond to the printing on the PCB q RY3 VR5V122C RY q RY4 VR10V121C q RY5 VR10V121C RY 21 FUSE HOLDER F q F1 Inser...

Page 15: ...from the snap in type and cannot be mounted incorrectly C q C35 22u 350V q C36 22u 350V q C37 100u 400V q C38 100u 400V q C39 220u 450V q C40 220u 450V q C41 220u 450V q C42 220u 450V 24 SWITCH SW SID...

Page 16: ...1 2 7 1 8 8 1 V5 8 1 7 2 6 5 4 5 3 3 4 4 3 3 4 5 5 6 V7 1 8 2 1 8 7 8 1 8 1 7 5 6 4 5 V6 2 3 3 4 f2 6 3VAC f2 f1 f1 5 3 4 4 5 3 1 2 8 V4 6 7 1 8 2 8 8 1 1 6 7 5 4 V1 3 3 5 4 6 3VAC 5 3 4 4 5 3 2 1 8 1...

Page 17: ...see figure the connecting eyes should not be used M3 NUT M3 LOCK WASHER LS TERMINAL NUT LS TERMINAL PCB SUPPORT NUT LS TERMINAL HOUSING REAR 16mm M3 BUTTON HEAD BOLT FIG 3 Check that the solder side o...

Page 18: ...connector This can be shrunken by hot air e g with a hair dryer IMPORTANT Stick a piece of insulating foil on the connector see figure This will later be used to prevent the connector piercing throug...

Page 19: ...figure 4 0 8 BLUE YELLOW RED HEAT SHRINK SLEEVE FIG 7 Do not forget to insert a 3 cm length of insulating heat shrink sleeve over the wires Solder the double yellow wire to the 4 Ohm loudspeaker termi...

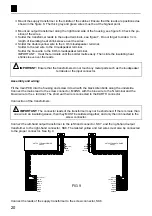
Page 20: ...ot touch any metal parts such as the loudspeaker terminals or the input connector Assembly and wiring Fit the main PCB into the housing and screw it down with the black Allen bolts along the underside...

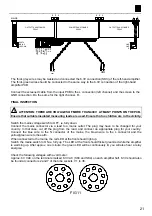
Page 21: ...TS ON THE PCB Ensure that suitable insulated measuring leads are used Ensure that no children are in the vicinity Switch the mains voltage switch to OFF ie fully down Connect the mains connector via a...

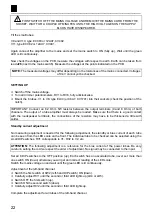
Page 22: ...and 8 Ohm of both channels The output of a tube amplifier must always be loaded Make sure that there is a good contact with the loudspeaker terminals the connections of the resistors may have to be t...

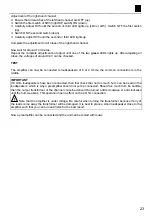
Page 23: ...ng all tubes the voltages of around 0 4V can be checked TEST The amplifier can now be connected to loudspeakers of 8 or 4 Ohms the common connection is in the middle IMPORTANT If 8 Ohm loudspeakers ha...

Page 24: ...e earth lead goes upwards then the nuts of the cage nuts should be below Attach the cover plate for the tubes to the rear mirror do not yet tighten the bolts When using a black cover a masking sticker...

Page 25: ...speaker continuous oscillation of the amplifier or crackling in bass peaks When using a piezo tweeter a 10 Ohm resistor must be placed in series with the tweeter Increase R65 and R68 in value e g 1k o...

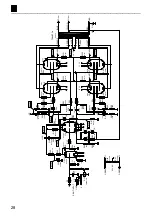
Page 26: ...8 R79 10K 1W R78 10K 1W D14 1N5408 R81 680K 1W D12 1N5408 R6 220K BC516 T4 C24 100u GREEN R35 1K5 R37 560 LD1 L 56BHD D19 1N4007 ZD2 C23 4u7 C25 470u D18 1N4148 R9 220K D17 1N4007 D16 1N4148 R7 2K2 0...

Page 27: ...VL VL RV4 100K f1 f2 5 9 4 3 R43 220K 1 2 V11 C35 22u 350V ECC82 LEFT INPUT R1 1K IN RV1 100K RV2 100K R85 390K 1W R59 100K 5W R22 3K9 C9 22n 630V 7 6 V9 R21 22K 7 ECC83 R61 47K 5W C10 100p 400V V3L...

Page 28: ...VR VR RV8 100K f1 f2 9 4 3 R55 220K 1 2 V11 C36 22u 350V ECC82 RIGHT INPUT R2 1K IN RV5 100K RV6 100K R88 390K 1W R60 100K 5W R28 3K9 C5 22n 630V 2 1 V10 R27 22K 7 ECC83 R62 47K 5W C18 100p 400V V3R R...

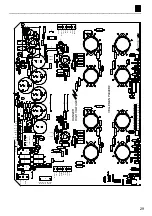
Page 29: ...C R103 1 R93 R94 5 4 J11 J12 C19 C20 V6 3 8 1 C18 100VDC 260VDC J14 C15 R88 R28 J6 R23 1 B 120VAC A 100VAC R106 R108 2 5A SLOW AT 230 245VAC EARTH MAINS 5A SLOW AT 100 120VAC R107 F1 YELLOW LS RED LS...

Reviews: