background image

TRC5


- 1 - 

VELLEMAN 

TRC5 – GROOVY HOOVY 


1. Introduction & Features 

 
Thank you for buying the 

TRC5

! Please read the manual thoroughly before bringing this device into service. 

If the device was damaged in transit, don't install or use it and contact your dealer. 
 

2. Safety Instructions 


Note that damage caused by user modifications to the device is not covered by the warranty. 


Keep the device away from unauthorised users and children under 8 years of age. 


For children to play with the 

TRC5

, adult supervision is strongly recommended. 


Do not go onto the ice surface of a lake or other body of water if it is likely to break under your weight. 


Use the 

TRC5

 in a safe area: away from other people, animals, cars etc. Do not drive it on streets or in the 

darkness (no lighting provided). 


Do not touch or try to pick up the 

TRC5

 when it is in motion. Wait until it has stopped completely. 


Keep your fingers, face, hair and loose clothing away from the propellers while the hovercraft is still switched on. 


Never block the rotation of one of the fans or stick objects through the protective grilles. 


Do not drive the 

TRC5 

into walls or other hard objects. 


3. Keep in mind  


This vehicle has no wheels: it rides on an air cushion created by the lift fan blowing downward. 


The 

TRC5

 should function fine on floor, pavement, ice, snow, water or any flat, smooth, clean surface. 


Do not use the hovercraft on rough or broken pavement/ground, carpets, rocks, pebbles or any surface that can 
allow the air to get out of the air cushion or that can damage the air cushion. 


Use on fresh water only (not salt water!). 


Keep the 

TRC5

 within radio and battery life range at all times to ensure retrieval. 


A hovercraft is not a boat: it needs an operating lift fan and an inflated air cushion to float properly. 


Running time: 7 to 13 minutes between charging, depending on battery type and conditions. 


The real rubber air cushion is durable but sharp objects can cause punctures in it. 
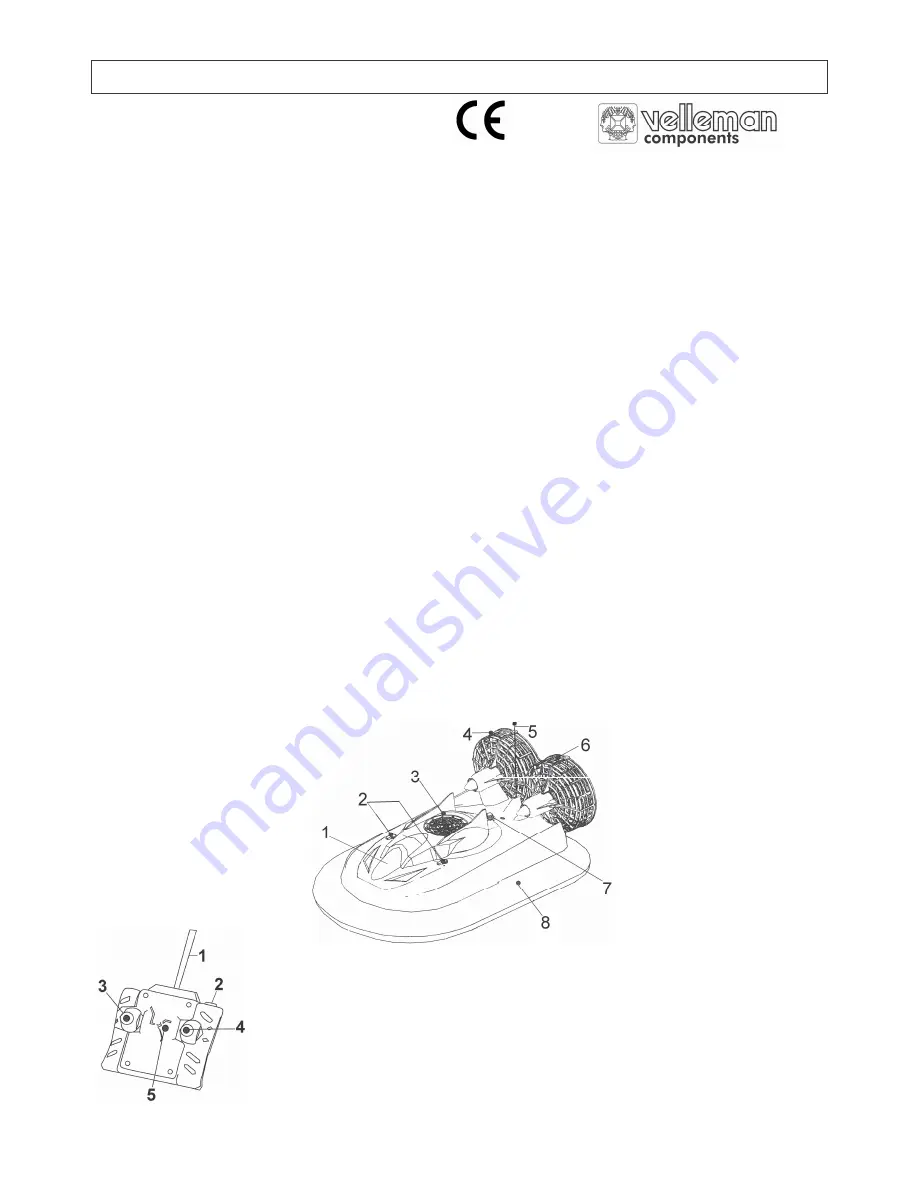
 

4. Parts 

 
1. Battery compartment door 
2. Battery compartment latches 
3. Lift fan 
4. Right propeller 
5. Antenna 
6. Left propeller 
7. On/off switch 
8. Rubber air cushion  


1.  Antenna 
2.  Stop button 
3.  Left stick 
4.  Right stick 
5.  "Power On" LED 

Fig. 1 

Fig. 2 

Summary of Contents for GROOVY HOOVY

Page 1: ...Never block the rotation of one of the fans or stick objects through the protective grilles Do not drive the TRC5 into walls or other hard objects 3 Keep in mind This vehicle has no wheels it rides on...

Page 2: ...k in 1 full cycle When the running time is gradually shortening the pack has probably reached the end of its life cycle Replace it b Using and Recharging the Battery Pack NiCd and NiMH battery packs a...

Page 3: ...he lift fan press the stop button fig 2 2 on the remote control NEVER push the stop button while the TRC5 is on water 3 Navigate the TRC5 by means of the 2 sticks on the remote control Push the 2 stic...

Page 4: ...aft runs slowly or won t move steer battery dead or low incorrect polarity loose battery connection power switch is off replace or recharge batteries correct polarity verify connections turn the power...

Page 5: ...ek geen voorwerpen door de roosters Laat de TRC5 niet botsen tegen muren of andere harde voorwerpen 3 Vergeet niet Dit voertuig heeft geen wielen het beweegt op een luchtkussen dat ontstaat doordat de...

Page 6: ...in 1 keer op te laden Wanneer de gebruiksduur geleidelijk afneemt is het batterijpack waarschijnlijk versleten Vervang het b Het batterijpack gebruiken en herladen NiCd en NiMH batterijpacks zijn nie...

Page 7: ...hefschroef wil stoppen drukt u op de afstandsbediening op de stop knop fig 2 2 Druk NOOIT op de stop knop wanneer de TRC5 zich op water bevindt 3 U bestuurt de TRC5 d m v de 2 hendels op de afstandsbe...

Page 8: ...f niet batterij bijna uitgeput foutieve polariteit de connector van het batterijpack zit los toestel staat niet aan vervang of herlaad batterijen corrigeer de polariteit controleer de aansluiting zet...

Page 9: ...ou plusieurs h lices et n ins rez jamais des objets dans les grilles protectrices Ne pilotez pas le TRC5 contre des murs ou d autres objets durs 3 Retenez Ce v hicule n a pas de roues il glisse sur un...

Page 10: ...ck en une fois Quand la dur e de fonctionnement diminue le pack a probablement atteint la fin de sa vie Remplacez le b Utiliser et recharger le pack d accus Des accus NiCd et NiMH ne sont pas comme de...

Page 11: ...ig 2 2 sur la t l commande Ne pressez JAMAIS le bouton stop quand le TRC5 se trouve sur l eau 3 Pilotez le TRC5 au moyen des 2 leviers sur la t l commande Pressez les 2 leviers simultan ment en avant...

Page 12: ...seur avance lentement ou ne bouge pas pile faible ou puis e polarit incorrecte mauvaise connexion accus TRC5 n est pas allum remplacez ou rechargez les accus corrigez la polarit v rifiez les connexion...

Page 13: ...una o m s h lices y no introduzca nunca objetos en las rejillas protectoras No deje chocar el TRC5 contra paredes u otros objetos duros 3 A recordar Este veh culo no tiene ruedas se desliza sobre un c...

Page 14: ...ck en una vez Si la duraci n de funcionamiento disminuye el pack est probablemente agotado Reempl celo b Utilizar y recargar el pack de bater as Las bater as NiCd y NiMH no son como las bater as alcal...

Page 15: ...a Controlar TRC5 1 Coloque el TRC5 en tierra y act velo girando el interruptor ON OFF fig 1 7 El rotor empieza a funcionar y el coj n de aire se hincha 2 Si quiere parar el rotor pulse el bot n stop f...

Page 16: ...en agua nieve o hielo saque el pack de bater as del aerodeslizador s quelo todo deje secar el TRC5 interior con el compartimiento de pilas abierto 8 Soluci n de problemas PROBLEMA CAUSA POSIBLE SOLUCI...

Page 17: ...er oder stecken Sie keine Objekte durch die Sicherheitsk fige Lassen Sie das TRC5 nicht gegen Mauer oder andere harte Objekte prallen 3 Achtung Dieses Fahrzeug hat keine R der Es bewegt mittels eines...

Page 18: ...ederaufladbare Batterien aufzuladen Schlie en Sie die Batterieanschl sse nicht kurz Entsorgen Sie die Batterien immer gem den jeweils geltenden lokalen Entsorgungsvorschriften Das Batteriepack nicht b...

Page 19: ...leuchten 4 Nach einem Ladezyklus von 2 Stunden Trennen Sie das Ladeger t vom Netz und entfernen Sie das Batteriepack 5 Nach dem Aufladen wird das Batteriepack warm sein das ist normal c Batteriepack i...

Page 20: ...nicht entworfen um H gel oder Abh nge hinaufzugehen Verwenden Sie das TRC5 auf ruhigem Wasser ohne Wellen Turbulenz oder starke Str mungen also nicht auf Fl ssen und Str men Nicht auf Salzwasser verw...

Page 21: ...und nicht in Richtung des TRC5 laden Sie das Batteriepack des Luftkissenfahrzeugs wieder auf wechseln Sie die Batterie der Fernsteueranlage Luftkissenfahrzeug funktioniert nicht mehr nach Gebrauch au...

Page 22: ...GLISSEUR TELECOMMANDE TELECOMMANDE PACK D ACCUS et CHARGEUR D ACCUS CA Markenname LUFTKISSENFAHRZEUG FERNBEDIENUNG BATTERIEPACK und AC LADERGER T Denominacion comercial AERODESLIZADOR TELEDIRIGIDO MAN...

Page 23: ...2 1 2000 09 Technical data are available and can be obtained from Des donn es techniques sont disponibles et peuvent tre obtenues chez Technische gegevens zijn beschikbaar en kunnen worden aangevraag...

Reviews: