CCTVPROM6
Rev. 01
04/02/2010
©
Velleman nv
8
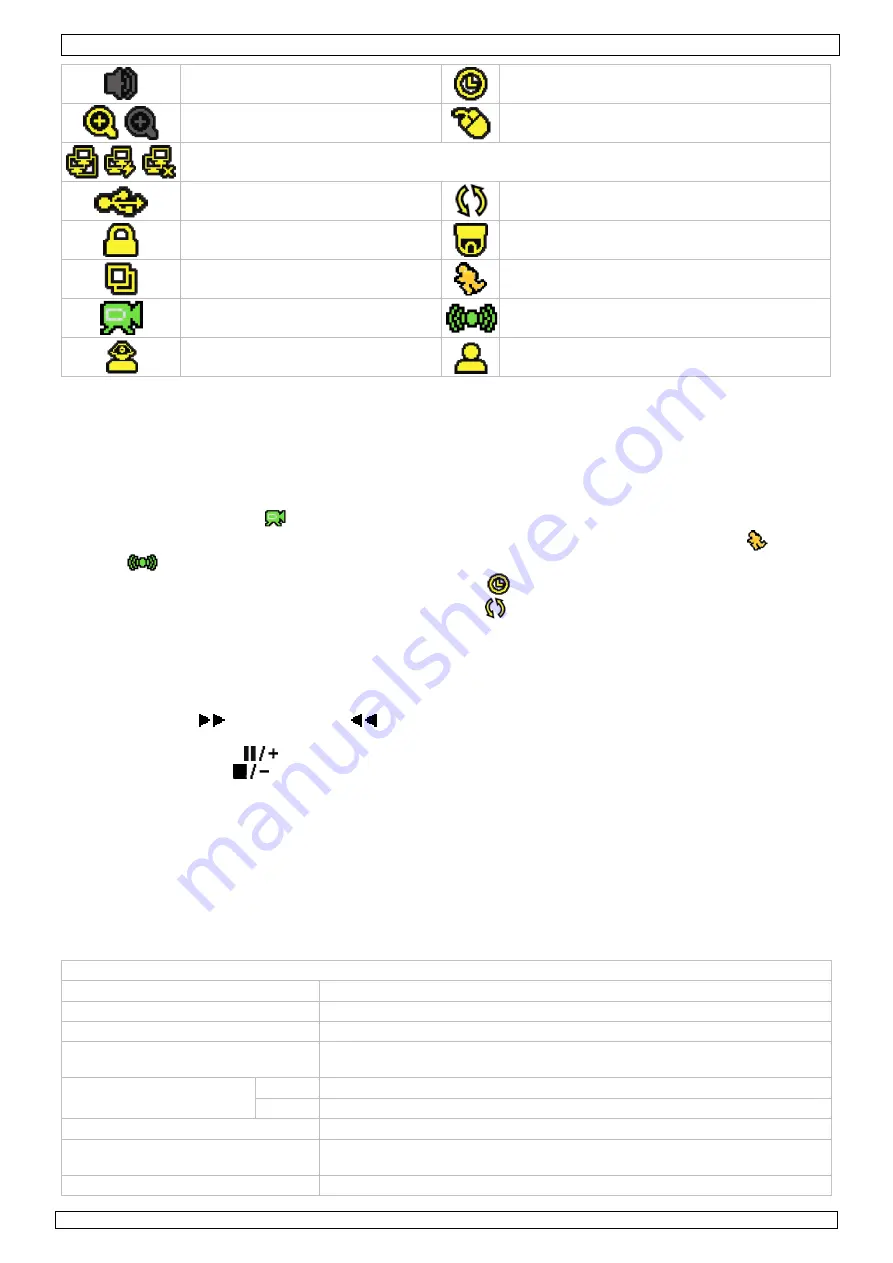
audio channel disabled
timer recording
digital zoom on (yellow) / off
USB mouse connected
LAN connected / Internet connected / no network connection
USB flash drive connected
Hard disk overwrite (default)
key lock on
PTZ mode
sequence mode
motion mode
recording mode
alarm mode
administrator logged on
operator logged on
Note that actual screen icons might differ slightly from the ones shown above.
Quick menu bar
Note:
only available when USB mouse is connected.
•
Move the pointer towards the left of the monitor to open the quick menu bar.
Recording
•
Check whether the camera(s) is (are) properly connected and a HDD is present inside the device.
•
When the auto-recording and pre-alarm functions are enabled, the device will start recording images.
•
Default the recording icon (
) is shown.
•
In case the motion or alarm detection is activated and a motion or alarm is detected, the motion (
) resp.
alarm (
) icon is shown.
•
When timed recording is enabled, the timed recording icon (
) is showed and the timed recording LED is on.
•
Default, the device is in HDD overwrite mode and the icon (
) is shown.
Play-back
•
Make sure the control panel is not locked and press the PLAY button on the control panel or use the quick
menu bar to open the playback control panel.
Note:
play-back needs at least 8192 recorded images to work properly (e.g. with IPS=30, the recording must
be at least 273 seconds long).
•
The fast forward (
) and fast rewind (
) buttons will increase resp. decrease the play-back speed.
Repeatedly pressing the button will increase/decrease speed to 4x, 8x 16x or 32x (max.).
•
Press the pause button (
) to temporary suspend video play-back.
•
Press the stop button (
) to return to live monitoring.
•
Press the SLOW button once to set play-back speed to 1/4
th
and twice for 1/8
th
.
Search
•
There are four ways to search recorded files: by record list, motion list, alarm list or by timer list.
•
To search an event, press the LIST button on the front panel (make sure the control panel is not locked). An
overview of the recorded file types (ALARM, MANUAL, MOTION, SYSTEM and FULL LIST) is shown.
•
Select the desired list and recording from the list.
•
Press ENTER to start play-back.
Note:
the recorded files can also be searched via the included Video Viewer software.
9.
Technical specifications
DVR4L5
video system
PAL
video compression
H.264 (CIF)
video input
4 channels, composite video signal 1Vpp / 75 ohms BNC
video output
composite video signal 1Vpp / 75 ohms BNC
VGA – max. 1600 x 1200 pixels
maximum recording rate
(PAL)
frame
704 x 576 pixels with 25 IPS (PAL)
CIF
352 x 288 pixels with 100 IPS (PAL)
image quality setting
best - high - normal - basic
hard disk storage
built-in SATA type, support 1x HDD, support HDD capacity over 1TB (HDD
not incl)
recording mode
manual / timer / motion / network / alarm controlled


