background image


CCTVPROM6


Rev. 01


04/02/2010 

©

Velleman nv 

7

Connecting Local Area Network (LAN) 


Connect the DVR to a local network by plugging a network cable into the LAN port at the back of the DVR. 
Connector type is 8P8C (RJ45). Setup is done through the OSD. 

7.


Preliminary settings 


Make sure the connected cameras are on and set the power switch at the rear of the device to the on-
position. It takes about 15 to 30 seconds to start up. 

Menu overview 


Press the MENU button and enter the password to go into the menu list.  

Note

: default admin password is “

0000

” (4 times zero). 


For more details, refer to the full user manual. 

Setting date and time 


Before using the DVR the time and date should be set to get a valid time stamp. 


Press the MENU button and enter the admin password to go into the menu list.  


Select the QUICK START menu item. 


Use the NAVIGATION button to move to the TIME SETUP menu item. Select it to set date and time. 

Note:

 once recording started, do not change date or time as this will make it very difficult to find back 

the recorded files. 

Note:

 when using the DVR for the first time and the correct time is set, leave it on for at least 48 

hours. 

Password setting 


Press the MENU button and enter the password to go into the menu list.  


Select the SYSTEM menu item. 


Go to TOOLS, select ADMIN PASSWORD (or OPERATOR PASSWORD) and press the ENTER button to set the 

password.  

Note:

 an operator can not access the main menu, only the quick menu bar (see below). 


Press the cursor up (

) or down (

) button to select the value of the first number and press enter to 

save and go to the next character, or use the mouse to select the desired value. Repeat this for all four 
password numbers. 

Note

: default admin password is “

0000

” (4 times zero). 

Record settings 


Press the MENU button and enter the password to go into the menu list.  


Select the QUICK START menu item. 


Select the GENERAL menu item using the NAVIGATION button. 


Set the image size, image quality and images per second for recording. 


Refer to the full user manual on the included CD-ROM for more details. 

Audio playback 


Press the SLOW and ZOOM button simultaneously to select the desired audio channel or use the quick menu 
bar (see below). The current audio channel is indicated in the status bar.  

8.


Operation 

Display 

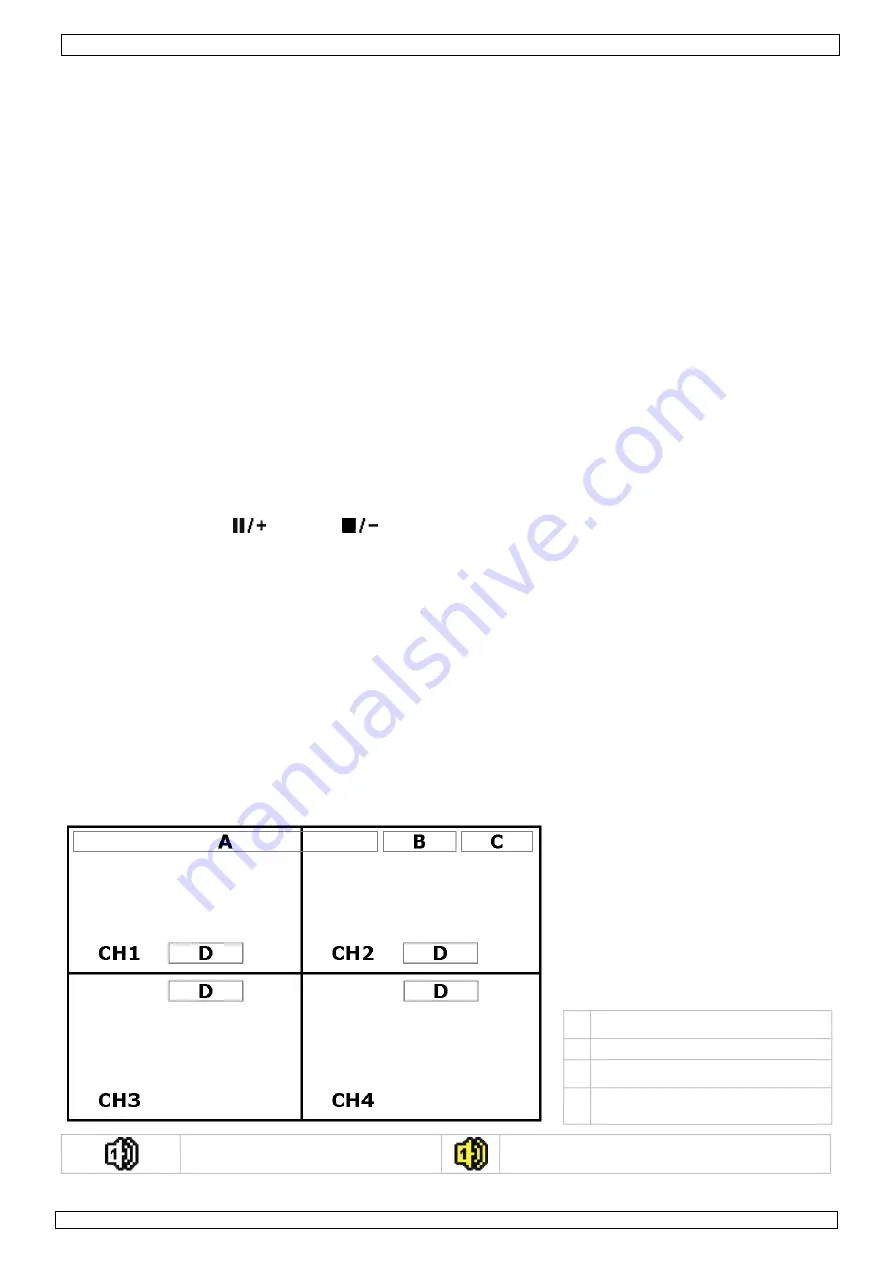
The following image shows the screen layout.  


 A 

system date and time 

 B 

general system status 

 C 

available HDD capacity 

 D 

channel status 


live audio channel 1 .. 4 enabled  


playback audio channel 1 .. 4 enabled (yellow) 

Summary of Contents for CCTVPROM6

Page 1: ...LIGINGSSET ENSEMBLE VID OSURVEILLANCE MULTIFONCTIONNEL JUEGO DE VIDEOVIGILANCIA MULTIFUNCI N UNIVERSELLER BERWACHUNGSSATZ QUICK INSTALLATION GUIDE 4 BEKNOPTE INSTALLATIEHANDLEIDING 10 GUIDE D INSTALLA...

Page 2: ...n de sortie vid o 1 DC 12V Eingangsanschluss 2 Video Ausgangsanschluss 1 Conexi n de entrada CC 12V 2 Conexi n de salida de v deo HDD not included Harde schijf niet meegeleverd Disque dur non inclus D...

Page 3: ...CCTVPROM6 Rev 01 04 02 2010 Velleman nv 3 not incl niet meegelev non incl nicht mitgeliefert no incl...

Page 4: ...rews 1x CD ROM containing the full user manual DVR4L5 Optional not incl hard disk HD500GB S HD750GB S DC DC converter for 4 channel DVRs DVR4 DC connection cable for DVR4 DC and cameras 20m DVR4 CAB 2...

Page 5: ...supports SATA HDD PTZ control supports PELCO D protocol alarm I O 4 inputs 1 output supports daylight saving function supports manual timer motion network recording functions system auto recovery afte...

Page 6: ...nology Attachment The HDD must be formatted Make sure to unplug the device from the mains before servicing and do not touch any electronic circuitry to avoid electrostatic discharge Unscrew the 6 scre...

Page 7: ...t least 48 hours Password setting Press the MENU button and enter the password to go into the menu list Select the SYSTEM menu item Go to TOOLS select ADMIN PASSWORD or OPERATOR PASSWORD and press the...

Page 8: ...needs at least 8192 recorded images to work properly e g with IPS 30 the recording must be at least 273 seconds long The fast forward and fast rewind buttons will increase resp decrease the play back...

Page 9: ...COLBUL5H4 pick up element 1 3 HR colour CCD image sensor number of pixels 753 H x 582 V PAL Resolution 520 TV lines min Illumination 0 6 Lux F2 0 0 Lux 15m IR on S N ratio 48dB AGC off electronic shut...

Page 10: ...hijf schroeven 1x cd rom met volledige handleiding DVR4L5 Optioneel niet meegelev harde schijf HD500GB S HD750GB S DC DC converter voor 4 kanaals DVR s DVR4 DC aansluitkabel voor DVR4 DC en camera s 2...

Page 11: ...sturing ondersteunt PELCO D protocol alarmin uitgang 4 ingangen 1 uitgang overschakeling naar zomer of wintertijd opnamemodi manueel timer beweging via netwerk automatisch herstel van het systeem nada...

Page 12: ...an deze handleiding Deze DVR is geschikt voor gebruik met een compatibele HDD niet meegeleverd type SATA Serial Advanced Technology Attachment Formatteer eerst de HDD schijf indien nodig Ontkoppel eer...

Page 13: ...oord Druk op MENU en geef het paswoord in om het menu weer te geven Selecteer het submenu SYSTEM Ga naar TOOLS Selecteer ADMIN PASSWORD of OPERATOR PASSWORD en druk op ENTER Opmerking Een gewone gebru...

Page 14: ...t de muis Opmerking Het bestand moet minstens 8192 beelden bevatten bv ips 30 de opname moet minstens 273 seconden lang zijn Druk op om de opname verder te spoelen of op om de opname terug te spoelen...

Page 15: ...t 1 3 kleuren HR CCD beeldsensor Pixels 753 H x 582 V PAL Resolutie 520 tv lijnen min Verlichting 0 6 Lux F2 0 0 Lux 15m IR aan S R verhouding 48dB AGC uit elektronische sluiter 1 50 tot 1 100000 sec...

Page 16: ...convertisseur CC CC pour enregistreur num rique 4 canaux DVR4 DC c ble de connexion pour DVR4 DC et cam ras 20m DVR4 CAB 2 Consignes de s curit Garder hors de la port e des enfants et des personnes n...

Page 17: ...t manuel programm par d tection de mouvement depuis r seau auto r tablissement du syst me apr s la remise sous tension disques durs en option 500 Go HD500GB S ou 750 Go HD750GB S non inclus supporte c...

Page 18: ...r l alimentation au r seau Ne pas encore allumer l enregistreur Connexion d une cam ra Cet enregistreur fonctionne avec un maximum de 4 cam ra Chaque cam ra n cessite sa propre alimentation Connecter...

Page 19: ...strement Enfoncer la touche MENU et saisir le mot de passe S lectionner le sous menu QUICK START D placer le curseur avec les touches de navigation et s lectionner le sous menu GENERAL Configurer la t...

Page 20: ...doit contenir un minimum de 8192 images p ex IPS 30 l enregistrement doit avoir une dur e minimale de 273 secondes Enfoncer la touche pour une avance rapide de l enregistrement enfoncer la touche pour...

Page 21: ...u syst me apr s la remise sous tension dimensions 343 x 223 x 59 mm CAMCOLBUL5H4 Capteur capteur d image CCD HR couleur 1 3 Pixels 753 H x 582 V PAL r solution 520 lignes TV clairement min 0 6 Lux F2...

Page 22: ...ance de personas no capacitadas y ni os Riesgo de descargas el ctricas al abrir la caja Puede sufrir una peligrosa descarga el ctrica al tocar un cable conectado a la red el ctrica Desconecte siempre...

Page 23: ...la alimentaci n de nuevo discos duros opcionales 500 GB HD500GB S o 750 GB HD750GB S no incl soporta una conexi n a la red TCP IP PPPoE DHCP y DDNS monitor opcional no incl MONSCA4 MONSCA5 CAMCOLBUL5H...

Page 24: ...onecte el cable SATA y el cable de alimentaci n al disco duro Fije el soporte con el disco duro a la parte inferior de la videograbadora con los tornillos incluidos Vuelva a cerrar la videograbadora y...

Page 25: ...a Seleccione el submen QUICK START Mueve el cursor con las teclas de navegaci n y seleccione el submen GENERAL Configure el formato de la imagen la calidad de la imagen y el n mero de im genes por seg...

Page 26: ...barra de men para activar la reproducci n de un fichero de grabaci n Nota El fichero debe incluir m n 8192 im genes p ej IPS 30 la grabaci n debe tener una duraci n m n de 273 segundos Pulse la tecla...

Page 27: ...o restablecimiento autom tico del sistema despu s de haber activado la alimentaci n de nuevo dimensiones 343 x 223 x 59 mm CAMCOLBUL5H4 elemento de imagen sensor de color HR CCD de 1 3 n mero de pixel...

Page 28: ...DVR4 DC Anschlusskabel voor DVR4 DC und Kameras 20m DVR4 CAB 2 Sicherheitshinweise Halten Sie Kinder und Unbefugte vom Ger t fern Stromschlaggefahr beim ffnen des Geh uses das Ber hren von unter Spann...

Page 29: ...nterst tzt die Sommer Winterzeit Funktion unterst tzt die Funktionen manuell Timer Bewegung ber das Netz automatische Systemwiederherstellung nach Stromunterbrechung optionale Festplatten 500 GB HD500...

Page 30: ...n Sie den Video Ausgang der Kamera mit dem BNC Video Eingang auf der R ckseite des Ger tes Die Nummer neben dem Anschluss zeigt die Kanalnummer an Audio Anschluss Das Ger t hat 4 Audio Eing nge Verbin...

Page 31: ...der ein und best tigen Sie mit ENTER Sie k nnen die gew nschte Ziffer auch mit der Maus ausw hlen Wiederholen Sie f r die brigen Ziffern Bemerkung das Standardpasswort ist 0000 4x Null Die Aufnahmefun...

Page 32: ...nach links um die Men leiste anzuzeigen Aufnahme Verbinden Sie die Kamera s und die Festplatte korrekt mit dem Ger t Das Ger t startet die Aufnahme wenn die automatische Aufnahme und die Prealarm Fun...

Page 33: ...tte nicht mitgeliefert Aufnahmemodus manuell Timer Bewegung ber das Netz gesteuert Alarm Bildwiederholrate 100 IPS PAL Audio I O 4x Audio Eingang 1x Audio Ausgang mono Erfassungsbereich Gitter 16 x 12...

Page 34: ...ung f r Schaden oder Verletzungen bei falscher Anwendung dieses Ger tes F r mehr Informationen zu diesem Produkt und die neueste Version dieser Bedienungsanleitung siehe www velleman eu Alle nderungen...

Page 35: ...ring of een vervangend product tegen 50 van de kostprijs of terugbetaling van 50 bij ontdekking na n jaar tot 2 jaar Valt niet onder waarborg alle rechtstreekse of onrechtstreekse schade na de leverin...

Page 36: ...lva el aparato con la factura de compra original y transp rtelo en un embalaje s lido preferentemente el embalaje original Incluya tambi n una buena descripci n del defecto Consejo Lea el manual del u...

Reviews: