background image

Do not use or install the heater in bathrooms, laundry areas, or similar indoor 

locations. Never place the heater near a bathtub or other water container. Do 

not place switches or controls within reach of a person in a bathtub, shower, or 

swimming pool.
Do not locate the heater immediately above or below a fixed socket outlet or 

connection box. This is because the heat radiated from the appliance may 

damage the electricity outlet or plug.
This heater must be grounded. Connect to properly grounded outlets only.
Ensure both plug and socket is clean and free from dust when using.
To disconnect the heater from the power supply, grip the plug and pull from the 

power socket. Never pull by the cord.
Do not touch the plug with wet or moist hands.
Do not use an extension cord with this heater.
Install the heater using the stainless steel brackets provided. Do not use other 

brackets for this purpose.
Do not remove this Installation & Service Manual or the provided spanners 

from the site of installation. Ensure that the manual is stored safely for future 

reference.
MAINTENANCE PRECAUTIONS
Repair or service must be carried out by a qualified and licenced person only.
If the appliance has not been used, or will not be used for a long period of time, 

disconnect the power supply.
Ensure that the heater is serviced and inspected by a qualified electrician on an 

annual basis.
Do not attempt to clean or service the heater until it has been switched off, the 

power has been disconnected, and the heater has cooled to room temperature.
Regularly check the heater for damage. Do not use the heater if the heating 

element is cracked or broken. If damage to the appliance is suspected, 

discontinue use immediately and contact the supplier or qualified person to 

repair.
Regularly inspect the power cord and plug for wear or damage and do not 

operate the heater with a damaged cord, plug or loose socket or after the heater 

malfunctions, has been dropped or damaged in any manner.
If the supply cord is damaged, it must be replaced by the manufacturer, it’s 

service agent or similarly qualified persons in order to avoid a hazard.

4

EN

Summary of Contents for AERO

Page 1: ...veito ELECTRIC CARBON INFRARED HEATER INSTALLATION INSTRUCTIONS MANUAL MODEL AERO...

Page 2: ...onal injury This appliance can be used by children aged from 8 years and above and persons with reduced physical sensory or mental capabilities or lack of experience and knowledge if they have been gi...

Page 3: ...or tampering If the appliance appears damaged contact the place of purchase for assistance This heater must only be used on a 220 240V AC single phase electricity supply Remove packaging and any tran...

Page 4: ...spanners from the site of installation Ensure that the manual is stored safely for future reference MAINTENANCE PRECAUTIONS Repair or service must be carried out by a qualified and licenced person on...

Page 5: ...ludes the veito carbon infrared tube producing mid wave infrared heat The AERO heater has weatherproof design which means you can use it for patios terraces smoking areas conservatories restaurants ho...

Page 6: ...r This heater must be installed according to the minimum installation clearances shown in the diagrams A minimum safety distance of 150cm should always be left in front of the appliance This heater mu...

Page 7: ...MINIMUM 50cm 180cm MINIMUM HEIGHT FROM FLOOR MINIMUM 45 ANGLE 7 CEILING FLOOR The heating surface must never be directed toward the ceiling WALL MINIMUM 50cm INCORRECT INSTALLATION EN...

Page 8: ...must be at the lower end of the heater if the heater is installed at an angle or vertically WIRING DIAGRAM 220 240V AC 50 60 Hz L N G HEATING ELEMENT 8 CEILING CEILING INCORRECT INSTALLATION CORRECT...

Page 9: ...in use store the heater carefully in a safe dry childproof location Do not touch the heating element with bare fingers as residue from your hand could affect the life of the lamp If it is accidentally...

Page 10: ...CARBON INFRAROT HEIZSTRAHLER INSTALLATIONS BENUTZERHANDBUCH MODELL AERO...

Page 11: ...as Produkt in irgendeiner Weise zu ver ndern Halten Sie sich w hrend des Betriebs von dem Heizstrahler fern Andernfalls k nnte die Kleidung in Brand geraten und oder es zu schweren Verletzungen kommen...

Page 12: ...es Heizstrahlers w hrend des Betriebs Bemalen Sie keine Oberfl che des Heizstrahlers Decken Sie den Heizstrahler nicht ab INSTALLATIONSVORSCHRIFTEN Die Installation muss von einem Fachmann oder einer...

Page 13: ...r an ordnungsgem geerdete Steckdosen angeschlossen werden Vergewissern Sie sich dass der Stecker und die Steckdose sauber und frei von Staub ist Um den Heizstrahler vom Stromnetz zu trennen fassen Sie...

Page 14: ...tromkabel besch digt ist muss es vom Hersteller seinem Kundendienst oder einer hnlich qualifizierten Person ausgetauscht werden um eine Gef hrdung zu vermeiden EINLEITUNG PRODUKTMERKMALE Der AERO Carb...

Page 15: ...Heizstrahler muss mit den Mindestabst nden installiert werden die in den Abbildungen angegebenen sind Ein Mindestsicherheitsabstand von 150cm sollte immer vor dem Ger t eingehalten werden Der Heizstr...

Page 16: ...MINIMAL 50cm 180cm MINIMALE H HE VOM BODEN MINIMAL 45 WINKEL DECKE FLUR Der Heizstrahler darf niemals in Richtung der Decke angewinkelt werden WAND MINIMAL 50cm FALSCHE INSTALLATION 16 DE...

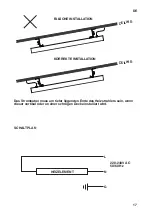
Page 17: ...efer liegenden Ende des Heizstrahlers sein wenn dieser vertikal oder an einer schr gen Decke installiert wird SCHALTPLAN 220 240V AC 50 60 Hz L N G HEIZELEMENT CEILING CEILING FALSCHE INSTALLATION KOR...

Page 18: ...eposition entfernt wird Ber hren Sie das Heizelement nicht mit blo en Fingern da R ckst nde von Ihrer Hand die Lebensdauer der Lampe beeintr chtigen kann Wenn es versehentlich ber hrt wird entfernen S...

Page 19: ...CHAUFFAGE INFRAROUGE CARBONE LECTRIQUE MANUEL D INSTALLATION ET D INSTRUCTIONS MOD LE AERO...

Page 20: ...ourrait entra ner l incendie des v tements et ou des blessures graves Cet appareil peut tre utilis par les enfants g s de 8 ans et plus et les personnes ayant des capacit s physiques sensorielles ou m...

Page 21: ...pendant son fonctionnement Ne peignez aucune surface de l appareil Ne couvrez pas l appareil CONSIGNES D INSTALLATION L installation doit tre effectu e par une personne qualifi e et autoris e uniquem...

Page 22: ...eil doit tre brancher sur une prise terre Assurez vous que la fiche et la prise sont propres et exemptes de poussi re lors de l utilisation Pour d connecter l unit de l alimentation saisissez la prise...

Page 23: ...mag il doit tre remplac par le fabricant son agent de service ou des personnes de qualification similaire afin d viter tout danger INTRODUCTION CARACT RISTIQUES DU PRODUIT Le radiateur infrarouge en c...

Page 24: ...t tre install conform ment aux d gagements d installation minimum indiqu s dans les sch mas Une distance de s curit minimale de 150cm doit toujours tre laiss e devant l appareil Ce radiateur doit tre...

Page 25: ...MINIMUM 50cm 180CM MINIMUM HAUTEUR DU SOL ANGLE MINIMUM DE 45 DEGR S PLAFOND SOL La surface de chauffage ne doit jamais tre dirig e vers le plafond MUR MINIMUM 50cm INSTALLATION INCORRECTE 25 FR...

Page 26: ...tre l extr mit inf rieure du radiateur si le radiateur est install un angle ou verticalement DIAGRAMME DE C BLAGE 220 240V AC 50 60 Hz L N G L MENT DE CHAUFFAGE PLAFOND PLAFOND INSTALLATION INCORRECTE...

Page 27: ...as utilis rangez soigneusement le radiateur dans un endroit s r sec et l abri des enfants Ne touchez pas l l ment chauffant avec les doigts nus car les r sidus de votre main pourraient affecter la dur...

Page 28: ...www veito com...

Reviews: