


www.veear.eu
20
EasyVR 3
User Manual (1.0.11)
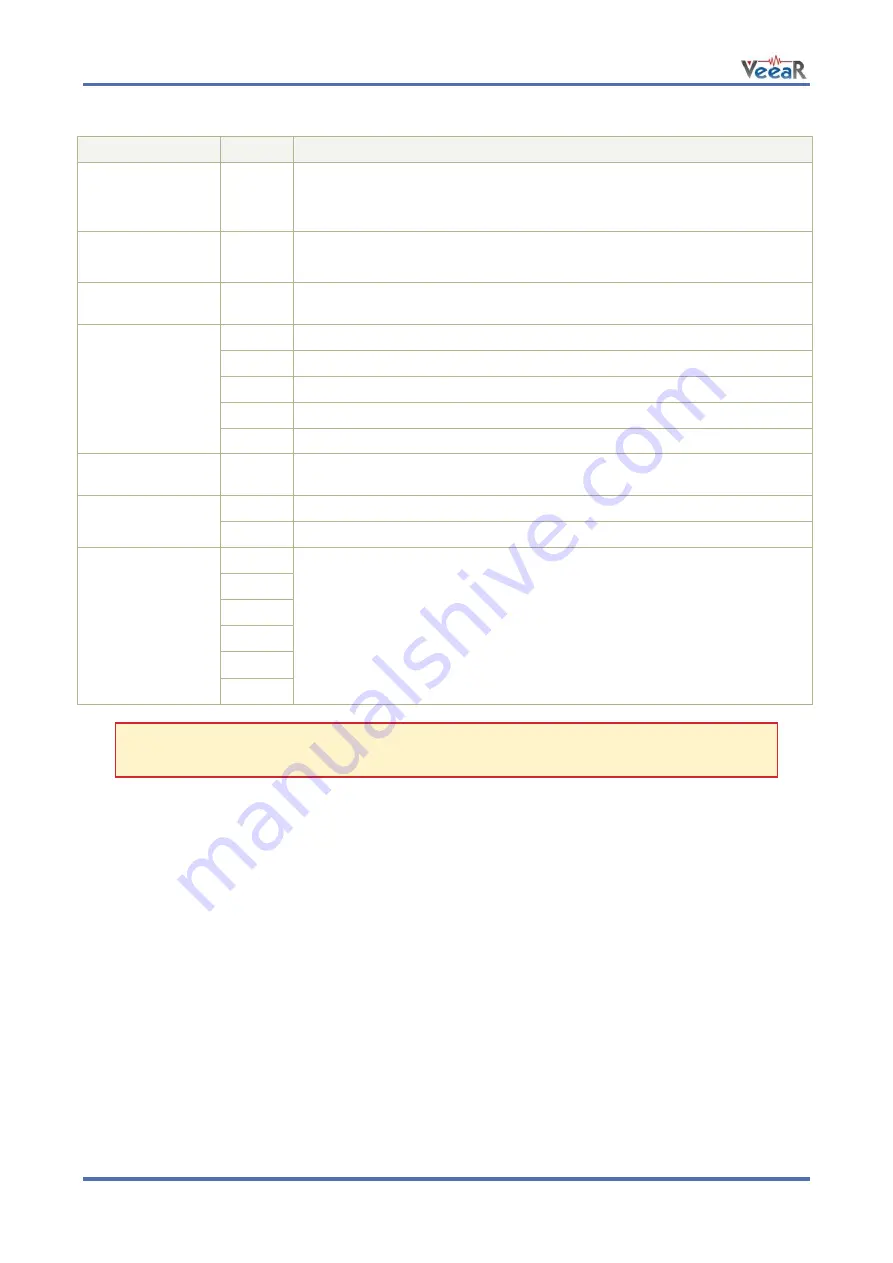
Pin assignment
Group
Pin
Description
●
ARDUINO
HEADERS
-
Arduino UNO-R3 Shield interface, pass-through connectors
(Pins 0-1 are in use when J12 is set to UP, PC, HW or LEO)
(Pins 12-13 or 8-9 are in use when J12 is set to SW)
●
EASYVR
AUDIO
-
Audio cables connectors of the EasyVR 3 module (microphone and
speaker)
●
LINE OUT
-
3.5mm stereo/mono jack (16
Ω - 32Ω headphones or line-level output)
●
MODE
JUMPER
SW
Arduino Software Serial (connected to pins 12-13 or 8-9)
HW
Arduino Hardware Serial (connected to pins 0-1)
PC
PC Mode (Arduino disabled, EasyVR in command mode)
UP
Update Mode (Arduino disabled, EasyVR in boot mode)
LEO
Leonardo Update (Arduino enabled, EasyVR in boot mode)
●
PROG
-
Red light indicator for Flash programming modes (UP and LEO)
●
SW SERIAL
PINS
RX
Use resistor to select Software Serial RX pin: 12 or 8
TX
Use resistor to select Software Serial TX pin: 13 or 9
●
EASYVR
GPIO
IO1
General purpose I/O as found on the embedded EasyVR 3 module
(referenced at the internal VDD logic level
– see note below)
IO2
IO3
IO4
IO5
IO6
Note
: The General Purpose I/O lines (IO1-IO6) are at nominal 3.0VDC level. Do not connect
higher voltages directly to these pins!
Mode Jumper settings
This jumper selects the operating mode of the EasyVR Shield and it can be placed in one of four positions:
o
SW
– Software Serial mode
Use it for controlling the EasyVR module from your Arduino sketch through a software serial port
(using pins 12-13). You can also connect the EasyVR Commander in this mode, provided that the
running sketch implements bridge mode (see the Arduino library examples).
o
HW
– Hardware Serial mode
Use it for controlling the EasyVR module from your Arduino sketch through the hardware serial port
(using pins 0-1).
o
PC
– PC Connection mode
Use it for direct connection with the EasyVR Commander. In this mode, the Arduino controller is held
in reset and only the embedded USB/Serial adapter is used.
o
UP
– Flash Update mode
Use it for firmware updates or to download sound table data and custom grammars to the on-board
flash memory from the EasyVR Commander. In this mode, the Arduino controller is held in reset and
only the embedded USB/Serial adapter is used. The EasyVR module is set in boot mode.
o
LEO
– Leonardo Update mode
This is similar to the regular
Flash Update
mode, for Arduino boards that don’t have a separate
USB/Serial adapter, such as Arduino Leonardo. The EasyVR module is set in boot mode, but the
Arduino controller is not reset and it must be running the special “bridge” sketch.