background image

VEC-1002K Owner's Manual 

2 Meter FM Receiver Kit 

15 

!


!

   7.  Locate two (2) 10K potentiometers.  Install one at R6 (tuning), making 

sure the pot is firmly seated before soldering in place. 

!


!

   8.  Install the second 10K pot at R16 (volume), checking seating before 

soldering. 

!


!

   9.  Find the 100K pot.  Install at R10 (squelch), check seating, and solder. 

Phase 9:  Coils 

!


!

   1.  Find the .074 uH slug-tuned coil with a red form (144-Coilcraft).  This 

will be installed at L4.  Before installing, make sure the coil's two pins 
and two shield-can tabs are straight and aligned with the mounting 
holes.  Install, and bend the shield-can tabs over to hold the can in 
place before soldering. 

!


!

   2.  Find the 660 uH quadrature detector coil  (five pins, black coil form).  

Make sure all pins and tabs are straight before installing.  Install at L5, 
bending over the shield-can tabs before soldering in place. 

The last three coils in your radio are air-wound types made from the #24 wire 
supplied with your kit.  In addition to the #24 wire, you'll also need a 6-32 screw 
at least 1/2" long to use as a winding form (longer is better). 

!


!

   3.  Carefully straighten the coil wire (drawing it over a plastic rounded 

surface such as a screwdriver handle works well).  Remove all bends 
and kinks.  Cut two (2) lengths about 5" long each. 

!


!

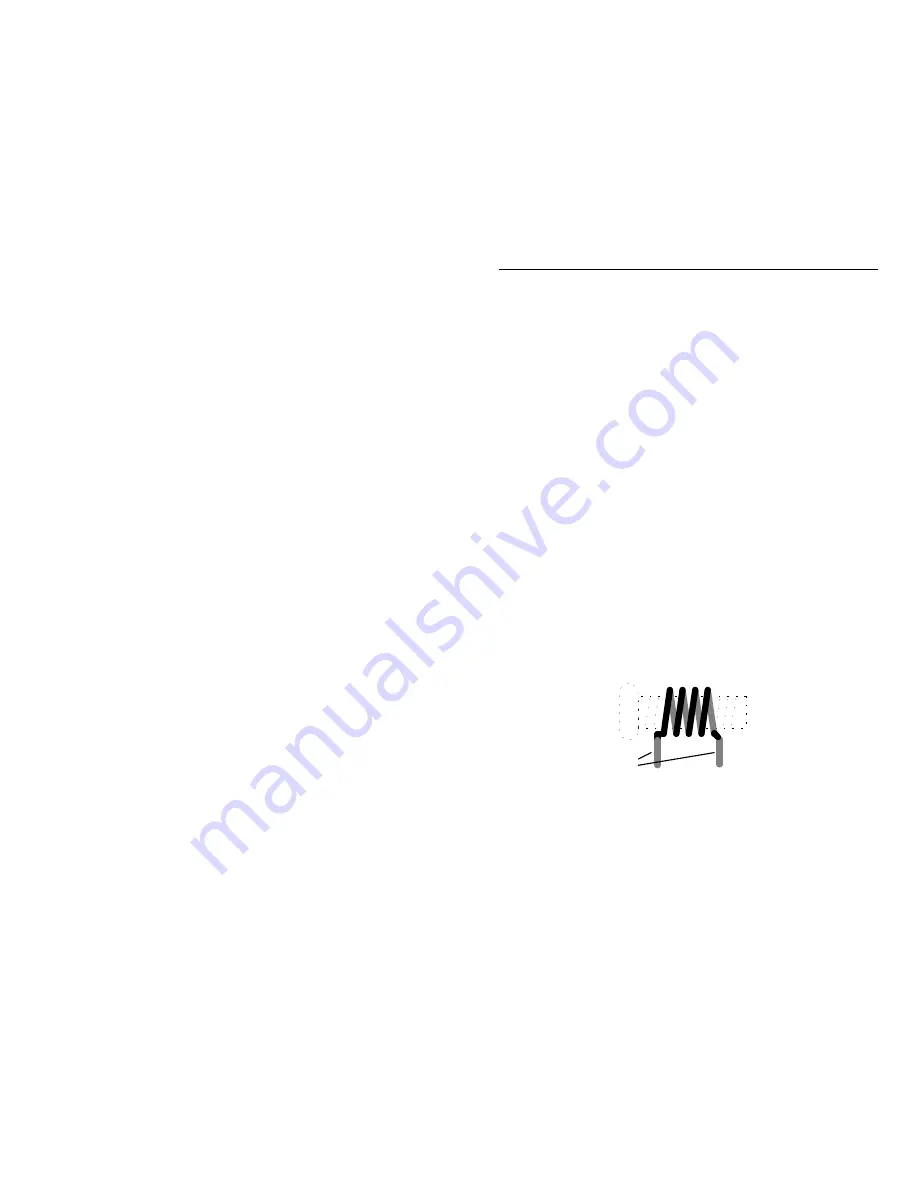
   4. Take one length of wire and, while grasping both ends firmly, 

carefully wind four (4) full turns over the winding form--as shown.  
The wire should conform into the thread grooves. 

6-32 screw thread 

4-turns #24 enameled wire

1/2" leads stripped

and tinned with solder


!


!

   5.  Remove the coil by unscrewing it from the 6-32 threads.  Shape as 

shown above, with about 1 wire-width spacing between each turn. 

!


!

   6.  Each lead must be tinned prior to installation. The wire provided with 

your kit is coated with enamel insulation formulated to melt at high 
temperatures.  This quality should allow you to strip, clean, and "tin" 
each coil lead in a single operation.  To prepare each lead, hold a hot 
soldering iron tip against it for several seconds while applying a small 

Summary of Contents for VEC-1002K

Page 1: ...ific part is no longer available or if Engineering has determined that an alternative component is more suitable Vectronics reserves the right to make substitutions at any time In most cases these cha...

Page 2: ...it well and include the minimum payment plus shipping and handling charges 25 00 total No work can be performed without pre payment Also provide a valid UPS return address and a day time phone number...

Page 3: ...ed while hitting the books Best of all once the license arrives you ll conquer mike fright easily because you ll know exactly what to say When it comes to pulling in weak signals the VEC 1002K rivals...

Page 4: ...e off air signals BEFORE YOU START BUILDING Experience shows there are four common mistakes builders make Avoid these and your kit will probably work on the first try Here s what they are 1 Installing...

Page 5: ...tip to promote rapid melting Desoldering Tips If you make a mistake and need to remove a part follow these instructions carefully First grasp the component with a pair or hemostats or needle nose pli...

Page 6: ...nce similar to resistors in both shape and band marking However a closer look will enable you to differentiate between the two chokes are generally larger in diameter and fatter at the ends than resis...

Page 7: ...ic transistors and voltage regulators use a case backed with a prominent metal tab to dissipate heat T 220 Here orientation is indicated by the positioning of the cooling tab Emitter Flat Side Metal T...

Page 8: ...R11 R14 2 4 7K yellow violet red R7 R17 2 10K brown black orange R5 R18 2 39K orange white orange R12 R15 1 47K yellow violet orange R8 4 100K brown black yellow R1 R9 R13 R19 2 10K potentiometer R6 R...

Page 9: ...For L1 L2 L3 1 074 uH slug tuned shielded red L4 1 660 uH adjustable shielded black L5 1 10 245 crystal Y1 1 10 7 MHz ceramic filter SFE10 7J FL1 1 455 KHz ceramic filter 55D or 55F FL2 Switches Jacks...

Page 10: ......

Page 11: ...holes for integrated circuit U2 are toward the rear Find the 8 pin IC socket and if necessary straighten any bent pins 2 Position the 8 pin socket at U2 with its notch or key toward the left hand sid...

Page 12: ...Find four 4 100K resistors brown black yellow Install one at R1 and solder 14 Install a 100K resistor brown black yellow at R9 and solder 15 Install a 100K resistor brown black yellow at R13 and solde...

Page 13: ...C24 18 Install and solder a 1 uF at C26 19 Install and solder a 1 uF at C29 Phase 4 Multilayer Capacitors There are 9 multilayer capacitors provided with your kit Important Note A multilayer capacitor...

Page 14: ...ue Phase 5 Electrolytic Capacitors The last six 6 capacitors in the kit are electrolytic capacitors Electrolytic caps are polarized and must be installed the correct way in order to work Each capacito...

Page 15: ...ads of Q1 into the three mounting holes provided Make sure that the transistor body is properly keyed to the silk screened outline if you insert the transistor incorrectly it may be damaged when power...

Page 16: ...filter FL2 55D or 55F This is a small black cube with three pins and it will only fit one way on the PC board Install and solder 3 Find the 3 5 mm stereo mini headphone jack Install at J2 making sure...

Page 17: ...pes made from the 24 wire supplied with your kit In addition to the 24 wire you ll also need a 6 32 screw at least 1 2 long to use as a winding form longer is better 3 Carefully straighten the coil wi...

Page 18: ...ing wire wind a 10 turn coil for L3 Unlike L1 and L2 the turns of L3 should be compressed closely so the overall coil is about 3 in length about the distance between its mounting holes Install and sol...

Page 19: ...ind inadvertent assembly errors that might prevent the radio from working or cause damage to sensitive parts Follow this procedure Compare parts locations against the parts placement diagram Was each...

Page 20: ...ds are you ve overlooked something minor that s easy to correct Take a break come back fresh and carefully repeat the QC inspection If no undiscovered errors turn up during your second inspection proc...

Page 21: ...the red voltmeter lead to pin 17 Using a small screwdriver adjust L5 for a reading of 2 3 volts No further adjustment will be required Final Alignment Oscillator Coil L4 Your kit should be mounted in...

Page 22: ...CH counter clockwise open 2 Power the radio and set VOLUME for a comfortable level 3 Key the HT s transmit switch Slowly tune the slug in L4 until the HT signal is heard 4 Confirm the signal you hear...

Page 23: ...al is heard on the scanner at 135 3 MHz OPTION 6 Calibrating with an off air signal If no other option is available you may calibrate L3 using the signal generated by a local repeater To do this you m...

Page 24: ...tion indicates an improvement in signal strength As you find the best point for each coil stretch or compress it permanently into that position Don t attempt to adjust L1 and L2 while tuned to a stron...

Page 25: ...s RG 58 Brass Welding Rod Periodically Check Battery Condition Operating your radio with a weak battery may lead to unstable tuning signals drifting off channel rapidly weak or distorted audio and mot...

Page 26: ...ken sensitivity will be poor If these checks fail to uncover the problem repeat the QC check one more time Service records show that for most malfunctioning kits outright component failure is relative...

Page 27: ...of the radio If you have technical skills and can read a schematic diagram this will help you For example if you get an unreasonable reading on pin 23 of U1 the schematic shows that the radio s voltag...

Page 28: ...tablishes the radio s message channel bandwidth prior to 100 dB of signal amplification and limiting in the 2nd IF Signals are demodulated by quadrature detection and recovered audio signals are pream...

Page 29: ......

Page 30: ...wo holes centered on each edge of the enclosure Refer to the diagram on the next page for location and orientation 3 Install the two 1 2 mounting screws next Insert the screws from the bottom through...

Page 31: ......

Reviews: