Vector Fog H100 Instruction Manual Download Page 10

10 


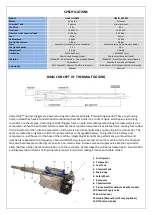
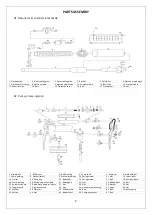
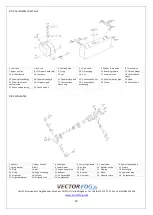
03. Chemical & Fuel Tank


04. Carbure

tt

or 


1. Venturi 

2. Upper Gasket 

3. Cone sha

ft


4. Petrol valve board  5. Petrol valve 

6. Petrol valve support 

7. Spring washer 

8. Bolt 

9. Lower Gasket 

10. Engine 

11. Ejec

ti

on nozzle 

12. Nozzle 

13. Ring 

14. Nut 

15. Engine upper pipe 

16. Plug 

17. Plug cap 

18. Metal grip 

19. O-ring 

20. Engine rear peg 

21. Reducer 

22. Run tee 

23. Elbow 

24. Explosion pipe 

25. Air gasket 

26. Washer 

27. Air Gasket Bolt 

28. Air elbow 

29. Extension hose 

30.  Air gasket bolt 

31. Air gasket washer 

32. Air gasket nut 

33. Air gasket nut 


1. Fuel tank  

2. Run tee 

3. Fuel tank pipe 

4. Check valve 

5. Rubber check valve 

6. T-check valve 

7. upper air pipe 

8. Oil pressure hose (blk)  9. O-ring 

10. Oil tank peg 

11. Knocking release  

12. Oil tank elbow 

13. oil 

lter device 

14. fuel hose 

15. nut 

16. nut 

17. chemical tank 

18. chemical tank 

mouth 

19. Chemical tank 

fitti

ng 

20. Chemical tank grip 

21. Chemical tank bolt  22. Chemical tank nut 

23. Chemical outlet pipe 

24. Elbow 

25. Chemical amount 

control valve 

26. Straight nipple 

27. Chemical tank 

mouth ring 

28. Chemical tank 

mouth peg 

29. Elbow 

30. Check valve-1 

31. Check valve packing 

32. Check valve-2 


Unit 13 Riverside Park, Dog

ud Way, Farnham, GU9 7UG. United Kingdom. Tel: +44 (0)1252 757 222. Fax: +44 (0)1483 326 534 

www.vectorfog.com


Summary of Contents for H100

Page 1: ...ment You must exercise caution if fuel is spilt in order to avoid the risk of fire CAUTION MARKS Please read this manual before using the equipment You must wear protective equipment face breathing ma...

Page 2: ...e VectorFog thermal foggers have an auto start and operate through compressed air via a compressor When the auto start button is pressed the compressed air pressurizes the fuel tank causing fuel to fl...

Page 3: ...volts Connect the charger to the unit and then connect to the mains The machine requires around 8 to 10 hours to fully charge Inspect the ignition unit Press the power button and listen to ensure tha...

Page 4: ...econds after you hear combustion starting sounds like a small explosion It is necessary to keep the machine on for about 10 seconds to warm up before opening the chemical valves TIP If the machine fai...

Page 5: ...ill the chemical tank with 25 of clean water and turn on the unit This will prevent corrosion and the accumulation of chemical deposits in the tank and pipes Spark Plug Maintenance Remove the spark pl...

Page 6: ...n the petal valve and the valve plate o should be approximately 1 mm COMMON TROUBLESHOOTING If there is no ignition Listen for any noises coming from the engine If there is noise coming from the engin...

Page 7: ...ose located on the side of the fuel tank to make sure it s not blocked Make sure the fuel tank is full before starting the machine Make sure the seal in the petrol cap is not damaged Make sure the cap...

Page 8: ...with the wire brush provided Use and forward and backward motion The machine doesn t fog or doesn t fog enough Check that the chemical supply valve is opened This is done by turning it anticlockwise M...

Page 9: ...3 Buffer spring 4 Pump shaft 5 Pump nut 6 Washer large 7 Pump packing 8 Washer small 9 Washer medium 10 Spring washer 11 Nut 12 Under cover 13 Piercer 14 Pump peg 15 Body left 16 Spring washer 17 Bol...

Page 10: ...t nut 1 Fuel tank 2 Run tee 3 Fuel tank pipe 4 Check valve 5 Rubber check valve 6 T check valve 7 upper air pipe 8 Oil pressure hose blk 9 O ring 10 Oil tank peg 11 Knocking release 12 Oil tank elbow...

Reviews: