ELX1003HDT
- 3 speed, continuous running fan.
The fan runs continuously at the pre-selected lower
speed, and the boost (speed 2) will start to operate
automatically when the relative humidity (adjustable
between 40% and 90% +/-5% tolerance) reaches
the pre-set level and will continue to operate at this
speed until the humidity has been dispersed and the
adjustable over-run timer (adjustable from 0 to 30
minutes) has completed its cycle. The boost speed
can also be activated by as described for model
ELX1003DT
ELX1003DL -
3 speed, continuous running fan with
Data Logger. For operation and monitoring of the
Data Logger, please refer to separate Data Logger
instructions enclosed. (Contact Vectaire Ltd for any
further clarification.)
5
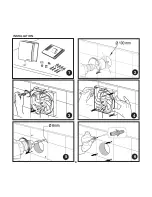
INSTALLATION
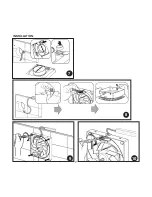
1. Check there is nothing missing in box and
remove front cover.
2. Drill hole in wall -
allow extra width if using
ducting - it is the installer's responsibility to
use the appropriate core cutter to obtain the
correct hole diameter.
3. Remove circuit board cover.
4. Use fan assembly as template to mark drill holes.
5. Drill 4 x 6mm dia holes.
6. Fit wall plugs
.
7/8 Decide whether to have cable access from
rear (recessed) or top (surface) of fan - if from
top ensure that included grommet is properly
fixed. (See dia 8). If cable is to come through
rear of fan, fit rubber ring (included) .
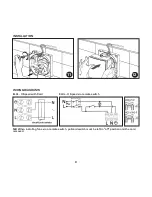
9.
Screw fan to wall.
10. Connect cable using cable clamp -
SEE WIRING DIAGRAMS FOR SPECIFIC MODELS
NB this fan is double insulated and does not need
to be earthed
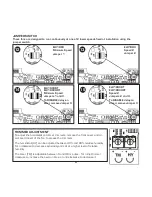
11.
Before replacing circuit board cover choose
speed of fan and set delay-on timer (if applica-
ble)
SEE JUMPER SWITCH SETTINGS BELOW
12. Replace front cover.
N.B This fan is NOT suitable for use with a Gravity
Grille. It should be installed using either a Cowl or
Fixed Grille.
IMPORTANT
If the fan is installed in a ceiling with a vertical duct
passing through an unheated space, a condensation
trap
MUST
be fitted. Any ducting in an unheated
space should also be insulated according to the lat-
est Building Regulations recommendations in the
Domestic Ventilation Compliance Guide. Failure to do
this could result in condensation affecting the opera-
tion of the fan and cause damage to the ceiling.
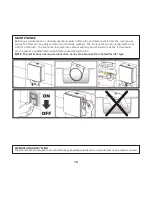
If the fan is to be ceiling mounted, the pull-cord
switch should be put in the “off” position and the
cord removed. A remote switch will be necessary
for changing the fan speed. See wiring diagrams.
Summary of Contents for ELIX 1003
Page 5: ...INSTALLATION 1 2 4 5 3 6 6...
Page 6: ...7 8 9 10 7 INSTALLATION...


