background image

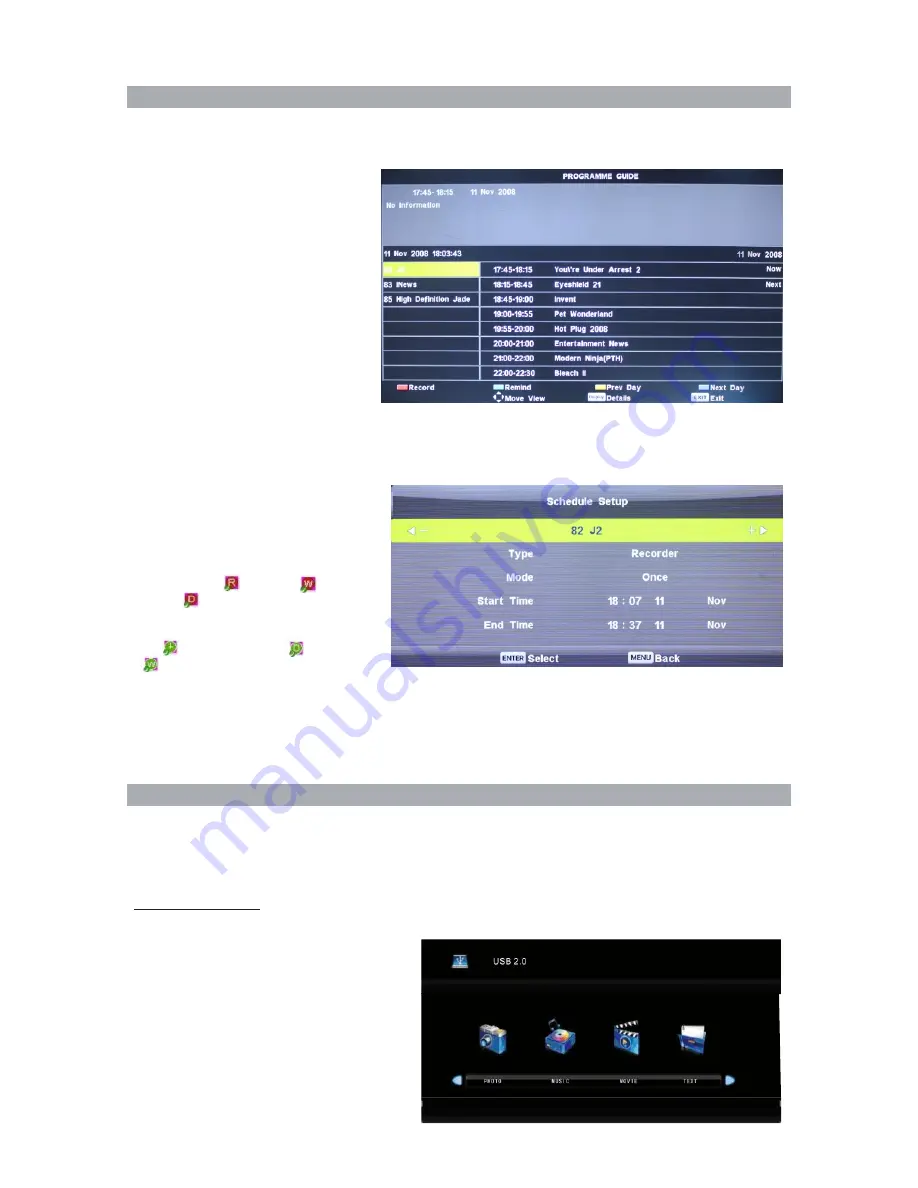
EPG ( only available in DTV mode)
Press EPG button in the DTV Mode to display electronic program guide.

Schedule setup

Press the blue button in Schedule List menu to display the recorder menu. Setting the 
schedule for starting, ending and recording mode. After confirmation, programs will start 
recording to USB device

.

Press SOURCE button, and then use 

▲▼ 

button to select DMP, press ENTER button to confirm.

Press 

◀▶


button


to


select


PHOTO, MUSIC, MOVIE, TEXT, press ENTER button to confirm.

Press 

◀▶ 

button to select the files, press ENTER button to confirm.

NOTE: Some USB storage devices or part of USB3.0 may not be supported or operate properly

.

Media Interface:


EPG

Media Menu

The formats supported

The TV supports the following files
including movie, music, photo and text.
For PHOTO, it supports file formats 
among JPEG, BMP, PNG.
For MUSIC, it supports MP3, WMA file 
format.
For MOVIE, it supports 

MP4, MPEG, MKV, 

AVI, MPG, RMVB 

file format.

For TEXT, it supports TXT.
NOTE: The special algorithm documents 
may not be supported by the USB.  

41

The display time of EPG is pre-play, and individual program will be 3-5 minutes later than EPG time because 
of the breaks (for example, news or Advertisement). Please postpone 3 to 5 minutes after finish the recording 
when you set recording.Please set start and end time of Monday to Friday automatically when using the 
mode of Monday to Fridayin recording mode.

Press the  RED button to see 
the setting you have done before.
Press the GREEN button to set the 
time you want to remind the 
program you want to see.
Press the YELLOW button to display 
previous date.
Press the BLUE  button to 
display next date.

Press the INFO button to display
detail information of current 
program. 

Note:

 if you connected a format hard disk 

when you select to EPG page.
A> Press Red buttom to record program 
and there are (    ) ONCE, (    ) 
DAILY, (    ) WEEKLY. 
B> Press Green buttom to set the time 
you want to remind program and there 
are (    CLOCK) ONCE, (     ) DAILY,
(      ) WEEKLY. 

Summary of Contents for 32LEDS992

Page 1: ......

Page 2: ...1 2 4 6 7 8 9 10 12 13 14 17 17 18 19 23 1 18 22 5 PC 15 EPG 16...

Page 3: ...2 AC V DIGI AC AC V DIGI AC AC 110 240V AC AC AC AC AC AC...

Page 4: ...3 AC AC AC AC AC AC AC AC AC AC AC AC AC...

Page 5: ...4 AC V DIGI AC AC LED 99 99 LED LED LED LED AC AC...

Page 6: ...5 M4 12mm 3pcs M4 12mm 3 M6 M6...

Page 7: ...5 26 27 28 29 POWER MUTE 0 9 INFO SOURCE MENU EXIT VOL CH PICTURE SOUND CH LIST ASPECT SLEEP FREEZE FAV LIST USB DTV DVR LIST TEXT SUBTITLE AUDIO ZOOM REP REC PAGE UP PAGE DOWN PLAY PAUSE REW FF STOP...

Page 8: ...7...

Page 9: ...8 TV TV...

Page 10: ...1 2 POWER POWER 3 POWER POWER 4 VOL VOL MUTE MUTE SOURCE ENTER 1 MENU 3 MENU 4 EXIT 2 ENTER 9 HDMI1 HDMI2 HDMI3 USB 1 ENTER USB 2 EXIT...

Page 11: ...3 ENTER 2 1 MENU 1 ENTER 2 MENU EXIT 3 10 2 0 0 TV 0 MENU 81 25 MHz ENTER MENU EXIT...

Page 12: ...2 3 6 FAV LIST 1 4 5 CH CH 2 ENTER 3 4 EXIT 1 473 00MHz UHF CH 14 BG DK L I 1 2 3 MENU 4 EXIT DTV 11 AFC AFC ENTER FAV EXIT MENU EXIT MENU BG PAL 48 25 MHz AFC 1...

Page 13: ...3 ENTER 2 1 MENU 12 ENTER MENU EXIT...

Page 14: ...3 ENTER 2 1 MENU 3 ENTER 2 1 MENU 13 ENTER PCM ENTER MENU EXIT ENTER MENU EXIT...

Page 15: ...5 15 30 3 ENTER 2 1 MENU 14 OSD ENTER P19 USB USB 15 30 45 60 90 120 240 ENTER MENU EXIT 4 3 16 9 1 2...

Page 16: ...15 ENTER MENU EXIT...

Page 17: ...EPG EPG 3 ENTER C D 2 1 SOURCE ENTER USB USB3 0 JPEG BMP PNG MP3 WMA MP4 MPEG MKV AVI MPG RMVB TXT 16 INFO USB EPG EPG 3 5 EPG 3 5 1 5 1 5 USB 2 0 EPG ONCE DAILY WEEKLY CLOCK ONCE DAILY WEEKLY...

Page 18: ...1 ENTER 2 ENTER PLAY 3 4 I I 90 90 90 90 90 90 ENTER ENTER I I 1 ENTER 2 ENTER PLAY 3 4 ENTER ENTER 17 R R...

Page 19: ...1 ENTER 2 ENTER PLAY 3 4 ENTER ENTER 1 ENTER 2 ENTER PLAY 3 4 I I ENTER ENTER txt I I A B AB 18 R R...

Page 20: ...19 19 USB 4 ENTER PVR USB OSD USB PVR ENTER USB USB USB USB 3 C PVR C USB 1 2 PVR Menu USB C USB USB PVR PVR 5 FAT32 SD 104 Mins HD 29 Mins 4Hr Menu USB C 3Hr All ENTER MENU...

Page 21: ...s USB PAUSE a PAUSE b c PVR REP REC USB USB PVR USB PVR REP REC USB REP REC PAUSE DVR LIST REP REC 00 00 19 00 00 51 18 04 b c d DVR LIST MENU e DVR LIST ENTER a REP REC 20 USB 00 00 19 00 00 51 18 08...

Page 22: ...ENTER PVR 1 USB 1G 2 USB USB 3 PVR DTV 4 PVR 5 PVR 6 6 USB USB2 0 7 PVR 21...

Page 23: ...2 VGA 1360 768 1920 1080 1024 768 800 600 60 60 60 60 Hz 1 YPbPr HDMI 480i 480p 720p 1080i 1080P 60 60 60 60 60 Hz 22...

Page 24: ...23...

Page 25: ...24...

Page 26: ...nd Descriptions 33 Basic Operation 34 Menu Operation 34 Channel Menu 35 Picture Menu 37 Sound Menu 38 Time Menu 38 Option Menu 39 EPG and Media Menu 41 Photo 42 Music 42 Movie 43 Text 43 Record 44 Bef...

Page 27: ...ng pack it using the original carton and packing material Never cover the ventilation holes or insert anything in the cabinet Leave space around the TV set To ensure proper ventilation and prevent the...

Page 28: ...l vibration near flammable objects candles etc The TV shall not be exposed to dripping or splashing and no objects filled with liquids such as vases shall be placed on the TV If you will not be using...

Page 29: ...en may appear constantly on the screen This is a structural property of the screen and is not a malfunction Do not push or scratch the front filter or place object on top of this TV set The image may...

Page 30: ...face and cabinet material When adjusting the angle of the TV set move it slowly so as to prevent the TV set form moving or slipping off from its table stand Keep optional components or any equipment e...

Page 31: ...30 3 3pcs M4 12mm M4 12mm...

Page 32: ...ect the sound mode CH LIST Show channel list ASPECT Adjust image display proportion SLEEP Set the timer turn off TV automatically FREEZE Freeze the picture FAV LIST Display Define favorite channel USB...

Page 33: ...32 Remote Control Sensor and Power Standby Indicator...

Page 34: ...33 TV TV...

Page 35: ...o mute the sound You can release mute by pressing MUTE or increase the TV s volume Press the SOURCE button to display the sources list Please use the buttons to select desired signal and press ENTER t...

Page 36: ...available in DTV mode You can also set program list again one by one by DTV Manual Tuning function Press button to select channel Press ENTER button to search When a channel is found the searching pr...

Page 37: ...lect items Press red button to delete the channel Press green button to rename the channel Note Only the ATV channel can be renamed Press to select the letter and press to change the letter Press yell...

Page 38: ...ghtness Press button to adjust the brightness of the picture Color Press button to adjust the color saturation Sharpness Press button to adjust the sharpness level of the picture Tint Press button to...

Page 39: ...t PCM Auto Only available in DTV Press MENU and buttons to select the TIME menu Press button to select the items Press ENTER or button to enter the submenu Sound Menu 38 Treble Press button to adjust...

Page 40: ...elect EXIT Exit MENU Return SETUP PVR File System First Time Installation Reset Software Update USB Blue Screen Off Aspect Ratio 16 9 OSD Language English Blue Screen To turn the blue screen on off If...

Page 41: ...s button to select SCREEN in the main menu Screen only available in VGA mode You can adjust Auto Adjust H Offset V Offset Size Phase Position Reset Screen Auto Adjust H Offset V Offset Size Phase Posi...

Page 42: ...it supports MP4 MPEG MKV AVI MPG RMVB file format For TEXT it supports TXT NOTE The special algorithm documents may not be supported by the USB 41 The display time of EPG is pre play and individual p...

Page 43: ...ng photo slide show Press to select the desired settings press ENTER button to confirm 2 Press to select the desired folder and press ENTER to open the folder playing or press to select the desired pi...

Page 44: ...e normal display characters Text Control Bar Press ENTER to display Text Control Bar while reading the text Press to select the desired settings press ENTER button to confirm 4 Select the return icon...

Page 45: ...m Select Disk Select the device for the Record files Check PVR File System USB Disk Display the USB state Format Format the USB device for PVR operating Time Shift Size Display the recording size of t...

Page 46: ...C to enter the submenu recording begins when press ENTER button press the STOP button to stop the recording or it will stop automatically when the storage data is full Recording menu When you press RE...

Page 47: ...then activate the recording when the time is reached and then return to standby mode when the end time is reached Note 1 At least 1G USB capacity should be used 2 All contents save will be lost after...

Page 48: ...47 2 VGA 1360 768 1920 1080 102 4 768 800 600 60 60 60 60 Resolution Vert Freq Hz 1 YPbPr HDMI 480i 480p 720p 1080i 1080P 60 60 60 60 60 Resolution Vert Freq Hz...

Page 49: ...48 Press Source button to display the list inputs and then select the desired input operations is different depends on the features of the USB...

Page 50: ...49...

Page 51: ......

Reviews: