Quick Start Guide
Battery Installation
LifePod
®
is powered by a 9v Alkaline battery (not included).
Under normal use the battery can last up to one year.
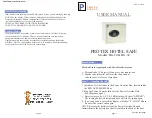
Undo both side compression latches to open your LifePod
®
.
Locate the battery cover on the front wall and remove by
pressing on the outer tab (Fig B).
Pull out the 9v battery snap inside the battery compartment,
and connect an Alkaline 9V battery to the connector. Be sure to
snap the battery in the correct orientation (Fig C).
When the battery is snapped in you will hear a short welcome
tone and the keypad will light up.
B
C
D
Step 1
Quick Start Guide
Follow the quick start guide to get your safe up and running. If you have any questions or issues
please email
Troubleshooting!
If you snap the battery in and the keypad is flashing then your battery is likely
low. Replace the battery with a new 9v Alkaline battery. We recommend a brand name battery
like Duracell or Energizer.
Once you hear the tone and see the keypad light up, slide the battery into its compartment being
mindful to place the battery ribbon underneath the battery first (Fig D). This will make the battery
easier to remove when replacing.
•
•
•
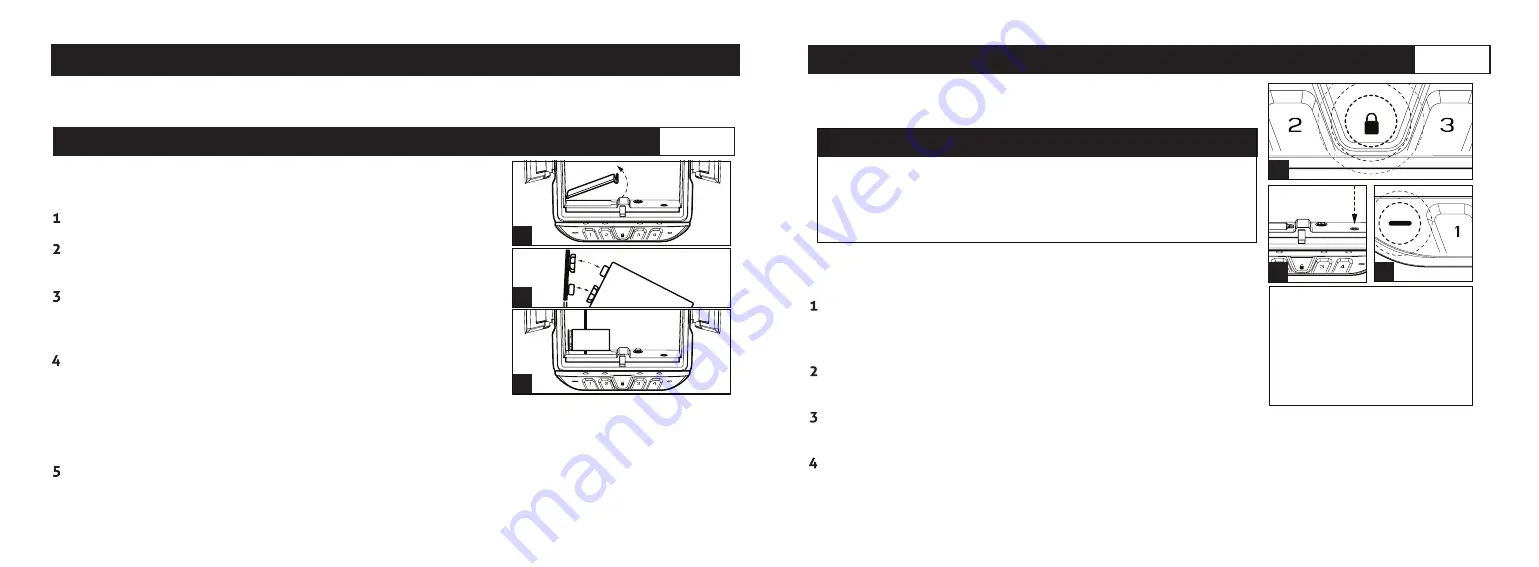
IMPORTANT!
The PROGRAM button will not function when
locked. Be sure the LifePod
®
latch is in the unlocked position.
First open the unit and tap the lock pad to wake the unit up
(Fig E). When the keypad lights up, your LifePod
®
is awake and
ready for programming.
While LifePod
®
is awake press and hold the PROGRAM button
for 3 seconds (Fig F) until ALL keys (1-4) turn solid RED.
E
Quick Start Guide
Master Code Programming
First time users should change the default code as soon as
possible to prevent unauthorized access when using the lock.
TIP:
Code Requirements
The default master code is 1-2-3-4.
Your code can be a minimum of 4 digits, or as long as 8 digits.
Two keys can not be pressed simultaneously.
Programming a new code will overwrite your previous code.
G
F
Enter your new code. Immediately press and hold the PROGRAM button a second time for 3
seconds (Fig F) until ALL keys (1-4) turn solid RED.
Enter your new code a second time. Immediately press and hold the PROGRAM button a third
time for 3 seconds (Fig F). The status LED (Fig G) will flash GREEN and LifePod
®
will beep to
confirm the code change is successful. If you make a mistake start over with step 1.
Tip!
Water will affect the keypad
performance. Wipe away excess
water and dry off the keypad
when opening for best results
and to prevent unwanted water
from entering the storage
compartment.
Step 2
•
05 Vaultek
®
06 Vaultek
®