TM
Fitting Instructions - KeyKeep1
Fitting the
TM
KeyKeep1
TM
Opening your KeyKeep1
1
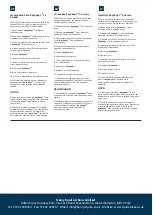
. Open shutter hatch to reveal the dial and the
opening lever.
2
. Dial existing combination, otherwise factory
default 0.0.0.0.
3.
Press down on the opening lever.
Setting a new combination
"
TM
1.
Open the
KeyKeep1
door to reveal the
setting mechanism.
2.
Push the reset lever left and towards you and
the reset lever will stay in position.
3.
Rotate dials to your preferred combination.
4.
Push the reset lever up and away from you to
return to original position. Double check your
combination before closing the storage
compartment door.
5.
Close the storage compartment.
6.
Scramble the combination dials to lock the
TM
KeyKeep1
and conceal your combination.
7.
Close the shutter hatch.
TM
Wall Mounting your KeyKeep1
NOTE: you will require an X-head/Pozi
screwdriver, a pencil, a spirit level, a drill bit, a
drill and a hammer.
TM
1.
Open the
KeyKeep1
door, as above.
TM
2.
Position the
KeyKeep1
on the desired
mounting surface (see note 1).
3.
Use a spirit level to check that the
TM
KeyKeep1
is vertical.
ES
GB
FR
TM
Ouverture de votre boîtier
KeyKeep1
1.
Ouvrez le volet obturateur pour révéler les
molettes et le levier d’ouverture.
2.
Composez la combinaison existante ou la
combinaison par défaut définie en usine 0.0.0.0.
3.
Abaissez le levier d’ouverture.
Définition d’une nouvelle
combinaison
TM
1.
Ouvrez la trappe du boîtier
KeyKeep1
pour
révéler le mécanisme de réglage.
2.
Poussez le levier de réenclenchement à gauche
et vers vous. Le levier restera dans cette position.
3.
Tournez les molettes de façon à composer la
combinaison souhaitée.
4.
Poussez le levier de réenclenchement vers le
haut et éloignez-le de vous pour le ramener à sa
position d’origine. Vérifiez à nouveau votre
combinaison avant de fermer la porte du
compartiment de stockage.
5.
Fermez le compartiment de stockage.
6.
Mélangez les molettes de combinaison pour
TM
verrouiller le boîtier
KeyKeep1
et dissimuler
votre combinaison.
7.
Fermez le volet obturateur.
Cómo abrir su KeyKeep1™
1.
Abra la cubierta obturadora para ver el dial y
la palanca de apertura.
2.
Marque la combinación existente, de lo
contrario utilice la configuración de fábrica
0.0.0.0.
3.
Presione la palanca de apertura hacia abajo.
Cómo configurar una nueva
combinación
TM
1.
Abra la puerta de la
KeyKeep1
para ver el
mecanismo de configuración.
2.
Presione la palanca de reinicio hacia la
izquierda y hacia usted y la palanca de reinicio se
mantendrá en su posición.
3.
Gire los diales a su combinación preferida.
4.
Empuje la palanca de reinicio hacia arriba y en
dirección contraria a usted para volverla a la
posición original. Revise su combinación antes
de cerrar la puerta del compartimiento de
almacenamiento.
5.
Cierre el compartimiento de almacenamiento.
6.
Gire los diales de combinación aleatoriamente
TM
para bloquear la
KeyKeep1
y ocultar su
combinación.
7.
Cierre la cubierta obturadora."
Opening lever
Palanca de apertura
Levier d’ouverture
Openingshendel
Öffnungshebel
Dźwignia otwierająca
Alavanca de abertura
Открывающий рычаг
Leva di apertura
Shutter hatch
Cubierta obturadora
Verschlussklappe
Pokrywa opadowa
Tampa da comporta
Rotelle
Sportello
Volet obturateur
Luik
Dials
Diales
Wahltasten
Dyski z cyframi
Indicadores
Поворотные диски
Rotelle
Molettes
Draaiknoppen
TM
Montageanleitung für den KeyKeep1
TM
Consignes d’installation du boîtier KeyKeep1
TM
Instrucciones de colocación de la KeyKeep1
Registered in England No. 88907
Tel: 01902 308050 Fax: 01902 308051 E-Mail: [email protected] Website: www.squirelocks.co.uk
Henry Squire & Sons Limited
Hilton Cross Business Park, Cannock Road, Featherstone, Wolverhampton, WV10 7QZ
TM
Montageinstructies Keykeep1
TM
Instrukcje montażu KeyKeep1
TM
Instruções de Montagem do Keykeep1
TM
Инструкции по установке Keykeep1
TM
Istruzioni per l'installazione di KeyKeep1


