Vantec UGT-ST310R User Manual Download Page 17


UGT-ST310R Page 

17 


For An Existing Installation 

1.


Setup the RAID Array prior to driver installation and boot up 
to Windows. 

2.

 At 

the 

Found New Hardware 

Wizard, select 

No, not this 

time

, then click 

Next

3.

  Insert the driver CD, select 

Install the software 

automatically (Recommended)

, and click 

Next

4.

 Click 

Finish

5.


Restart Windows to complete the driver installation. 


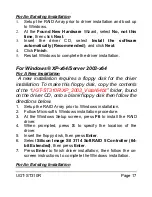
For Windows® XP-x64/Server 2003-x64 

For A New Installation 

A new installation requires a floppy disk for the driver 

installation. To make this floppy disk, copy the contents 
of the 

UGT-ST310R\XP_2003_Vista\64bit

” folder, found 

on the driver CD, onto a blank floppy disk then follow the 
directions below. 

1.  Setup the RAID Array prior to Windows installation. 
2.  Follow Microsoft’s Windows installation procedure. 
3.  At the Windows Setup screen, press 

F6

 to install the RAID 

driver. 

4.  When prompted, press 

to specify the location of the 

driver. 

5.  Insert the floppy disk, then press 

Enter

6. Select 

Silicon Image SiI 3114 SoftRAID 5 Controller (64-

bit Extended)

, then press 

Enter

7. Press 

Enter 

to finish driver installation, then follow the on-

screen instructions to complete the Windows installation. 


For An Existing Installation 

Summary of Contents for UGT-ST310R

Page 1: ...6 Port SATA II 150 PCI Host Card w RAID User Manual Model UGT ST310R All brand names and trademarks are properties of their respective owners w w w v a n t e c u s a c o m...

Page 2: ...Contents 3 4 System Requirements 4 5 Hardware Description 4 6 Hardware Installation 5 7 Device Connection 5 8 RAID Arrays 6 RAID 0 Striping 6 RAID 1 Mirror 8 RAID 0 1 Mirroring Striping 9 RAID 5 Pari...

Page 3: ...riping RAID1 mirroring RAID5 Parity RAID RAID 0 1 mirroring striping and Concatenation JBOD Individual Mode HDDs function normally when not in RAID sets Supports SATA up to 150MB Sec Supports Windows...

Page 4: ...indows 2000 XP 2003 32 64bit Vista 32 64bit Hardware Description G Jumper Settings JP Description Active Port 1 2 close Enable SATA Connector F J1 J4 2 3 close Enable SATA Connector C 1 2 close Enable...

Page 5: ...Remove the slot bracket from an available PCI slot 5 To install the card carefully align the card s bus connector with the selected PCI slot on the motherboard Push the board down firmly but gently un...

Page 6: ...e setup in the 6 Port SATA II 150 PCI Host Card w RAID s BIOS RAID 0 Striping This RAID array to be used on New Blank hard drives Striping will destroy existing data on the hard drive Auto Configurati...

Page 7: ...he RAID BIOS 2 At the next screen select Create RAID Set then press Enter 3 Select RAID0 then press Enter 4 Select the number of drives then press Enter 5 Select Manual configuration then press Enter...

Page 8: ...reboot 9 Continue with FDISK and FORMAT steps as if you were installing a conventional hard drive For Existing Hard Drives with Data 1 As the BIOS boots press Ctrl S or F4 when prompted to enter the...

Page 9: ...ified either by the RAID BIOS during boot or by the SATARAID5 GUI while in Windows The steps below will guide you in rebuilding a failed mirror set 1 Replace the failed drive with one of equal or grea...

Page 10: ...o configuration then press Enter 5 Input the RAID size press Enter 6 When asked Are You Sure Y N press Y to accept 7 Press Ctrl E to exit the BIOS 8 When asked Are you sure to exit Y N press Y to exit...

Page 11: ...asked Are you sure to exit Y N press Y to exit and reboot 16 Continue with FDISK and FORMAT steps as if you were installing a conventional hard drive RAID 5 Parity This RAID array to be used on New B...

Page 12: ...ess Ctrl S or F4 when prompted to enter the RAID BIOS 2 At the next screen select Create RAID Set then press Enter 3 Select RAID5 then press Enter 4 Select the number of drives then press Enter 5 Sele...

Page 13: ...RAID BIOS 2 At the next screen select Create RAID Set then press Enter 3 Select CONCATENATION then press Enter 4 Select the number of drives then press Enter 5 Select the first drive press Enter 6 If...

Page 14: ...tion properly this old metadata must be first overwritten with the new metadata To resolve this from the main BIOS window select Resolve Conflicts then press Enter the correct metadata including the c...

Page 15: ...XP_2003_Vista 32bit folder found on the driver CD onto a blank floppy disk then follow the directions below 1 Setup the RAID Array prior to Windows installation 2 Follow Windows 2000 installation proc...

Page 16: ...nstallation requires a floppy disk for the driver installation To make this floppy disk copy the contents of the UGT ST310R 2000_XP_2003_Vista 32bit folder found on the driver CD onto a blank floppy d...

Page 17: ...ion To make this floppy disk copy the contents of the UGT ST310R XP_2003_Vista 64bit folder found on the driver CD onto a blank floppy disk then follow the directions below 1 Setup the RAID Array prio...

Page 18: ...XP_2003_Vista 32bit folder found on the driver CD onto a blank floppy disk then follow the directions below 1 Setup the RAID Array prior to Windows installation 2 Follow Microsoft s Windows installati...

Page 19: ...AID Array prior to Windows installation 2 Follow Microsoft s Windows installation procedure 3 At the Windows Setup screen press Load Driver to install the RAID driver 4 Insert the floppy disk please s...

Page 20: ...1 Please insert the driver CD into your CD ROM Drive 2 At the Windows desktop click Start then Run 3 Type D UGT ST310R 2000_XP_2003_Vista 32bit setup msi then click OK Change D to match your CD ROM dr...

Reviews: