background image

www.vanco1.com

800.626.6445

7

EDID 

 EDID MODE  EDID Description

   1

1080i, 2CH AUDIO

   2

1080p, 2CH AUDIO

   3

 DVI 1920X1080

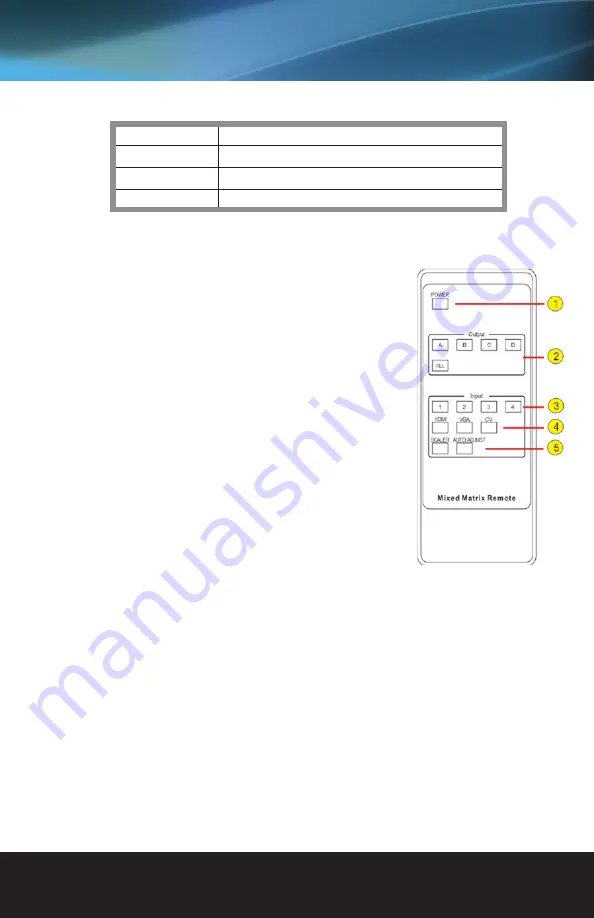
REMOTE CONTROL

1.  Press this button to power on the matrix or set it to standby mode.
2.  Output selection. Letters correspond with the outputs on the matrix.
3.  Input selection. Numbers correspond with the inputs on the matrix.
4.  Sources input selection. Press the button to select source input. For 

example: Press input 1>VGA. The input 1 will select the VGA video input.

5.  Picture adjust. Press the button to adjust the output picture. For 

example: Press output 1>SCALER. The output 1 video will be scaler 
adjust. Note: The AUTO ADJUST button only work on VGA input.

IR CONTROL SYSTEM

At Matrix end: Insert the 3.5mm jacks of the IR TX Emitters included with the unit into the IR TX Emitter 
ports at the rear of the matrix according to input. The IR signal is added to the HDMI of the input device so, 
for example, if the user is watching Blu-ray on input 1, the IR signal will be directed through the IR TX1 socket 
to control the device. 
As each IR TX port is allocated to an individual HDMI input port, if the user is unable to establish IR control of 
the device, care should be taken to check firstly, that the IR emitter and HDMI input ports match (Input 1-TX1, 
Input2-TX2 etc.) with plugs secured in correct ports, and secondly, that the IR TX emitter sensors are firmly 
attached directly to the front of inputs and covering infrared sensor windows of the source devices. Some later 
adjustment may be needed to the location of the sensor to achieve the best performance results - sometimes 
moving the sensor to different areas on the source can improve IR performance.
NOTE: Infrared receiving areas of devices can be located by shining a flashlight onto the front of the device – 
the sensor should be able to be seen through the plastic as a small, round object inside. Insert 3.5mm jacks 
of IR RX receivers into RX ports, making sure the receivers themselves are placed in clear view to receive an 
infrared signal from the remote handset used to control the display outputs.

Summary of Contents for Evolution EVMX44SL

Page 1: ...Vanco Part Number EVMX44SL HDMI 4 x 4 Multi format Matrix with Video Wall and Seamless Multiview www vanco1 com 800 626 6445 HDMI 4x4 MA TRIX with Video Wall and Seamless Multiview ...

Page 2: ...cularly at the plugs 9 Use unit only with accessories specified by the manufacturer 10 Refer all servicing to qualified personnel CAUTION HDMI is a very complex technology requiring continuous authentication of the signal and the same video resolution and audio settings on all electronic equipment in the system When there are multiple sources and displays the video resolution and audio setting on ...

Page 3: ... seamless matrix switching as well as having multiview and video wall modes The switching mode of the matrix allows the speed of switching to be controlled allowing inputs to fade in and fade out Multiview mode allows all of the sources to be seen on the displays equally in Quad view or in PIP with a main source being larger than the other smaller sources Video Wall mode allows the matrix to be co...

Page 4: ...ischarge Power Supply 12 V 2 5 A DC US EU standards CE FCC UL certified Dimensions H 17 32 W x 1 75 H x 7 87 D Weight 5 2 lbs Chassis Material Metal Silkscreen Color Black Operating Temperature 0 ºC 40 ºC 32 ºF 104 ºF Storage Temperature 20 ºC 60 ºC 4 ºF 140 ºF Relative Humidity 20 90 RH non condensing Power Consumption 13 5 W Max 1 2W Standby PACKAGE CONTENTS 4x4 Matrix EVMX44SL 4 Wideband IR Tx ...

Page 5: ...oad input source It can easy download any EDID mode to any input source 9 IR Channel IR EXT if the panel sensor is obstructed or the unit is installed in a closed area out of infrared line of sight a provided IR RX receiver can be inserted into the IR EXT port at the rear to extend the IR sensor range and enable local control of the matrix IR IN When used with the provided IR RX receivers will rec...

Page 6: ...rovided IR RX and IR TX cables if you wish to use IR routing See below for additional detailed information 4 OPTIONAL Connect an Ethernet cable from the TCP IP port on the matrix to a local Area Network 5 OPTIONAL Connect an RS 232 cable from the RS232 port on the matrix 6 Connect the DC 12V Locking power supply to the power receptacle on the matrix 7 Connect the power supply to an available elect...

Page 7: ...lu ray on input 1 the IR signal will be directed through the IR TX1 socket to control the device As each IR TX port is allocated to an individual HDMI input port if the user is unable to establish IR control of the device care should be taken to check firstly that the IR emitter and HDMI input ports match Input 1 TX1 Input2 TX2 etc with plugs secured in correct ports and secondly that the IR TX em...

Page 8: ... the application How to change settings and control switching General page 1 Select RS232 COM or TCP mode 2 Select RS232 COM port 3 Click to connect or disconnect PC and Matrix 4 Select Matrix IP 5 Connect to Matrix IP 6 Search Matrix IP 7 Configure Matrix IP and MAC 8 Click to reset to the factory settings 9 Device information display area 10 Click to refresh device status include device informat...

Page 9: ...he seamless switching output mode 5 Click to select the seamless switching time 6 Click to automatically adjust the output picture 7 Click to scaler the output picture 8 Click to select the input signal source Note The signal source for the VGA input 6 can use FW upgrade page 1 Click to open FW file file extension is fw 2 Display the FW file path 3 Displaying the progress of the software upgrade 4...

Page 10: ...nd display manufacturers employ a proprietary control channel to communicate between devices from the same manufacturer Sometimes this can interfere with the HDMI control circuit or the authentication of the signal Call the manufacturer if you experience this issue Sometimes a player an audio video receiver or a cable satellite box may not have the latest software update usually this can be downlo...

Page 11: ...ical Support by dialing 1 800 626 6445 You can also email technical support issues to techsupport vanco1 com When calling please have the Model Number Serial Number affixed to the bottom of the unit and Invoice available for reference during the call Please read this Instruction Manual prior to calling or installing this unit since it will familiarize you with the capabilities of this product and ...

Page 12: ...Vanco International 506 Kingsland Drive Batavia Illinois 60510 call 800 626 6445 fax 630 879 9189 visit www vanco1 com ...

Reviews: