background image

www.vanco1.com

 800-626-6445

15

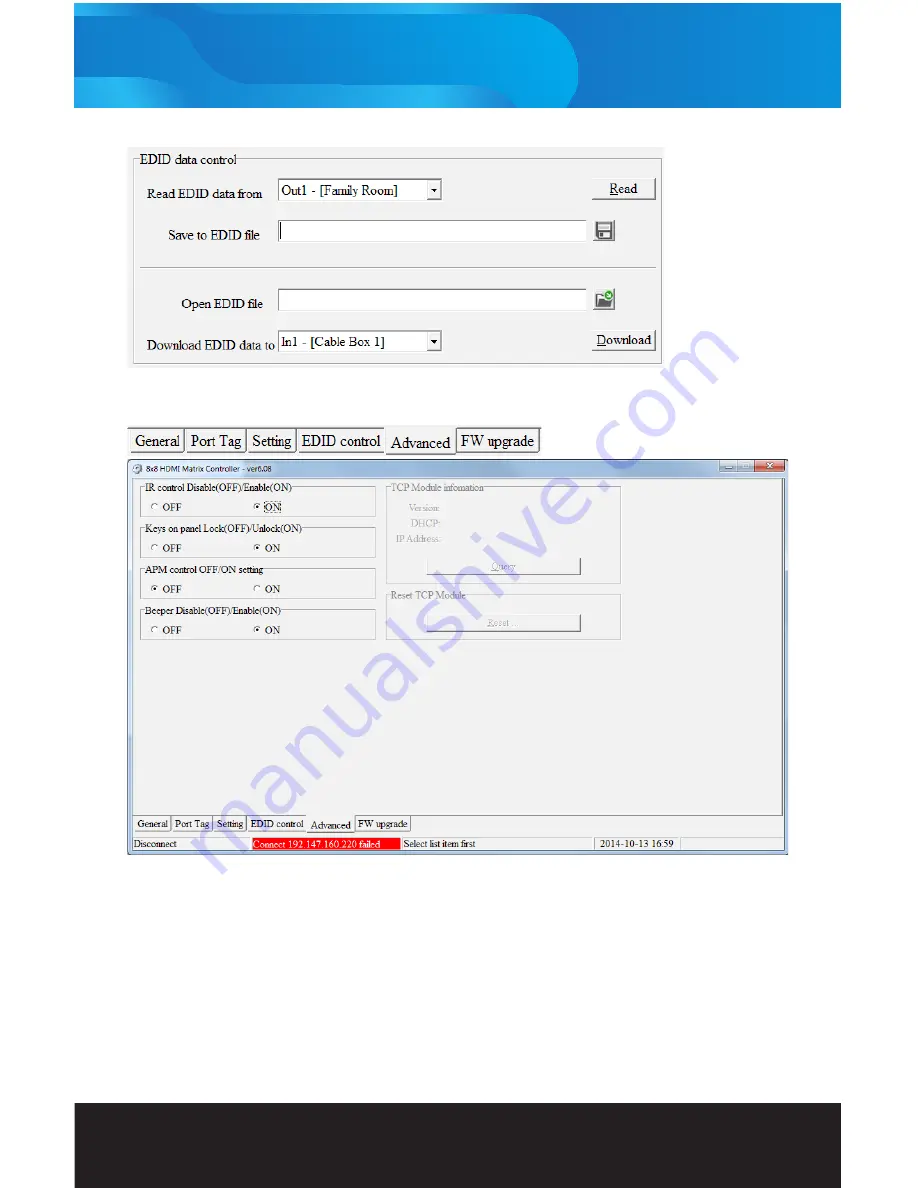
Advanced Tab

The Advanced tab allows you to make changes on features such as disabling IR, locking the front panel, and 
disabling the beeping sound the Matrix unit makes when switching.  
APM control
APM is short for Advanced Processing Mode, the default setting is off, this is to be used for Vanco internal 
testing only.
Simply click on “ON” or “OFF” for each setting.

Summary of Contents for 280688

Page 1: ...HDMI 8x8 4K2K Matrix Selector Switch Vanco Part Number 280688 HDMI 6x6 4K2K Matrix Selector Switch Vanco Part Number 280566 Technical Support www vanco1 com info vanco1 com 800 626 6445 ...

Page 2: ...cularly at the plugs 9 Use unit only with accessories specified by the manufacturer 10 Refer all servicing to qualified personnel CAUTION HDMI is a very complex technology requiring continuous authentication of the signal and the same video resolution and audio settings on all electronic equipment in the system When there are multiple sources and displays the video resolution and audio setting on ...

Page 3: ...0688 is also equipped with RS 232 and LAN connectivity which allows for firmware updates EDID management renaming inputs outputs switching control etc For reliable no nonsense HDMI distribution and control on a budget over short distances the 280566 280688 Matrix Selector Switches are a great choice for any application HDMI 8x8 4K2K Matrix Selector Switch Part 280688 Allows up to 8 HDMI sources to...

Page 4: ...nced EDID management for rapid integration of sources and displays Dolby TrueHD and DTS HD master audio pass through HDMI output Full 3D pass through Choose from 4 switching modes Front Panel buttons IR remote control RS 232 control and TCP IP control HDCP Compliant Wideband bi directional IR pass through 20 to 60 kHz 8 IR Transmitters and 9 IR Recievers included Dimensions 17 25 438mm W x 1 63 41...

Page 5: ...pe A 19 pin female RJ 45 connector WE SS 8P8C RS 232 connector DB 9 9 pin D sub female 3 5mm connector System IR Receives IR commands from remote control MECHANICAL SPECS Housing Metal enclosure Power Supply 12V 5A DC Power consumption 20 watts max Operation temperature 32 104 F Storage temperature 4 140 F Relative humidity 20 90 RH no condensation 1 280566 HDMI 6x6 Matrix Selector Switch 7 IR Rec...

Page 6: ...be used at each source for source control 6 All IR Output 3 5mm IR blaster socket for HDMI source control on all 8 inputs 7 IR extension receiver input connect IR RX receiver to extend IR eye if hiding or concealing matrix unit 8 RJ45 for TCP IP control 9 RS232 port connect serial cable to PC for software control and management 10 Power On Off Switch 11 HDMI inputs 1 through 8 connect HDMI sources...

Page 7: ...e used at each source for source control 6 All IR Output 3 5mm IR blaster socket for HDMI source control on all 8 inputs 7 IR extension receiver input connect IR RX receiver to extend IR eye if hiding or concealing matrix unit 8 RJ45 for TCP IP control 9 RS232 port connect serial cable to PC for software control and management 10 Power On Off Switch 11 HDMI inputs 1 through 6 connect HDMI sources ...

Page 8: ...er to the Operation Control IR Remote Control section 2 Software Control Please refer to the Operation Control EDID section EDID Settings Here is a list of the supported EDID settings Select EDID 1080i Stereo Audio 2 0 1080i DOLBY DTS 5 1 1080i HD AUDIO 7 1 1080p Stereo Audio 2 0 1080p DOLBY DTS 5 1 1080p HD AUDIO 7 1 3D Stereo Audio 2 0 3D DOLBY DTS 5 1 3D HD AUDIO 7 1 4K2K Stereo Audio 2 0 4K2K ...

Page 9: ...urces that are connected To copy the EDID of a specific display to all inputs 1 Press the COPY button 2 Press the specific OUTPUT number of the display you would like to copy the EDID from 3 Then press the ALL button under the INPUT section This will send the EDID of the chosen display to all of the input sources that are connected OPERATION CONTROL SOFTWARE CONTROL THROUGH RS 232 AND LAN PORT Van...

Page 10: ...drive double click on the icon and this program will appear 4 Select which connection Control Mode Select you have chosen COM for RS 232 connection TCP for Cat5e 6 connection a For COM control mode ensure that the correct Port is selected and is set within your PC otherwise your PC will not connect to the Matrix unit b For TCP control mode you can find out what the IP address the Matrix unit will ...

Page 11: ...sh device status will refresh all of the information on the right hand of the General tab including how many inputs outputs are connected You can also turn on and off the Matrix unit by clicking on the power button Port Tag Tab This tab allows you to customize the names of the inputs and outputs of your Matrix unit this will make it much easier to route the Bluray player to the specific output thi...

Page 12: ...each Output s source simply by clicking on the actual input number or clicking left and right to scroll through each source You can also customize pre settings very beneficial for a commercial application such as a bar This way the bartender can choose a pre setting based on an important sporting event To customize each setting click on the setting number and click on Edit then set each input outp...

Page 13: ...800 626 6445 13 Clicking on Set will output that pre setting ...

Page 14: ...ired preset EDID from the dropdown then select the desired Input from the drop down b Select Set to save EDID changes 2 Copying the EDID from a specific display to a specific input a Select the desired Output from the dropdown then select the desired Input from the next dropdown b Click Copy to apply changes The Matrix Controller software also allows you to read the EDID file from any connected di...

Page 15: ...uch as disabling IR locking the front panel and disabling the beeping sound the Matrix unit makes when switching APM control APM is short for Advanced Processing Mode the default setting is off this is to be used for Vanco internal testing only Simply click on ON or OFF for each setting ...

Page 16: ...ext upgrading procedure 1 Power down the Matrix unit 2 Close the Matrix Controller software 3 Power up the Matrix unit then wait for 10 seconds to ensure the Matrix is ready and fully booted 4 Run the Matrix Controller open firmware file and repeat firmware update process again Web Control Web Control allows you to remotely control the switching of the matrix unit via your mobile phone tablet or a...

Page 17: ...ablet laptop etc by entering the IP address of the Matrix unit on the web browser The IP address can also be saved as a favorite or shortcut For example if the IP address on the Matrix unit was set to 192 168 1 121 simply enter this IP address on the native web browser of your mobile device and this User Interface will display Simply click on any Input for each Output then click on Submit this wil...

Page 18: ...www vanco1 com 18 CONNECT AND OPERATE IR Receiver IR Transmitter DVD Player Game Console Game Console Cable Box Apple TV ...

Page 19: ...oint each display connected should display the assigned source input 1 at default when powered on initially scroll through each of the sources on each display to ensure everything is in working order Use included IR remote at each IR receiver to test switching function between sources and IR function itself If a display is having difficulty receiving a signal access the display s menu and adjust t...

Page 20: ...orts on the back of the matrix unit place blaster in front of the IR window eye of the corresponding source For example if the Bluray player is connected to Input 1 then route the IR blaster plugged into TX1 to the Bluray player Note Placement of the IR Blaster is important and can result in the IR system not working if improperly placed First locate the IR eye or window on the source If placing t...

Page 21: ...rs and blasters are connected to the corresponding sources and displays The Matrix unit will route IR along with the audio and video this way you can only control what you are viewing on that output This helps with having the same source for instance so that you are only controlling the cable box you are watching instead of any other cable boxes connected to the matrix unit ...

Page 22: ... placement of IR Blaster and Receiver may result in the failure of the unit Please check carefully before plugging in the IR accessories into the respective IR sockets 3 If your HDMI display has multiple HDMI inputs it is found that the first HDMI input HDMI input 1 generally can produce better transmission performance among all HDMI inputs ...

Page 23: ...e major source and display manufacturers employ a proprietary control channel to communicate between devices from the same manufacturer Sometimes this can interfere with the HDMI control circuit or the authentication of the signal Call the manufacturer if you experience this issue Sometimes a player an audio video receiver or a cable satellite box may not have the latest software update usually th...

Page 24: ...r modifications inadequate maintenance and care or use in any manner for which the product was not originally intended Items integrated into Vanco products that are made by other manufacturers notably computer hard drives and liquid crystal display panels are limited to the term of the warranty offered by the respective manufacturers Such specific warranties are available upon request to Vanco A s...

Page 25: ...additional information such as helpful installation videos glossary of terms etc please visit vanco1 com LIABILITY STATEMENT Every effort has been made to ensure that this product is free of defects The manufacturer of this product cannot be held liable for the use of this hardware or any direct or indirect consequential damages arising from its use It is the responsibility of the user and install...

Page 26: ...Vanco International 506 Kingsland Drive Batavia Illinois 60510 call 800 626 6445 fax 630 879 9189 visit www vanco1 com ...

Reviews: