Valor H3 1000JN Homeowner'S Manual Download Page 21

21

Valor

®

 Outdoor Installation Warranty

If you have a problem with this unit, please contact your dealer or supplier immediately. Under no circumstances 

should you attempt to service the unit in any way by yourself. The warranties in paragraphs 1 are provided 

only to the initial owner of this unit, are not transferable and are subject to the conditions and limitations in 

paragraphs 2 and 3. Please review the conditions and limitations carefully and strictly follow their requirements.

1. Two-Year Parts Warranty

Two (2) years from the date of purchase, the 

Company, at its option, will repair or exchange 

all parts and components that are found to have 

a bona 

ȴ

 de defect in material or workmanship 

under normal conditions of use.

2. Conditions and Limitations

a)  The warranty registration card must be 

completed by the initial owner and returned 

to the company within 90 days. Alternatively, 

the warranty registration form may be 

ȴ

 lled out online at 

valor

ȴ

 replaces.com

b)  Installation and maintenance must be performed 

by an authorized and trained dealer in accordance 

with the Company’s installation instructions.

c)  This warranty is void where installation of the 

unit does not conform to all applicable codes, 

including national and local gas appliance 

installation codes and building and 

ȴ

 re codes.

d)  The owner must comply with all 

operating instructions.

e)  The Company is not responsible for the 

labor costs to remove defective parts or re-

install repaired or replacement parts.

f)  The initial owner of the unit will be responsible 

for any shipping charges for replacement 

parts as well as travel time incurred by the 

dealer to perform the warranty work.

g)  This warranty applies to non-commercial use and 

service and is void if it is apparent that there is 

abuse, misuse, alteration, improper installation, 

accident or lack of maintenance to the unit.

h)  This warranty does not cover 

damage to the unit due to:
i)  

Improper installation, operational 

or environmental conditions.

ii)  

Inadequate ventilation in the area 

or competition for air from other 

household equipment or appliances.

iii)  Damage due to chemicals, dampness, 

condensation, or sulphur in the fuel supply 

lines which exceeds industry standards.

i)  This warranty does not cover glass, log breakage 

or damage to the unit while in transit.

j)  The Company does not allow anyone to extend, 

alter or modify this warranty and assumes no 

responsibility for direct, indirect or consequential 

damages caused by the unit. State or provincial 

laws where the initial owner or user resides may 

provide speci

ȴ

 c rights extending this warranty 

and, if so, the Company’s sole obligation 

under this warranty is to provide labor and/

or materials in accordance with those laws.

3. No Other Warranty

All obligations to repair this unit are de

ȴ

 ned in 

this warranty. Some states or provinces may 

speci

ȴ

 cally mandate additional obligations on 

the part of manufacturers, but in the absence 

of such speci

ȴ

 c legislation, there is no other 

warranty or obligation expressed or implied.

190

ɋ

ɋ

2255 Dollarton Highway, 

North Vancouver, BC

Ʉ

Canada

Ʉ

V7H 3B1

warranty work.

Summary of Contents for H3 1000JN

Page 1: ...ll your gas supplier from a neighbor s phone Follow the gas supplier s instructions If you cannot reach your gas supplier call the fire department Installation and service must be performed by a quali...

Page 2: ...rohibited by local codes This appliance is only for use with the type of gas indicated on the rating plate This appliance is not convertible for use with other gases unless a certified kit is used INS...

Page 3: ...____________ Trim ___________________________________________ Options ________________________________________ ________________________________________________ ________________________________________...

Page 4: ...hearth floor surfaces The hearth or floor directly in front of the fireplace can get very hot when the fireplace heats Although safe they may reach temperatures in excess of 200 F depending on elevati...

Page 5: ...gas control that has been under water Intended use This appliance is designed and approved as a supplemental heater and provides the potential for most energy conservation when used while attended The...

Page 6: ...ng fireplace They lack full awareness of danger and rely on your protection Toddlers in particular do not have the motor skills and response reflexes to withdraw in the event of accidental contact wit...

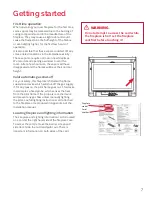
Page 7: ...fireplace is fitted with a flame supervision device which will shut o the gas supply if for any reason the pilot flame goes out This device incorporates a fixed probe which senses the heat from the p...

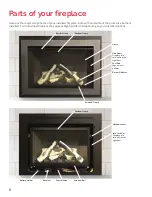
Page 8: ...rame Window Levers Info Card Slot Fireplace info card behind the right door Control Valve Receiver Battery Holder Window Rail Parts of your fireplace Here are the major components of your installed fi...

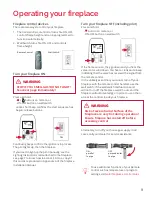
Page 9: ...eplace OFF including pilot Press and hold button on remote or ON OFF button on wall switch If the flames are on they go down and you hear the valve motor wind down You hear a clunk and a beep indicati...

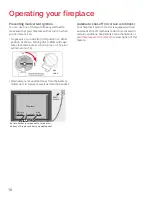
Page 10: ...l remain on if lit Alternately remove all batteries from the battery holder next to receiver as well as from the handset Gas valve ON Wall switch Fireplace Receiver Battery holder Gas valve Battery ho...

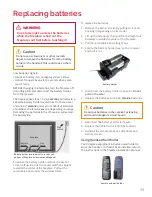
Page 11: ...hile the fireplace is hot Let the fireplace cool first before touching it Caution Do not use a screwdriver or other metallic object to remove the batteries from the battery holder or the handset This...

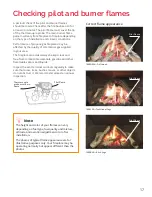
Page 12: ...itable fireplace glass cleaner Abrasive cleaners must not be used Be careful not to scratch the glass when cleaning See Cleaning Your Fireplace section of this manual Inspect the operation of the flam...

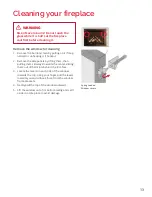
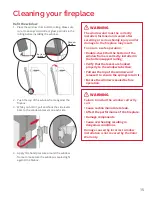
Page 13: ...slots behind the trim face 3 Locate the levers on each side of the window towards the top Using your finger pull the levers towards you and unhook them from the window frame brackets 4 Gently pull th...

Page 14: ...results of these products Brasso Polish Plus by KelKem Cook Top Clean Creme by Elco White O by Rutland Turtle Wax Do not clean the glass while it is hot Always securely replace the window and the barr...

Page 15: ...y installed fastened and sealed after servicing or serious bodily injury and or damage to the fireplace may result To ensure a safe operation Double check that the bottom of the window frame is correc...

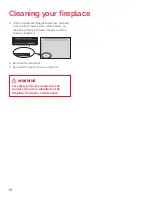
Page 16: ...tall it by sliding it between the glass and the frame as indicated 6 Re install the side doors 7 Re install the barrier screen on the trim Hot Glass Warning Plate Cleaning your fireplace WARNING For s...

Page 17: ...eplaces may be a ected by the quality of commercial gas supplied in your area The fireplace area must always be kept clear and free from combustible materials gasoline and other flammable vapors and l...

Page 18: ...suddenly hear a faster series of beeps than usual This is an indication that the batteries in your fireplace are getting critically low not the batteries in your remote control handset but the batter...

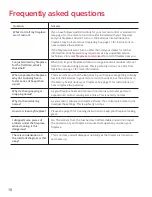
Page 19: ...start my fireplace the flame is dirty or black is this normal No This is possibly caused by a blocked opening in the burner which can be cleaned by vacuuming it see page 14 for cleaning instructions C...

Page 20: ...nform to all applicable codes including national and local gas appliance installation codes and building and re codes d The owner must comply with all operating instructions e The Company is not respo...

Page 21: ...install repaired or replacement parts f The initial owner of the unit will be responsible for any shipping charges for replacement parts as well as travel time incurred by the dealer to perform the w...

Page 22: ...22 Notes...
Reviews: