background image

Securing the heater.

The contents have been identified in figure 4 (Fascias are not included).

Page 10

INSTALLER AND OWNER GUIDE

© 

Baxi Heating U.K. Limited 2008.

Contents

Quantity

(Illustrations are not to scale)

Heater

1

Spacer frame

1

Spare lamp

1

No. 8 x 3/8 pan head

screw

5

Tension wire

1

Screweye

1

Woodscrew

5

Wall plug

5

Cable clamp

1

Figure 4. Contents (Fascia not shown)

Summary of Contents for 842

Page 1: ...OWNER GUIDE This guide is intended to help you install and care for your Valor Fires electric heater Please read carefully before installing and using your heater However if further information is req...

Page 2: ...st with low interest rates PRICE MATCH always get the best deals available Boilers Radiators Heating controls Pipes ittings Cylinders Fires Renewable energy Bathroom suites Kitchen sinks taps Showers...

Page 3: ...ission to reproduce any part of this publication should be made giving details of the proposed use to the following address The Company Secretary Baxi Heating UK Limited The Wyvern Business Park Stani...

Page 4: ...ity performance and safety requirements to provide our customers with many years of trouble free service This guide aims to improve your understanding and appreciation of your new Valor Fires heater b...

Page 5: ...s weight is considered too heavy then obtain assistance When lifting always keep your back straight Bend your legs and not your back Avoid twisting at the waist It is better to reposition your feet Av...

Page 6: ...t etc Never install the heater close to curtains or combustible materials Never use the heater to dry clothes etc Never sit or stand on the heater Important Electrical Safety The heater must not be lo...

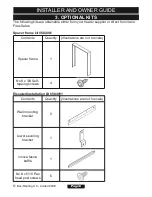
Page 7: ...ated installation kit 0584091 Page 6 INSTALLER AND OWNER GUIDE Baxi Heating U K Limited 2008 Contents Quantity Illustrations are not to scale Spacer frame 1 No 8 x 3 8 Self tapping screws 4 Contents Q...

Page 8: ...heater is suitable for hole in the wall installations these being installations where the heater is recessed into a builders opening This is not referring to the heater being hung on the wall It is i...

Page 9: ...ia to be lifted off or removed during servicing To check the shelf clearance gently place the fascia against the surface to which it is to be fixed and measure the distance from the top of the fascia...

Page 10: ...ction Ensure that the lamp is located firmly in the lamp holder See figure 2 It is important that the lamp is horizontal and not angled in any way See figure 3 When closing the access panel be careful...

Page 11: ...cluded Page 10 INSTALLER AND OWNER GUIDE Baxi Heating U K Limited 2008 Contents Quantity Illustrations are not to scale Heater 1 Spacer frame 1 Spare lamp 1 No 8 x 3 8 pan head screw 5 Tension wire 1...

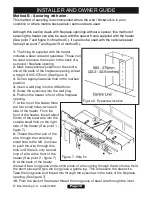
Page 12: ...or tile it is advisable to protect the hearth surface Do not drag the heater as the surface finish may be damaged Method A Securing with screws Note If fixing to marble it is recommended that Method B...

Page 13: ...5 Screw the eyescrew into the wall plug 6 Position the heater in front of the fireplace opening 7 At the top of the heater there are four small holes two each side of the heater From the front of the...

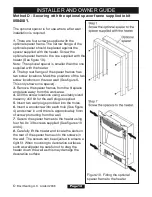
Page 14: ...frame is central to the fireplace 2 The top rear flange of the spacer frame has two screw locations Mark the positions of the two screw locations on the rear wall See figure 8 3 Remove the spacer fram...

Page 15: ...frames from the fireplace and place away from the work area 4 Drill the screw locations using a suitably sized masonry drill bit for the wall plugs supplied 5 Insert two wall plugs provided into the h...

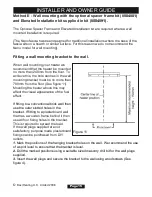
Page 16: ...0mm from the floor See figure 11 Mounting the heater above this may affect the visual appearance of the fuel effect If fitting to a conventional brick wall then use the outer slotted holes in the brac...

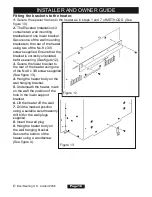
Page 17: ...Secure the lower bracket to the rear of the heater using one of the No 8 x 3 8 screws supplied See figure 13 4 Hang the heater body on the wall hanging bracket 5 Underneath the heater mark on the wall...

Page 18: ...of the fascia towards the heater to engage the magnets 6 OPERATING THE HEATER Important Safety Never cover the heater or obstruct the openings at the base of the heater this could cause overheating an...

Page 19: ...ce the life of the lamp Caution Ensure the lamp is cool before attempting to remove it from the heater To replace the lamp The lamp access cover is on the rear of the heater Access can be gained as be...

Page 20: ...ged in works then there is a good chance that the problem lies with the 13 Amp fuse in the heater plug If either fuse or socket is suspected have them checked by an electrician 3 My heater is on but t...

Page 21: ...is information can be found on a small label attached to the lower right of the heater See figure 18 and should also have been recorded on the last page of this guide 8 ENVIRONMENT Environmental Prote...

Page 22: ...e heater Read section 7 of this guide Cleaning and maintaining the heater If the problem cannot be resolved simply call our service division heateam on 08706 090 081 to book an engineer visit or for a...

Page 23: ...ut or agreed with you in advance Compensation or consequential losses e g loss of earnings business losses stress and inconvenience arising from a production breakdown including repair delays caused b...

Page 24: ...Date of Installation A LABEL CONTAINING THE FASCIA CODE MAY HAVE BEEN PLACED INSIDE THIS BOX Fascia name Block Capitals Fascia code Can be found close to the information label Block Capitals Figure 1...

Page 25: ...Baxi Heating U K Limited 2008...

Reviews: