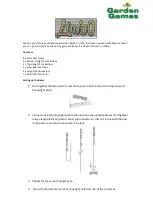
background image


18. 

Now with the male and female overhead tubes both mounted into the side 

bracket clamps, tighten all mounting brackets and clamps until securely fastened. 

19. 

Use the last ¼”-20 hex head bolt and washer to secure the female overhead tube 

(front side of table) to the mounting bracket clamp and SECURE BOTH SIDES FIRMLY 
with your 7/16” socket. 

20. 

Use a level (or your best judgement) to adjust the overhead housing. 

21. 

Once leveled, tighten the four nuts securing the light housing mounting bracket 

with your 7/16” socket.  Use an alternating “X” pattern and tighten these nuts as 
much as possible without stripping the threads. 

22. 

Use your 1/8” Allen/hex key and insert the ¼” – 20 Allen Set Screw into the 

center hole of the overhead housing to prevent any additional movement.  THE 
OVERHEAD HOUSING WILL PIVOT ON THE TUBES IF PULLED DOWN OR PUSHED 
UP.  THIS IS NORMAL AND DESIGNED FOR SAFETY TO PREVENT THE ASSEMBLY 
AND THE TABLE FROM DAMAGE DUE TO PLAYERS ATTEMPTING TO STAND ON 
THEM.  CAUTION – EXCESSIVE PIVOTING MAY DISCONNECT OR DAMAGE THE 
WIRING. 

23. 

  Use the trap door opening 

to disconnect the 6” side mount 
score display harness from the 
main unit harness.(if installing 
on an older table, you have 
pulled this harness out for 
access, disonnnect it at this 
time)  You may want to save the 
side mount score display 
harness if you decide later to 
remove the overhead and 
install a side mount display on 
the table.  Attach the 3 white 
connectors from the overhead 
to the three connectors on the 
main harness.  Each section 
connects only one way. 

24. 

Retrieve the fluorescent 

lighting tubes and reinstall 
them in the overhead.  Line up 
one tube so the pins are 
positioned vertically.  Insert the 
ends into the white sockets.  
Once the contact pins are 
pushed in as far as they can go, 
turn the bulb clockwise a 
quarter turn.  You should feel 

Summary of Contents for Dynamo Hockey

Page 1: ......

Page 2: ...stomer s sole remedy for any warranty claim Valley Dynamo will request and you must provide the complete Model Number Serial Number of the unit not just the last 5 digits or other proof of purchase such as an invoice or receipt OPERATORS AND END USERS While our Tech Support staff is available to assist with diagnosis and troubleshooting of your problem contact your Distributor for Warranty Service...

Page 3: ...Dynamo may send replacement parts or issue an account credit NO REFUNDS Valley Dynamo reserves the right to cancel outstanding RMAs 30 days after issue Items returned without an RMA will not be inspected or credited and may be refused or returned at Customer Expense SCOPE OF COVERAGE Note that our warranty is not an unconditional guarantee for the duration Dynamo products are made to our exacting ...

Page 4: ...s resulting from interruption of service loss of business or revenue or for liability in tort relating to this product or resulting from its use or possession LIMITATIONS OF IMPLIED WARRANTIES There are no other warranties expressed or implied including but not limited to those of merchantability revenue generation or fitness for a particular purpose The duration of implied warranties is limited t...

Page 5: ... or unsafe operation WARNING Plug this game into a properly grounded outlet to prevent shock hazards and assure proper game operation Do not use an adapter plug to defeat the power cord s grounding pin Do not cut off ground pin Information in this manual is subject to change without notice Dynamo reserves the right to make improvements in the equipment function design or components as process in t...

Page 6: ... hardware items 20 Kep Nuts 4 Flat Washers 6 20 x 1 Hex Head Bolt 2 20 x 1 Allen head set screw w cup point 1 8 32 x Pan head Phillips self tapping screw 4 Rubber Gasket 1 This instruction booklet 1 and these parts Complete Overhead Housing 1 Light Housing Mounting Bracket 1 Diffuser Bracket 2 Overhead Tube Male End w square hole at bottom 1 Overhead Tube Female End 1 Side Mounting Bracket 2 Side ...

Page 7: ...ervice door side of the table remove the pan Head screws and washers already installed Save them for reattachment later in the process 5 Remove the paper from the rubber gasket supplied in the hardware kit to expose the adhesive backing With the adhesive side down carefully center the gasket over the joint where the overhead male and female tubes meet and securely wrap it around 6 Remove the light...

Page 8: ... it for access in a later step 13 Have the remaining four 20 x 1 pan head Phillips screws and mounting bracket clamp ready at the backside of the table You will need them in step 16 14 New tables have a trap door underneath the table Remove it at this time 15 This is where having the second person to help gets important Carry the completely assembled unit to the table Aim the overhead so the male ...

Page 9: ...BES IF PULLED DOWN OR PUSHED UP THIS IS NORMAL AND DESIGNED FOR SAFETY TO PREVENT THE ASSEMBLY AND THE TABLE FROM DAMAGE DUE TO PLAYERS ATTEMPTING TO STAND ON THEM CAUTION EXCESSIVE PIVOTING MAY DISCONNECT OR DAMAGE THE WIRING 23 Use the trap door opening to disconnect the 6 side mount score display harness from the main unit harness if installing on an older table you have pulled this harness out...

Page 10: ...o illuminate inspect the bulb mounting brackets to ensure they line up flush and square to the bulbs If not UNPLUG THE TABLE and then loosen the screws on the problem bracket for repositioning Repeat as needed for other brackets 27 Once the lamps are operational slide the light diffuser back into place 28 On the left end of the overhead housing reinstall one diffuser trim bracket lip facing up and...

Reviews: