background image

    21

Overview

Bender160 Components
Bender Drive Unit Anchor

!

WARNING

• BENDER BARRICADE MUST BE INSTALLED 

PRIOR TO ENTERING INTO BEND MODE. 
FAILURE TO INSTALL THE BARRICADE PRI-
OR TO BENDING THE SYSTEM CAN RESULT 
IN DAMAGE TO BOTH THE SYSTEM AND ANY 
FIELD OBSTRUCTIONS IT MAY BE BENDING 
AROUND.

• OPERATOR MUST BE PRESENT DURING 

THE FIRST BEND WITH THE BENDER DRIVE 
UNIT ANCHORS.

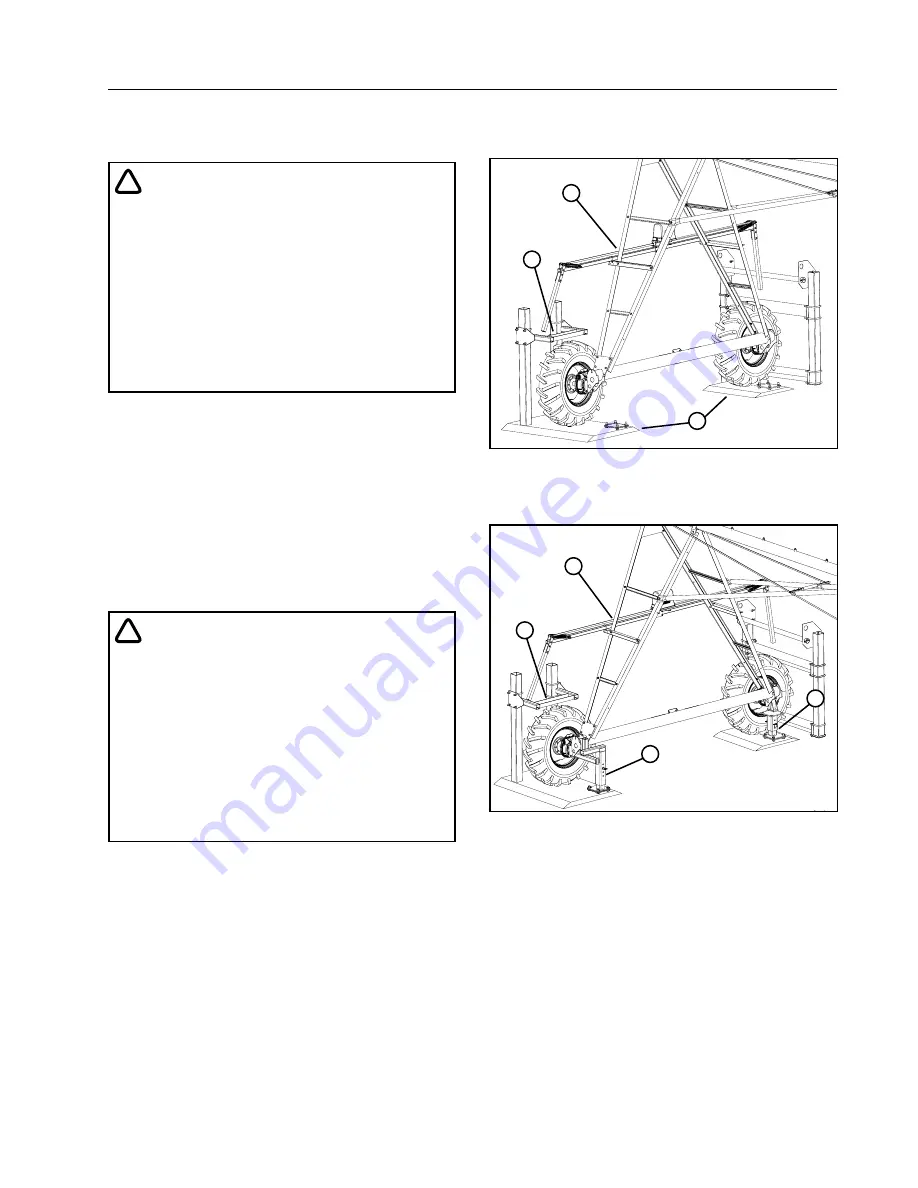
The Bender drive unit anchor is located at the 
bending tower in conjunction with two concrete pads.  
The bender drive unit anchor consists of a rear tire 
hold down. See Figure 21-1.
When the bender end of field stop arm contacts the 
bending barricade, the bending tower stops, and 
the machine enters the bending mode. The bender 
drive unit anchor holds down the rear tire during the 
bending procedure to prevent the rear tire from lifting 
off of the ground, allowing for stability and consistent 
bending procedure.

!

CAUTION

• NEVER USE THE SAFETY OVERRIDE BUT-

TON TO WALK THE MACHINE OFF OF THE 
BARRICADE. STRUCTURAL DAMAGE MAY 
RESULT.

• SOIL MAY BUILD UP IN THE WHEEL TRACK 

RESULTING IN A RAMP EFFECT ALLOW-
ING THE ACTUATOR ARM TO GO OVER THE 
BARRICADES. REGULARLY MAINTAIN THE 
WHEEL TRACK TO INSURE THE ACTUATOR 
ARM ALWAYS CONTACTS THE BARRICADE.

Optional Hold Down Components

The optional hold down components are used in 
situations where more hold down strength is required. 
This may be necessary for long bender machines, or 
on steep terrain, which could result in pulling forces 
great enough to severely compress the trailing tire 
against the hold down frame, or the leading tire 
against the concrete. See Figure 21-2.
When being used properly the rear hold down hook 
is to allow additional anchor strength to the rear tire 
hold down. Additionally the front tire support is used 
to transfer the load off the tire to the concrete pad.

2

1

3

Figure 21-1 Bender Drive Unit Anchor

1. Bender Drive Unit
2. Rear Tire Hold Down
3. Concrete Pad

1

2

3

4

Figure 21-2 Optional Hold Down Components

1. Bender Drive Unit
2. Rear Tire Hold Down
3. Rear Hold Down Hook
4. Front Tire Support

Summary of Contents for Bender160

Page 1: ...Bender160 Owner s Manual Supplement 0998322_C Bender160 Owner s Manual Supplement 2019 Valmont Industries Inc Valley NE 68064 USA All rights reserved www valleyirrigation com...

Page 2: ...2...

Page 3: ...Sequence of Lockout 9 Restoring Equipment to Service 9 Operate Safely 10 Safety Decals 14 Overview Bender160 Components 19 Bender160 Swivel 19 Bender160 Box 19 Junction Tower Box 19 Fixed Pipe 19 Swi...

Page 4: ...lication was approved for printing Valmont Industries Inc reserves the right to change specification or design at any time without notice and without incurring any obligation Specifications are applic...

Page 5: ...damage the equipment Safety Messages Safety messages in this manual are preceded by the hazard symbol and one of three words danger warning or caution These messages alert you to potential hazards tha...

Page 6: ...angles and ladders in areas with energized power lines exposed conductors or circuit parts work practices such as the use of insulation guarding and material handling techniques must be used to minimi...

Page 7: ...n Equipment near Airports and Crop Dusting Aircraft If any part of the irrigation machine comes within 3200 ft 975 m of an airport runway especially the ap proach ends of the runway additional warning...

Page 8: ...tal conditions will increase the possibility of electrocution and require additional consideration Transmitter towers can induce the equipment or materials being handled with an electrical charge Befo...

Page 9: ...etc 4 De activate the energy isolating device s so that the machine or equipment is isolated from the energy source s 5 Lock out the energy isolating device s with assigned individual lock s 6 Stored...

Page 10: ...and what to do in case of emergencies EMERGENCY STOPPING The machine can be stopped at any time at any tower by turning the disconnect switch located underneath the tower box to the OFF position Refer...

Page 11: ...re 11 2 CAUTION QUALIFIED SERVICE PERSONNEL If you do not understand electricity or other parts of the machine have qualified service personnel perform any hazardous repairs or maintenance CAUTION GUA...

Page 12: ...RESULTING IN SEVERE INJURY DO NOT SERVICE THE MACHINE UNTIL THE MAIN DISCONNECT IS LOCKED IN THE OFF POSITION ALWAYS REPLACE DRIVE SHAFT SHIELDS AF TER SERVICING DRIVE SHAFT SHIELDS MUST ALWAYS BE IN...

Page 13: ...ediately discontinue use and adjust the shutoff setting or call your Valley dealer to repair the end gun shut off mechanism CAUTION PART CIRCLE OPERATION SAFETY If the machine reverses direction at a...

Page 14: ...Danger Warning and Caution decals appear in various locations on a Valley irrigation machine You MUST familiarize yourself and other operators with these safety decals For replacement of any decal con...

Page 15: ...10 EGSO Roller Angle 1780562 11 1 4 x 1 Cap Screw 0161056 12 1 4 Lock Nut 0133008 13 5 16 x 1 1 4 Cap Screw 0161051 14 1 2 Hex Nut 0131015 15 5 16 x 3 4 Cap Screw 0161076 16 EGSO SIS Control Box UL 1...

Page 16: ...become entangled resulting in severe injury Do not service until machine is locked in the off position Always replace drive shaft shield after servicing Drive Shaft Starts Without Warning DANGER Do no...

Page 17: ...17 Safety Safety Decals Continued...

Page 18: ...18 Safety...

Page 19: ...vent that the machine does not stop at the end of field stop This switch has to be field adjusted and set Junction Tower Box The junction tower box is used to allow extra span cable during bend mode S...

Page 20: ...cts the end of field barricade If the auto reverse option is installed the operator can choose to either have the system stop or automatically reverse its direction of travel and continue to run once...

Page 21: ...IDE BUT TON TO WALK THE MACHINE OFF OF THE BARRICADE STRUCTURAL DAMAGE MAY RESULT SOIL MAY BUILD UP IN THE WHEEL TRACK RESULTING IN A RAMP EFFECT ALLOW ING THE ACTUATOR ARM TO GO OVER THE BARRICADES R...

Page 22: ...22 Overview...

Page 23: ...ain Service Disconnect Switch from public power to the control panel See Figure 23 1 Control Panel Main Disconnect Switch See Figure 23 1 Any Tower Box Disconnect Switch See Figure 23 1 3 1 2 Figure 2...

Page 24: ...e unit for machines exceeding 1500 ft or 10 spans beyond the bender drive unit 3 wheel base beams are allowed on all drive units The following options are not allowed at or beyond the bender drive uni...

Page 25: ...er service disconnect to the irrigation machine See Figure 25 1 FILL OUT the blue OSHA safety color code tag and attach to the disconnect after locking See Figure 25 1 2 SHUT OFF and lock the control...

Page 26: ...hose clamps See Figure 26 2 Contact your local Valley dealer if you have any questions about replacing the 6 in hose Female Swivel Gasket Replace ment Follow the steps below to replace the pierce gas...

Page 27: ...ime establish a regular preventative maintenance program using the recommended maintenance charts in this section If replacement parts are needed use only genuine Valley parts 1 Figure 27 1 1 Ball Mou...

Page 28: ...ld stop has not been engaged Call your Valley dealer Machine is running out of alignment A bow in the machine while running in straight mode is normal Call your Valley dealer End gun fails to come on...

Reviews: