9. Inspect all assembly mountings for loose hardware, and tighten as necessary.
10. Rinse the fan screen and fan filter in clean water and blow dry with low-
velocity air.
11. Reinstall the fan, fan filter, fan screen brackets, and fan screen using the four
screws, lockwashers, and hex nuts.
12. Replace the top cover of the unit and return it to service according to the
procedures on page 14.
Carrier Flow Rate Verification
The carrier flow rate is maintained at a constant value through use of a
differential pressure regulator which keeps a constant 3 psi pressure drop
through a sapphire orifice plate. The actual carrier flow rate of each unit is deter-
mined at the factory prior to shipment and noted on the Flowmeter Calibration
Data sheet provided with each unit. The front panel carrier flowmeter provides
only a relative indication of the flow; however, changes in its reading can indicate
the need for flow verification. To verify the flow rate, a one liter N.I.S.T. traceable
flowmeter is recommended. After using the appropriate leak checking proce-
dures to determine that the calibrator has no leaks, proceed as follows:
1. Remove power from the unit.
2. Remove the top cover of the unit by unscrewing the six allen screws on each
side of the instrument, above the side bars..
3. Close the dilution flow control valve(s) all the way (fully clockwise).
4. Plug the overflow vent securely.
5. Connect the flowmeter to the span outlet.
6. Connect main power to the unit and depress the main power switch. If the
unit does not have an internal main pump, connect a gas source to the supply
or carrier inlet.
7. Measure the flow rate to an accuracy of ±1% per the instructions in the
flowmeter manual.
8. Record the flow rate on the current Flowmeter Calibration Data sheet for the
Dynacalibrator.
Dilution Flowmeter Calibration
VICI recommends that Dynacalibrators be returned to the factory for N.I.S.T.
traceable dilution flowmeter calibrations, unless you have access to sophisticated
flow measuring equipment
Maintenance
Summary of Contents for 500
Page 9: ... Introduction Specifications ...
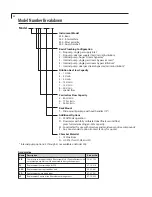
Page 36: ...32 Model Number Breakdown ...


